Main content
Virtual Branch


Virtual branch

Opening a new account online in Virtual branch
-
Open accounts for your business completely online in the CEB service via Virtual Branch (this
process does not apply to specific chamber professions accounts and to accounts for corporate clients).
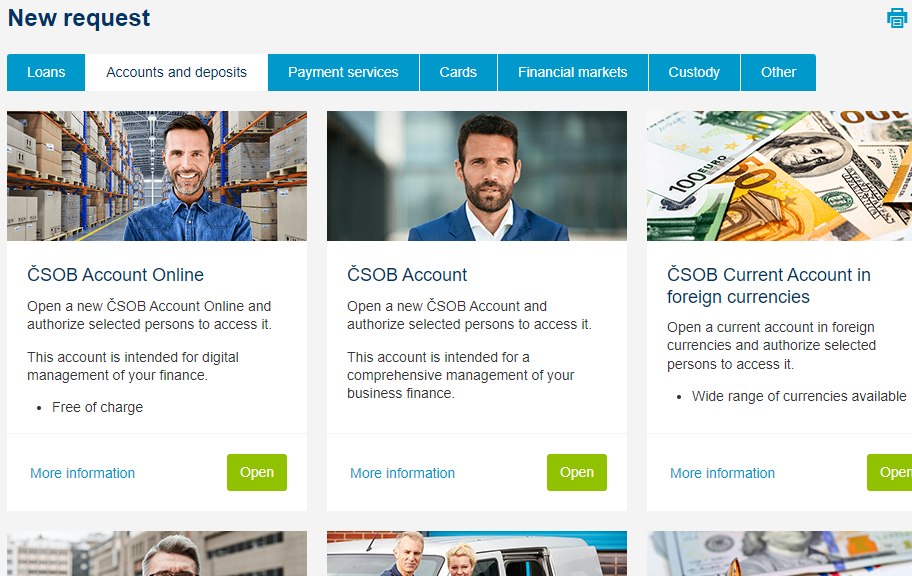
In the CEB service main menu, select Virtual branch, the Accounts and deposits tab, then select
the account you want to Open.
-
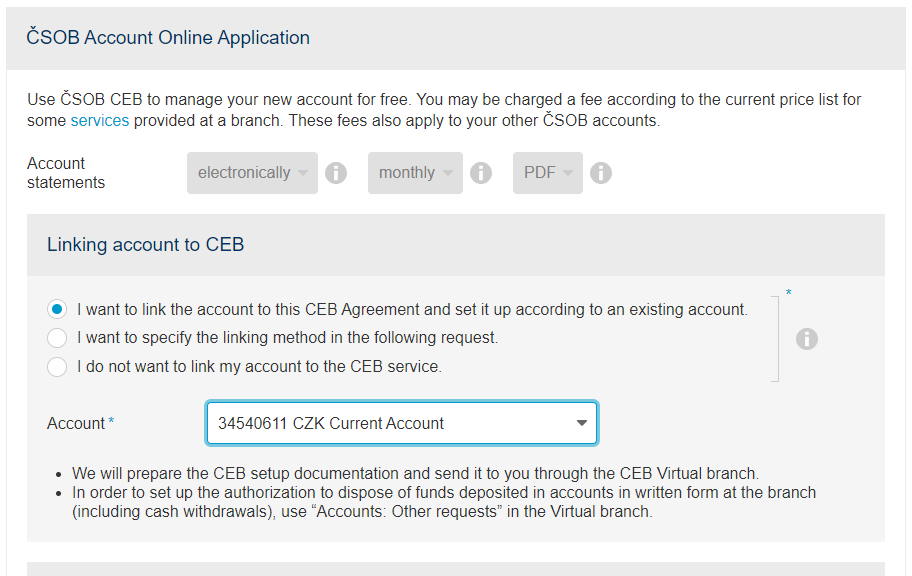
Specify what settings the new account should have – the easiest way is to clone an existing account. You
can also use Service administration to set it up later.
-
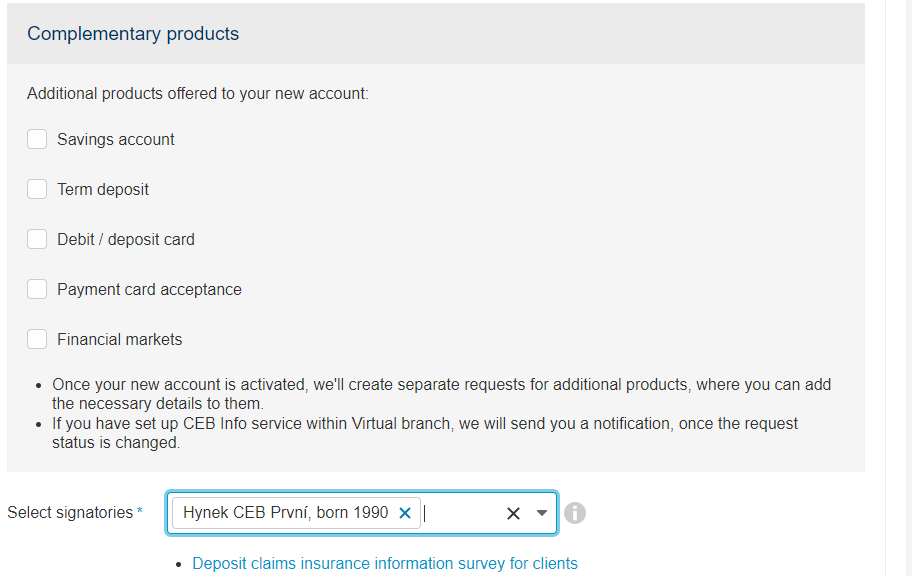
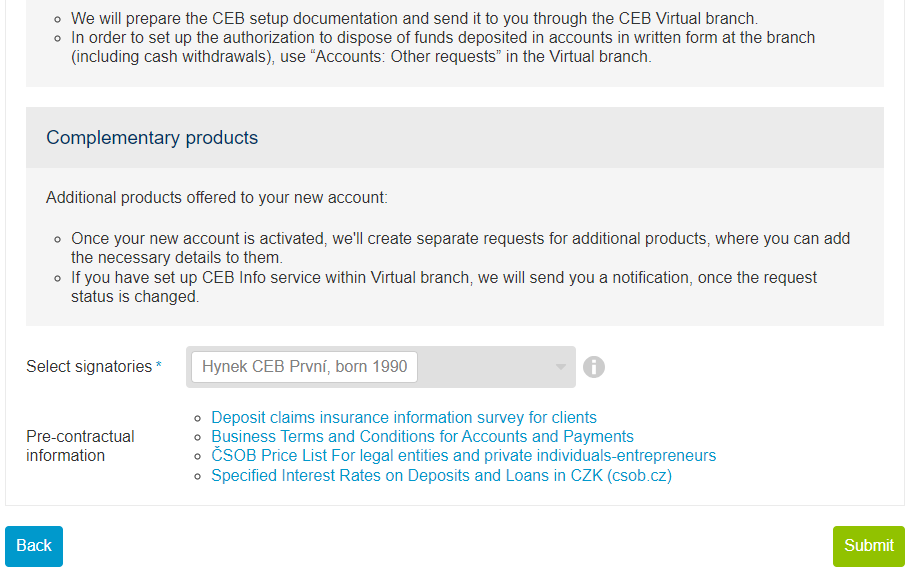
You can apply for additional products – cards, savings account and more. Specify who will sign the
agreement, and Continue.
-
A recapitulation screen will be displayed after you confirm the account settings. Press the Send
button to start generating contract documents – this process may take a while.
-
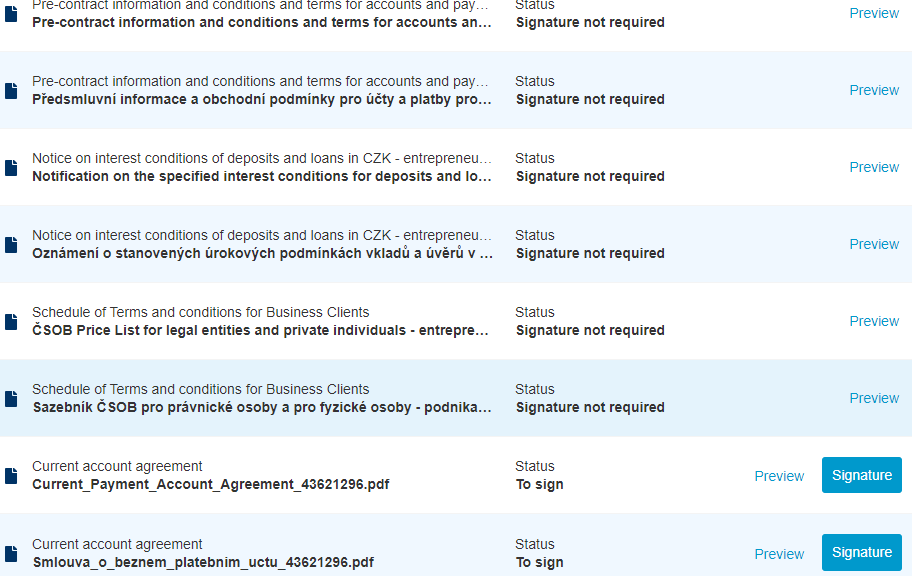
The complete contractual documentation, including terms and conditions, is now ready. One of documents
is an account agreement, containing your new account number – you can check the agreement and add your
Signature.
-
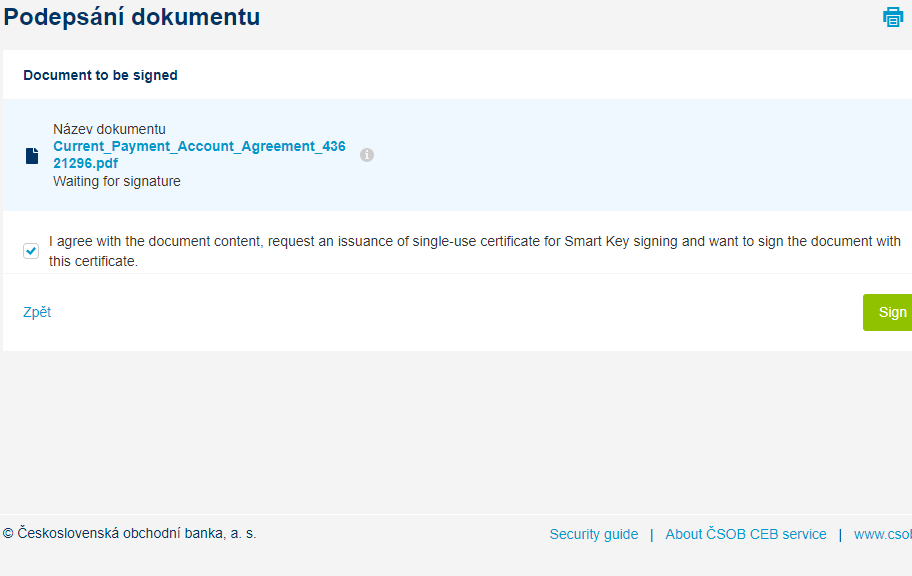
Use a certificate or Smart Key to sign the agreement. Confirm that you agree to the document content,
afterwards you can Sign it. Should you use Smart Key, switch to your phone and open the app
there.
-
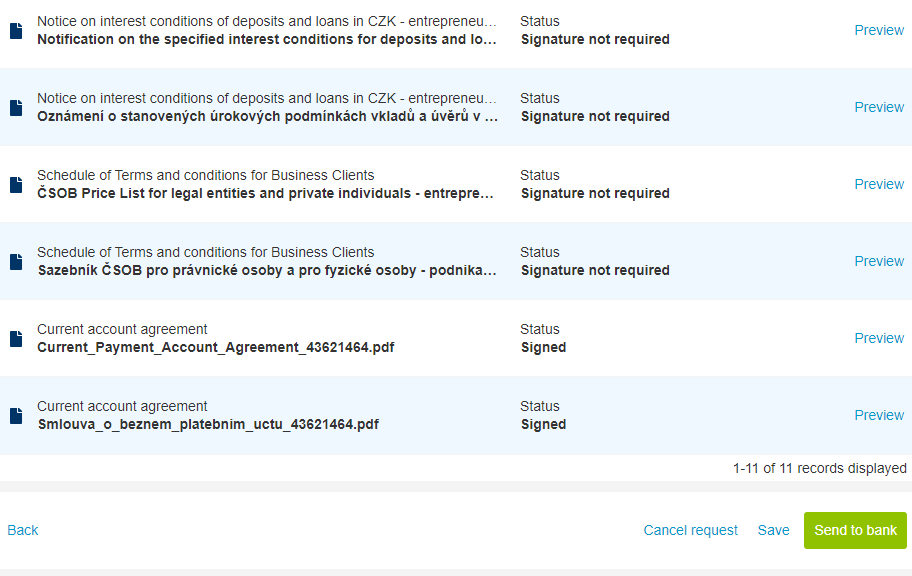
After the last signature has been added, you can press the Send to bank button, and your account
will be opened.
-
Done, your account is active. We will also enable its connection to the CEB service if you've requested
it. If applied for additional products (e.g. cards), you'll find the related requests in the Request
list section. Please send these requests to the bank for processing so we can handle them too.
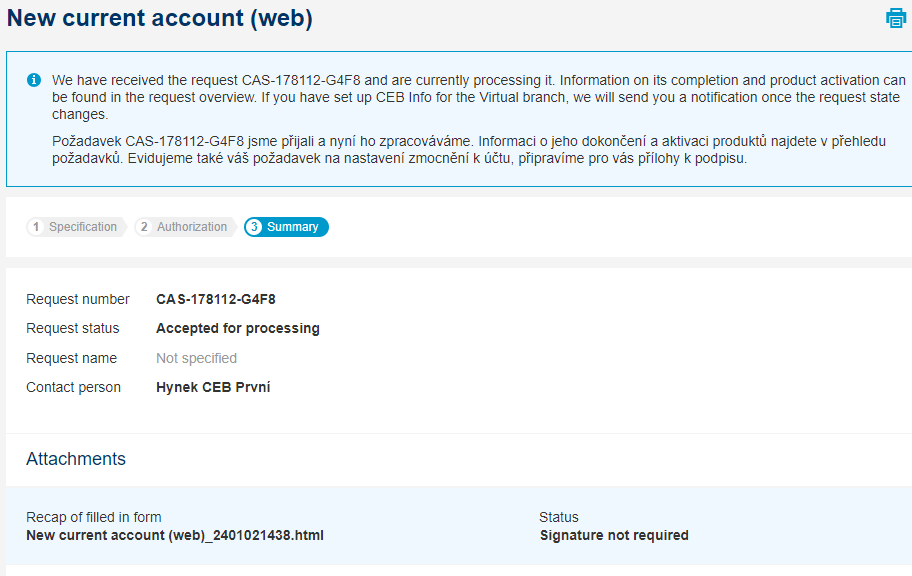
Applying for a new account in Virtual branch
-
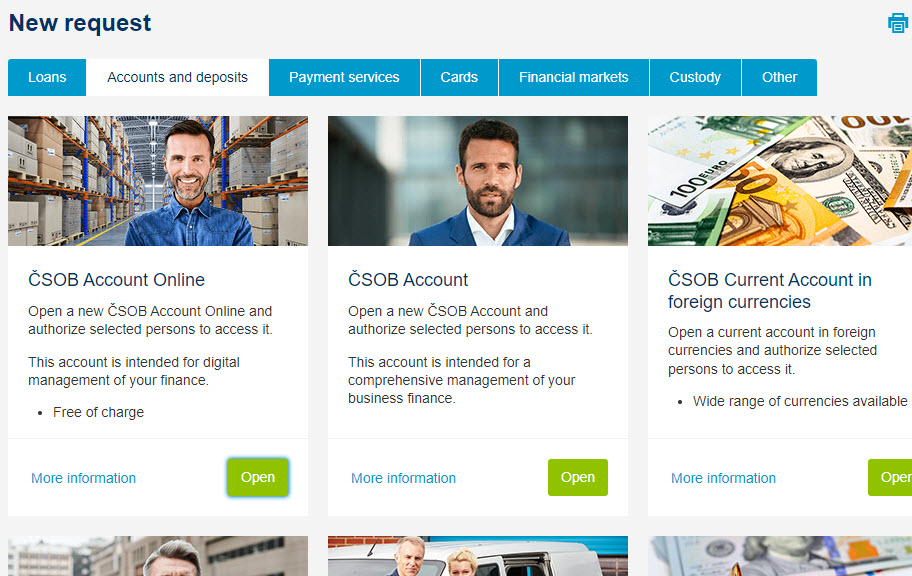
Some accounts cannot yet be opened completely online via Virtual branch – but you can apply for such
account. Select Virtual branch in the CEB menu, then go to the Accounts and deposits tab
and select the desired account (this procedure applies to accounts for corporate clients and chosen
chamber professions).
-
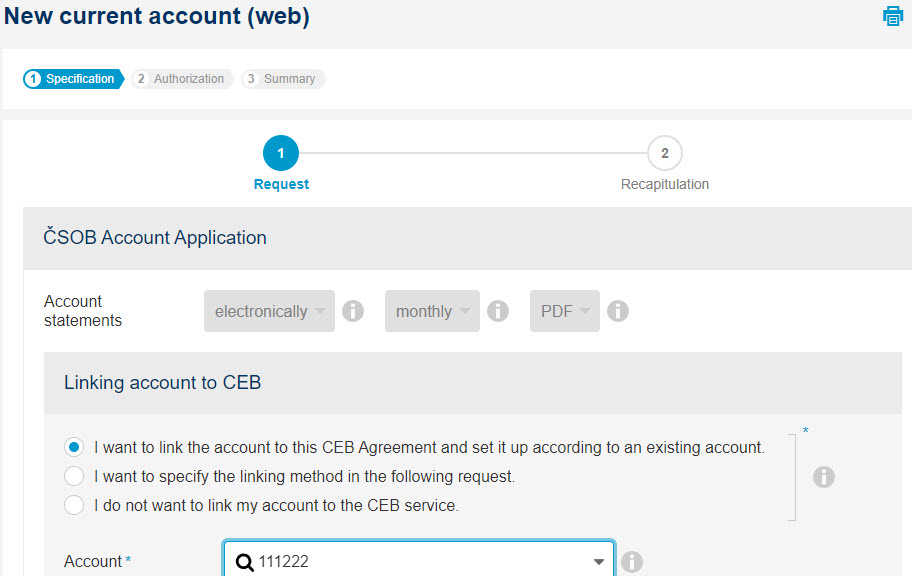
You've created a new Request towards bank. We need to know what settings the new account should
have - currency, statements, authorizations, etc. The easiest way is to clone settings of an existing
account.
-
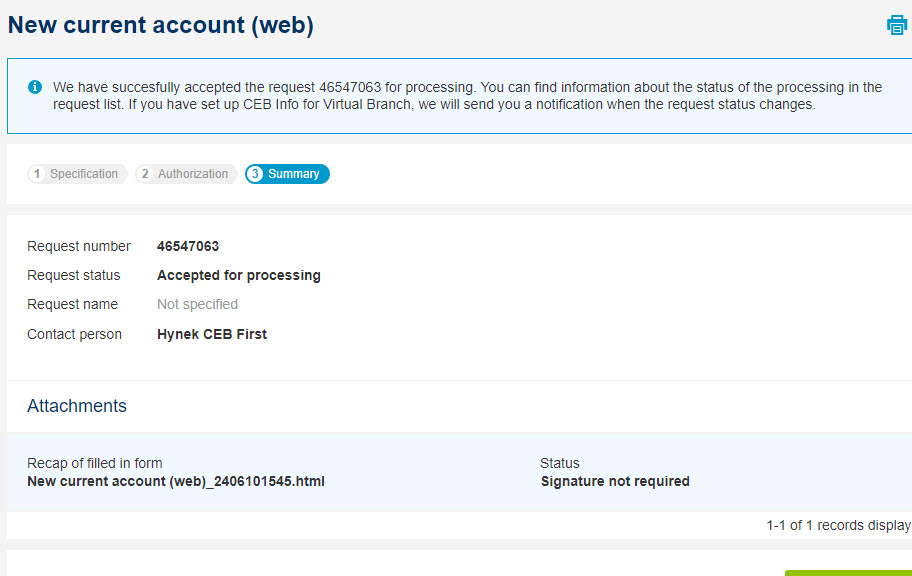
A recapitulation screen will be displayed after you confirm the account settings – the details you've
entered are available in the HTML format and will be sent to the bank for processing. Simply press the
Send to bank button.
-
Now it's our turn – we'll send you a contract proposal. The request returned from the bank can be found
in the Request list section and may contain other related contractual documents besides the
account agreement. If you've set up notifications (CEB Info), you'll automatically receive a message
when the status of the request changes.
-
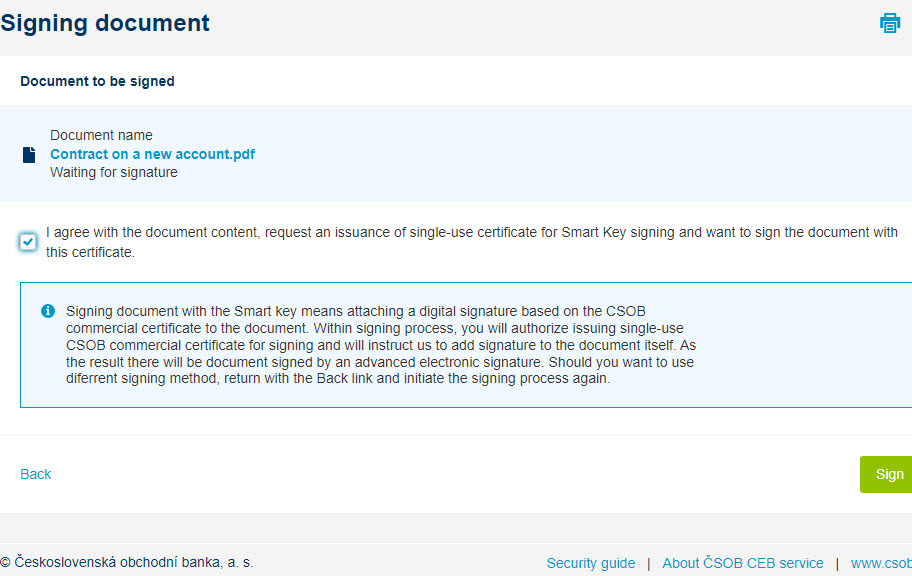
Please check the contractual documentation. If you agree to the contents of the documents, you can
Sign them. There are multiple ways to sign documents, the easiest one using the Smart Key.
-
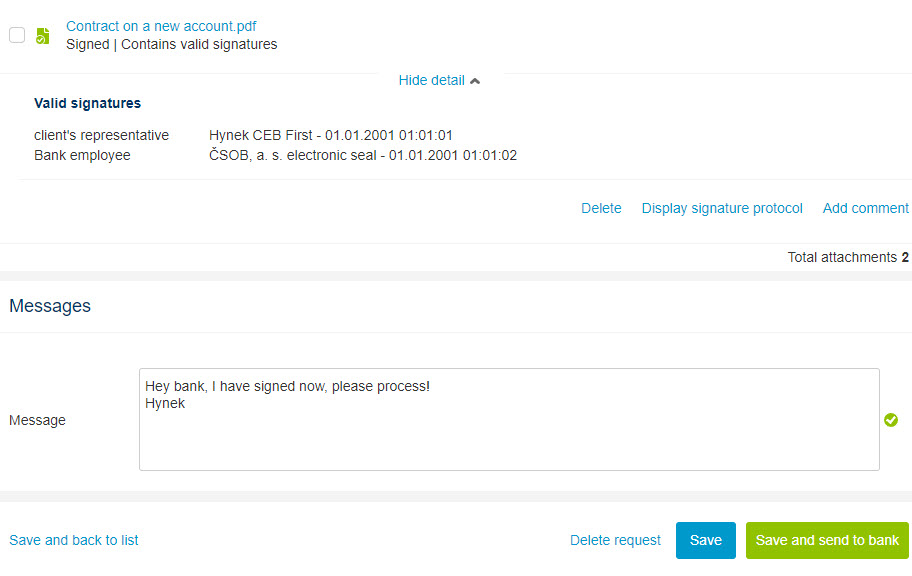
Please make sure to press the Save and send to bank button so we can complete the processing. You
can check the processing status in the request list, and you may also receive automatic notifications.
You'll find the signed contract in the Document archive.
Ordering a Payment Card in Virtual Branch
With the CEB service, you can easily order a new payment card through the Virtual Branch:
-
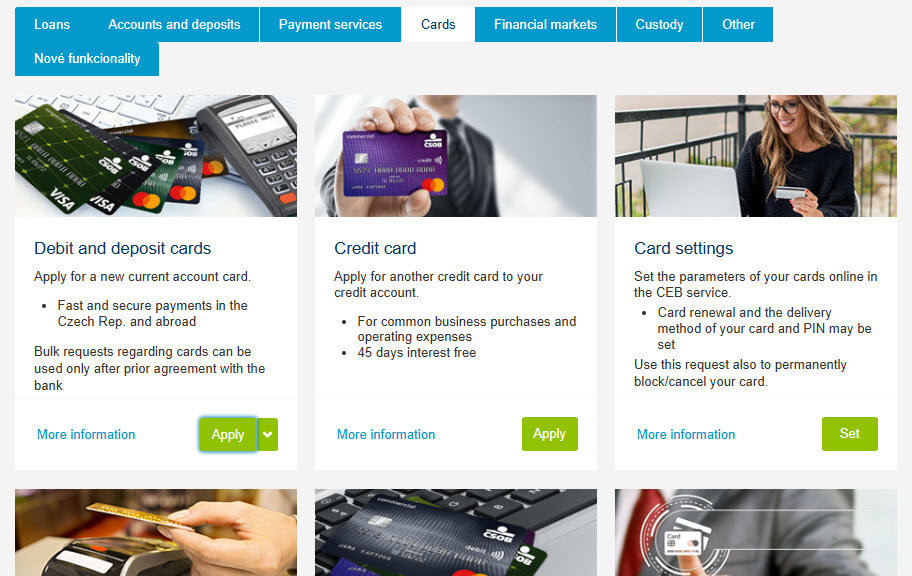
In the main CEB menu, select Virtual branch, then choose New request and go to the Payment cards tab. Click on the Debit and deposit cards tile and then press Request.
-
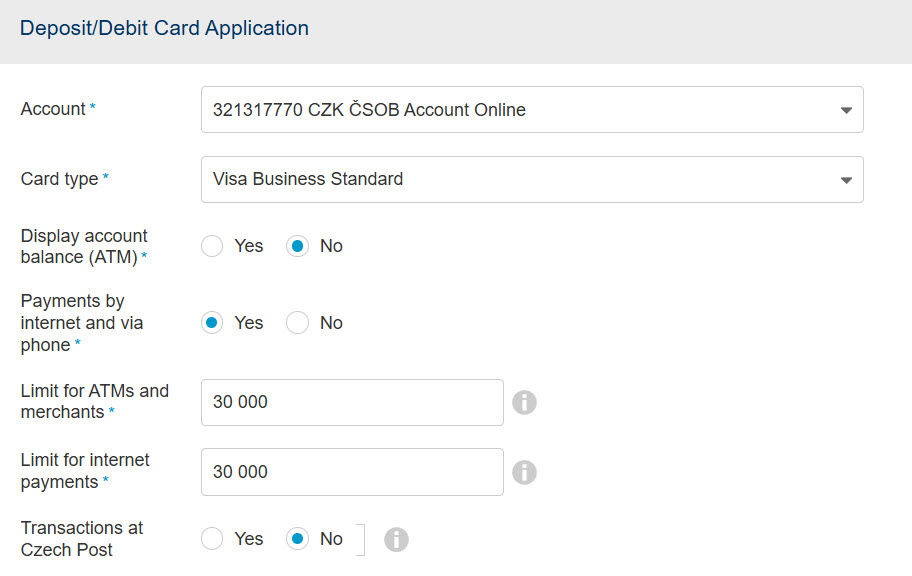
A web form will appear, divided into several steps. In the first step, select the card type, its attributes, and the person who will sign the resulting agreement.
-
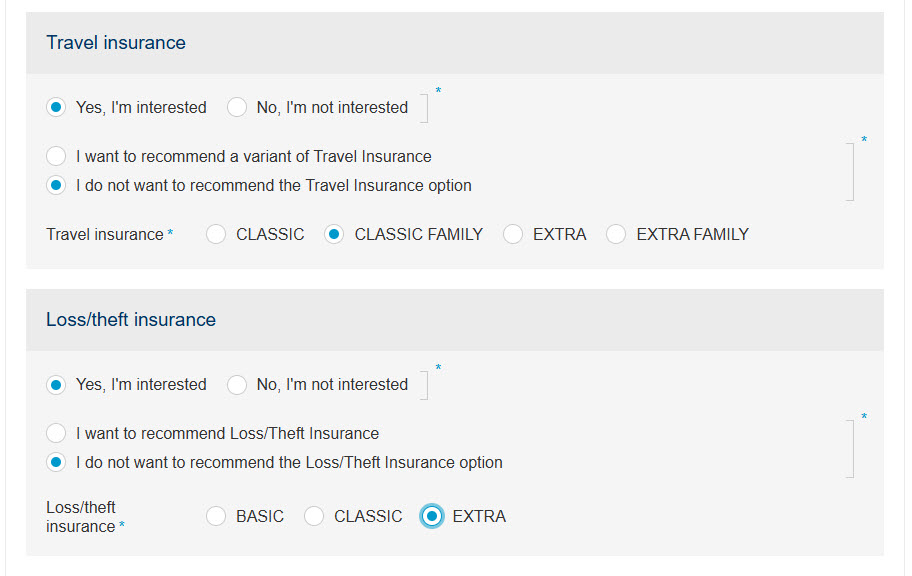
You can add supplementary insurance, for example, in case of card loss or theft.
-
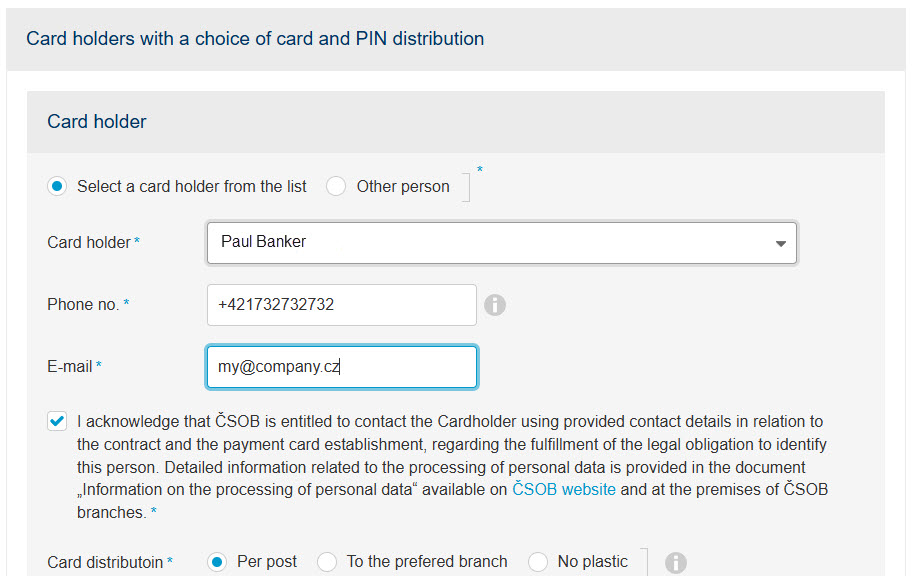
Select or enter the cardholder. (If you want to issue the card to multiple holders, click the + icon to expand the form and add another cardholder.)
-
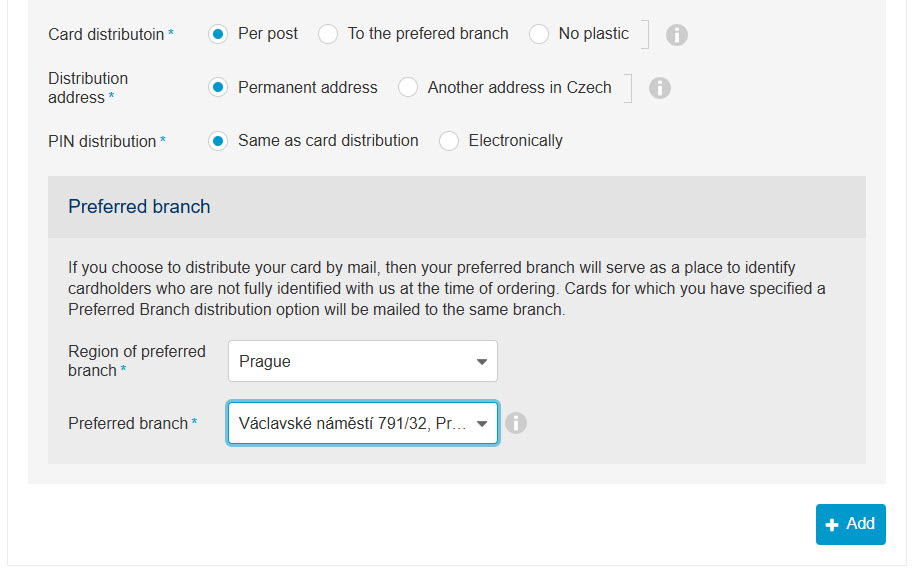
Choose how the card and its PIN will be delivered.
-
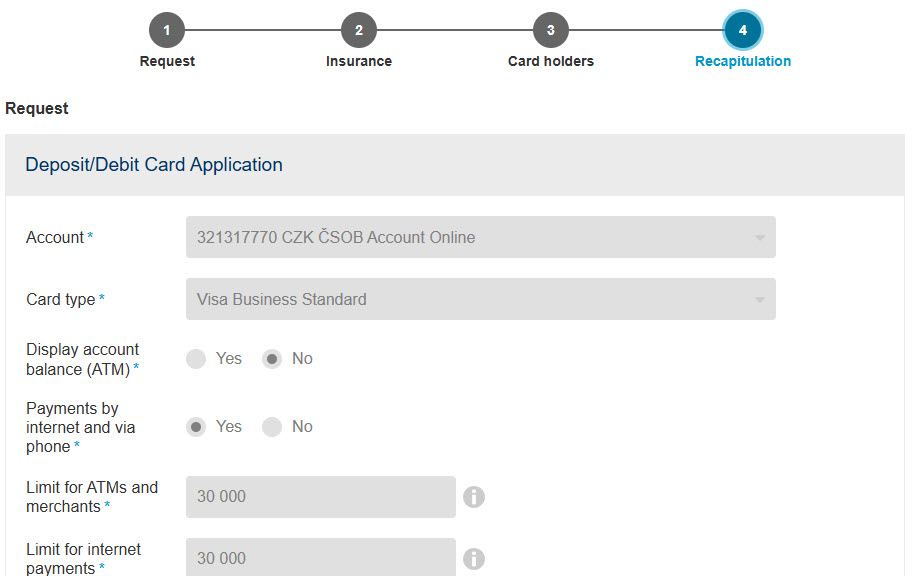
In the next step, you’ll see a summary of the entered information. If everything is correct, click Submit to proceed and generate the agreement.
-
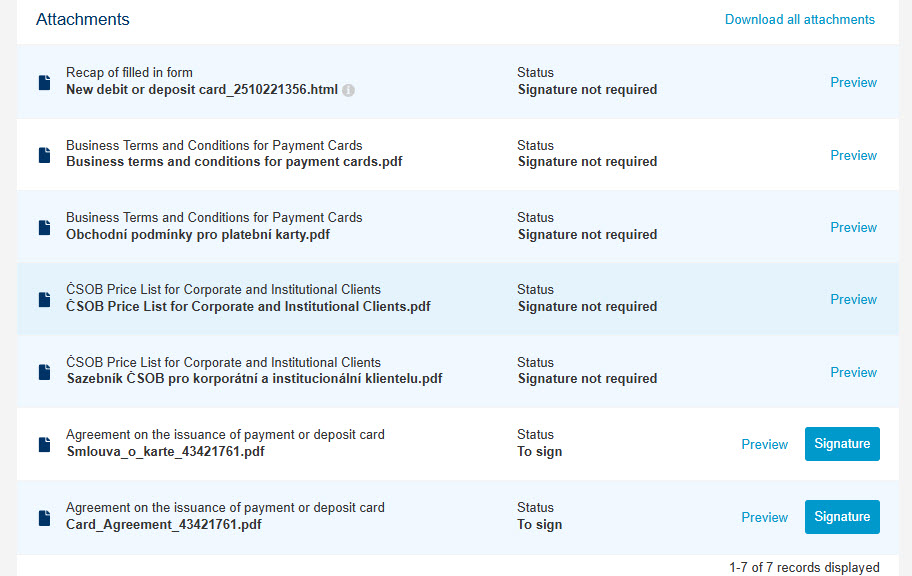
Based on your request parameters, a set of documents will be generated, including terms and conditions and any documents related to supplementary insurance. The Agreement for Issuance of a Payment or Deposit Card will be prepared for your signature.
-
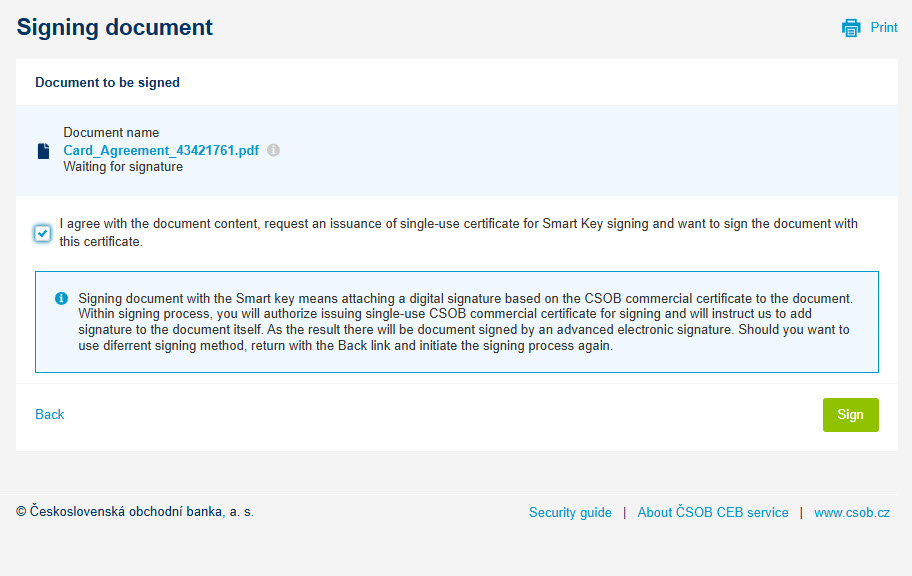
Sign the agreement using your Smart Key or a certificate stored on a chip card by clicking Sign.
-
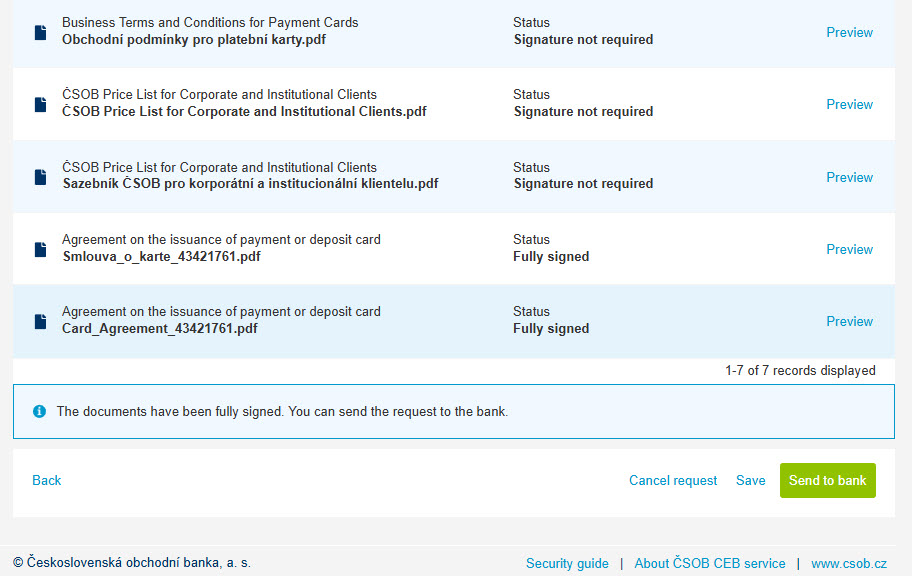
Once the agreement is fully signed, click Send to Bank. The card will be issued immediately, sent to you, or made available in the CEB. The signed agreement will be archived in the Virtual Branch.
-
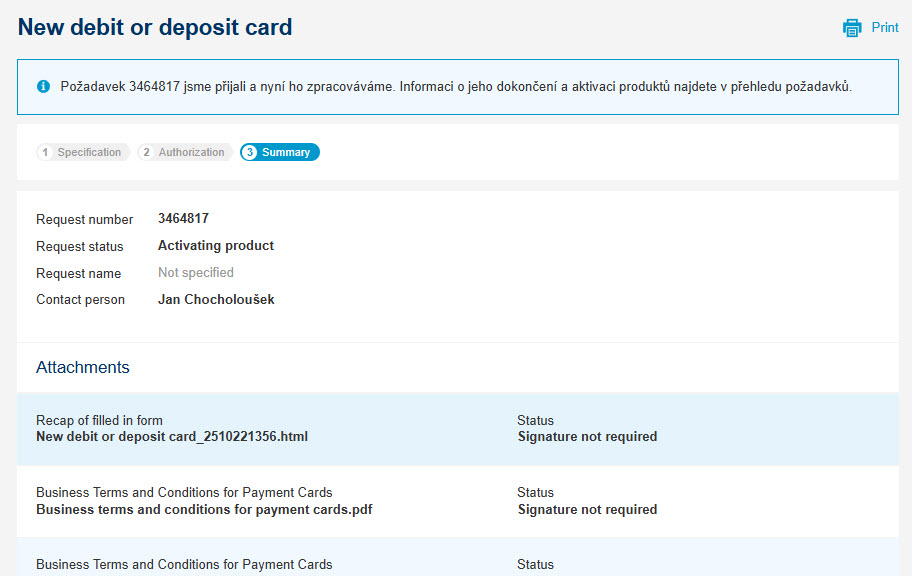
Your new card is now fully activated and will be delivered to you along with the PIN according to the selected delivery method.
Loan drawdown
-
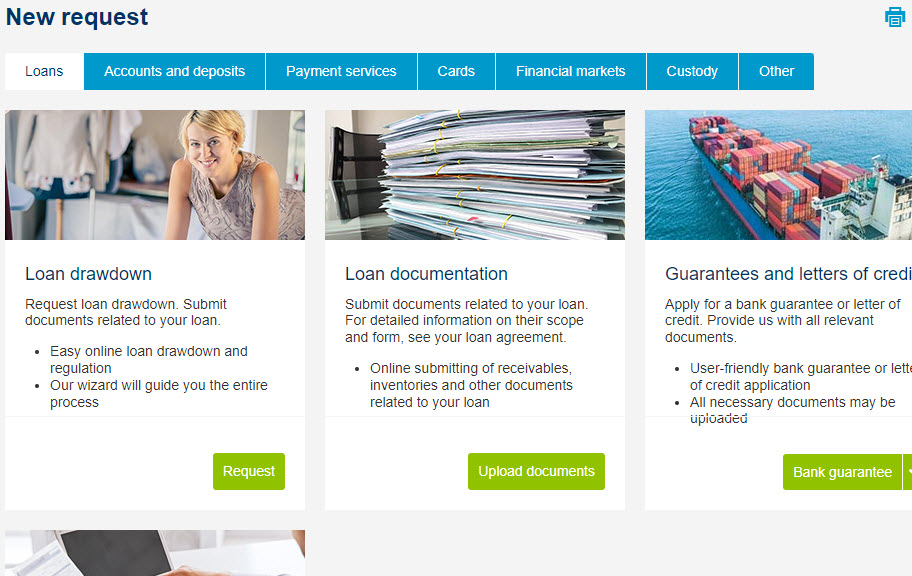
You can easily arrange the drawdown of your business loan in Virtual branch. Select Loan
drawdown in the Loans tab.
-
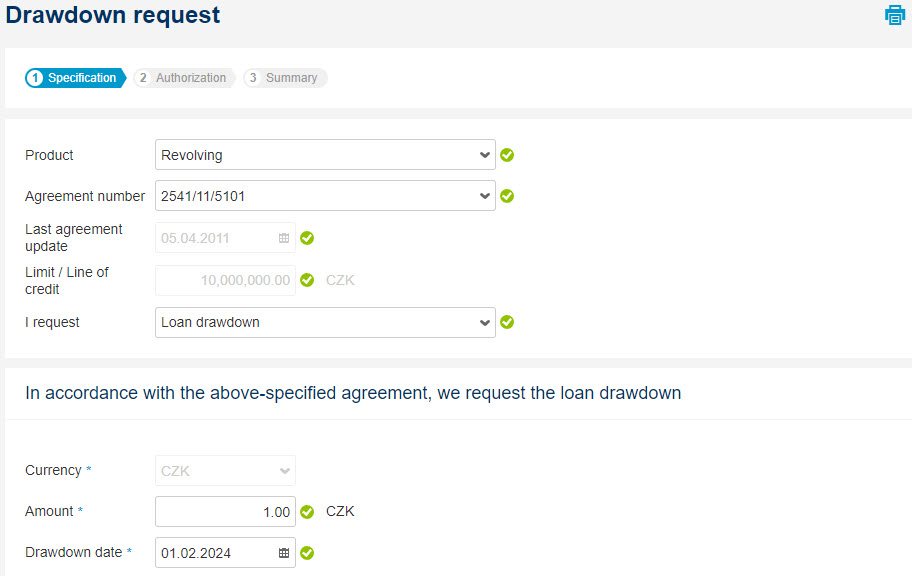
Select the loan type and the agreement number under which you will request drawdown (or
limit regulation), enter the amount, and enter or check drawdown dates. If necessary, add another
drawdown to the request.
-
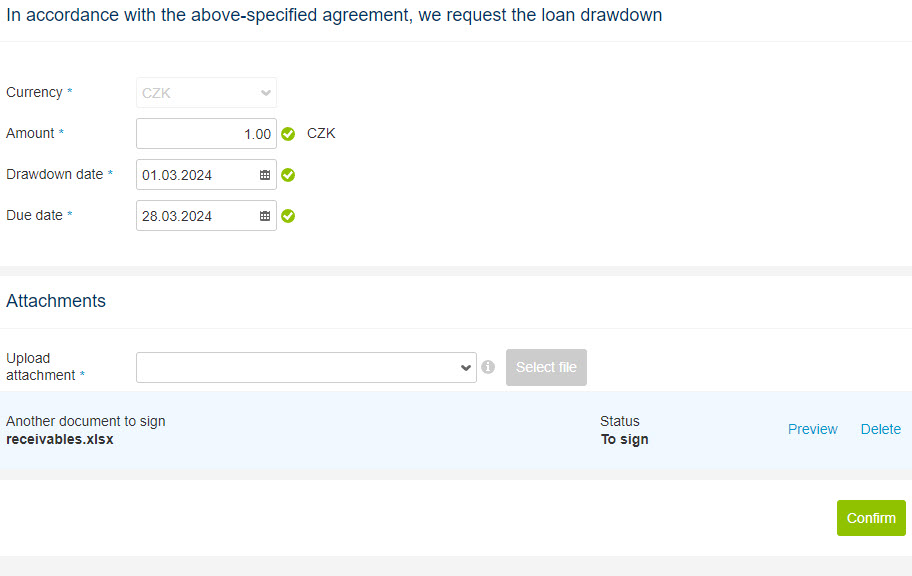
If you want to upload supporting documentation, select the attachment type, then Select file and
Save it at the bottom of the screen. You may need to add properties (e.g. agreement numbers) for
some attachment types. Multiple attachments can be added. Confirm you want to create the request.
-
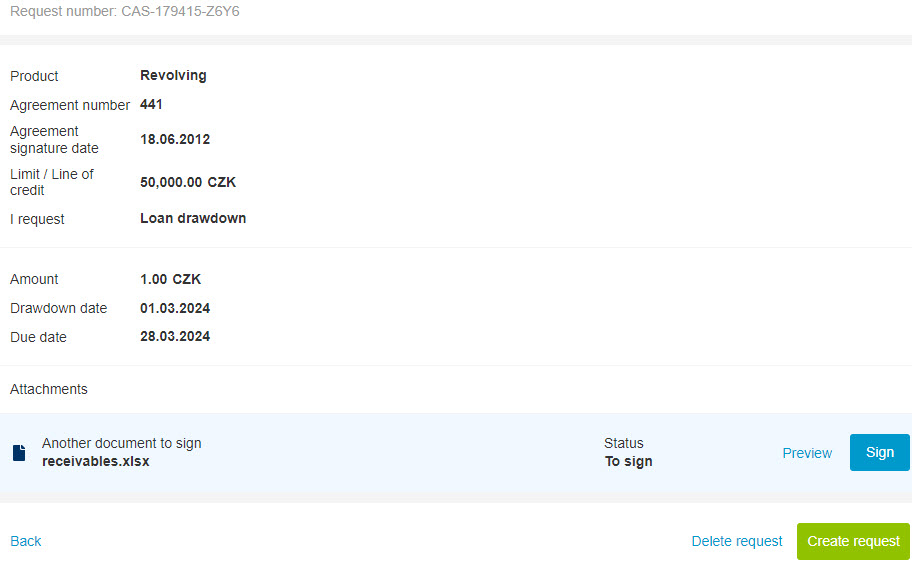
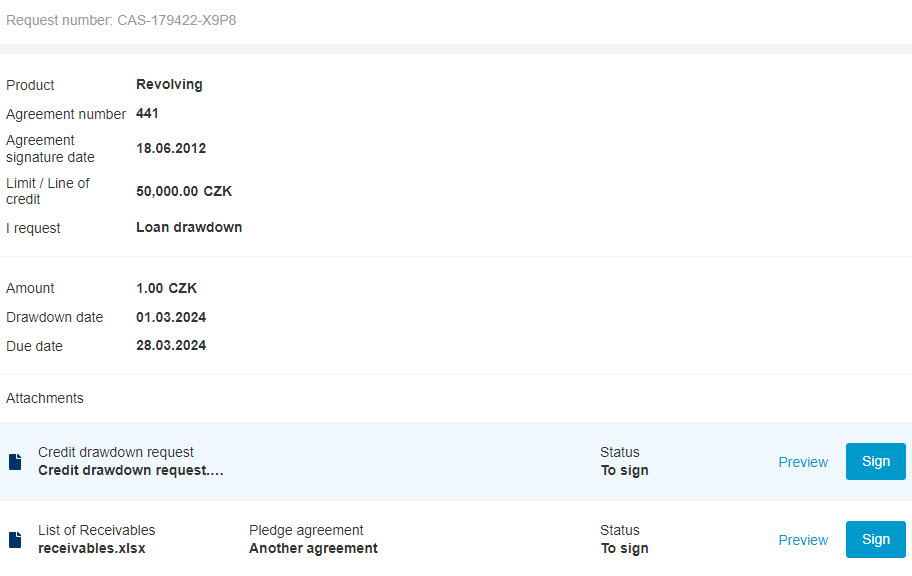
Your loan drawdown request is ready. Check the entered details and attachments, and Sign the
attachments that need to be signed. Please note that signing with a certificate may be required for
selected documents. Then Create request.
-
The CEB service will save and evaluate the entered details, a PDF request will be created and you'll be
able Sign it. If the attached documents require a signature, the Sign button will be displayed
too.
-
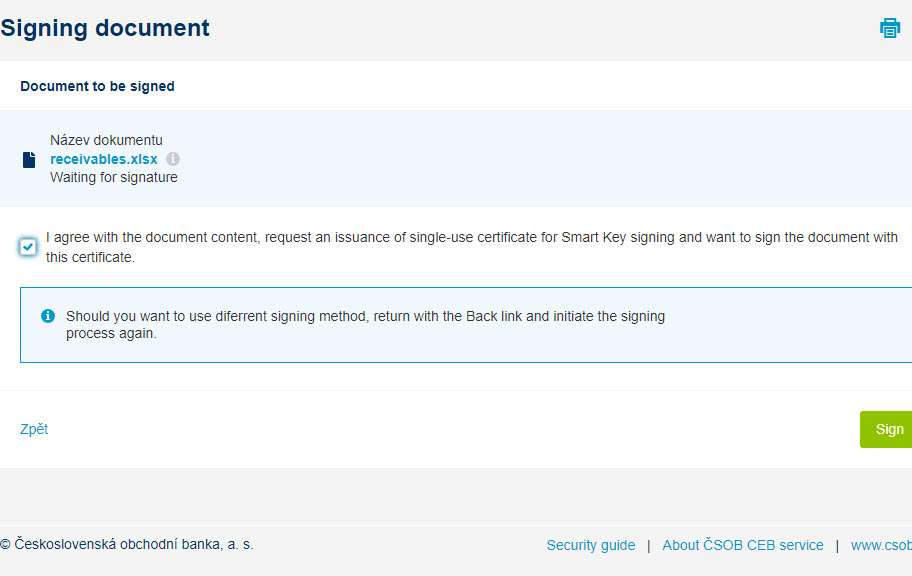
A certificate may be used for signing, and most documents can also be signed with Smart Key. In this
case, you'll press the Sign button and confirm signing in the mobile app.
-
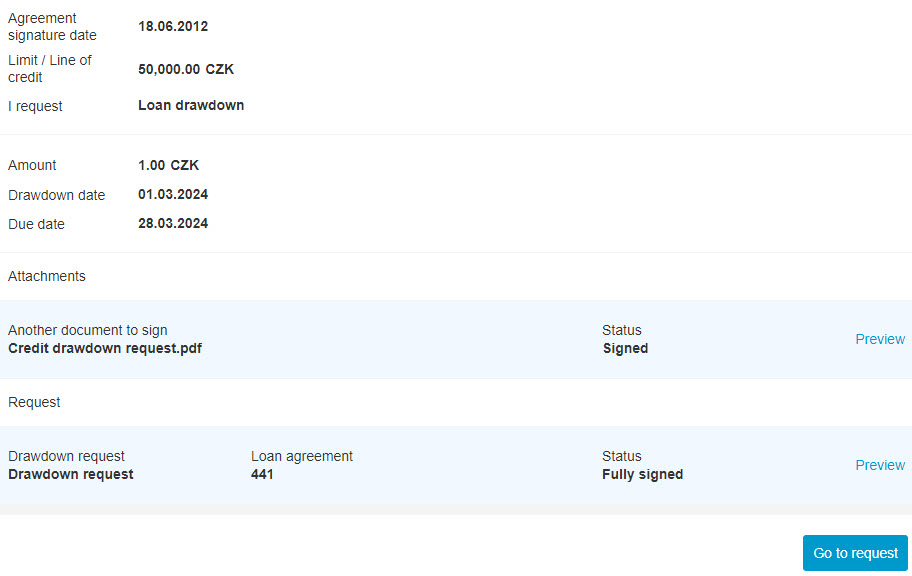
Done. Don't forget to Send the drawdown request to the bank. If you're not the only signatory,
ask the other ones to attach their signatures – they will find the request in the Request list
section. Once all the signatures have been attached, it will be possible to send the request to the
bank.
Submitting loan documentation
-
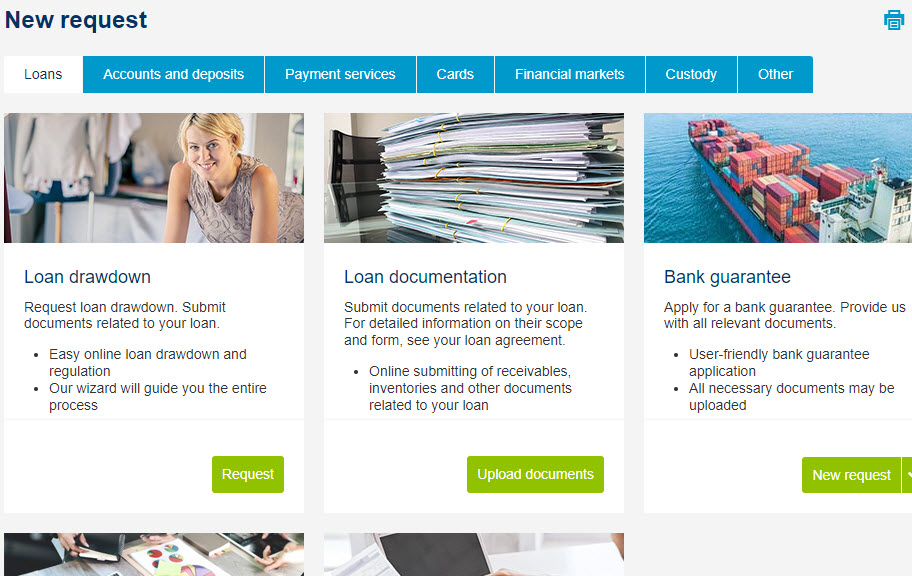
In the CEB service, you can easily submit documents required by the bank in connection with the loan
agreement. In the Virtual branch menu, create a New request; open the Loans section
and select Upload documents.
-
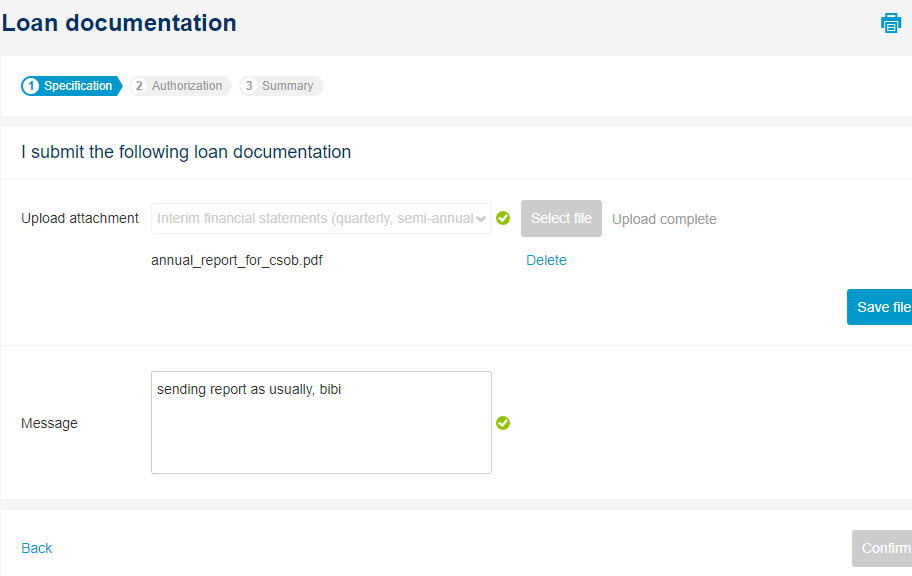
Various types of financial statements can be easily uploaded – first select the type of the document you
want to submit. Confirm the upload by pressing Save file.
-
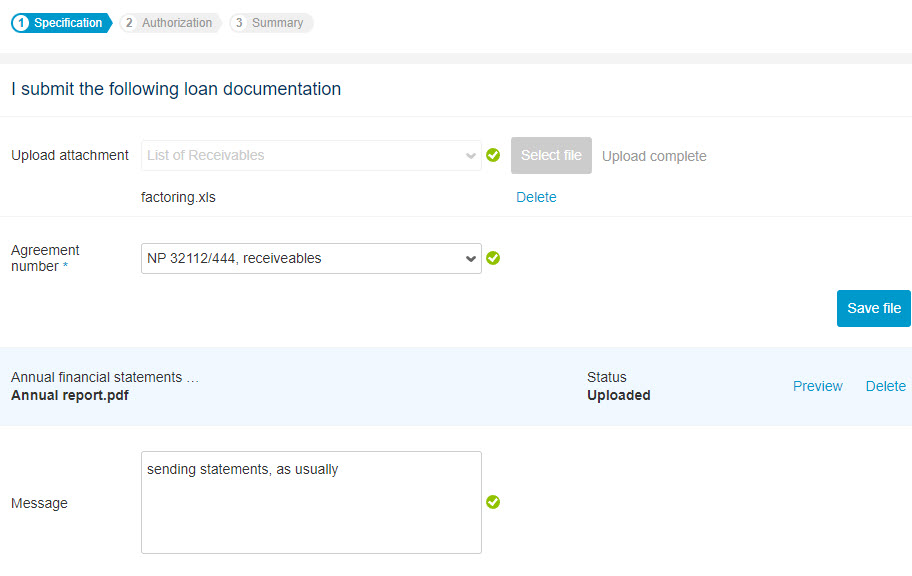
Apart from statements, you can also submit e.g. lists of receivables for collateral (the required
documents are specified in the pledge agreement).
-
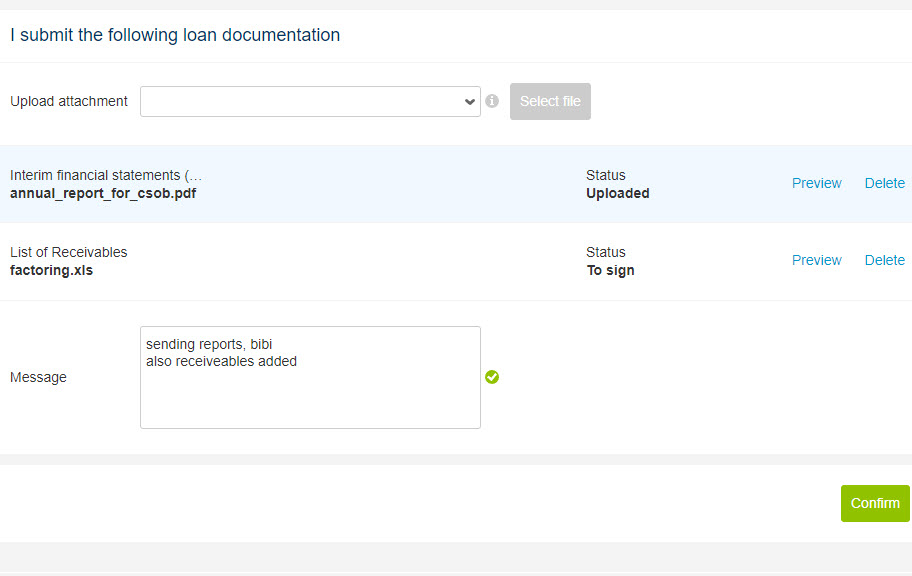
Once all attachments have been uploaded, simply Confirm the request.
-
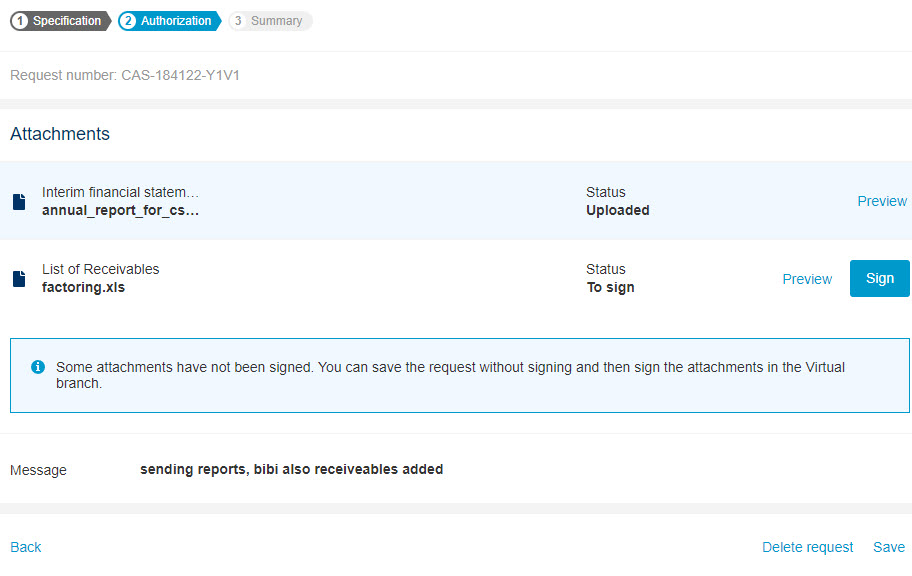
The service will determine whether you need to Sign any of attachments.
-
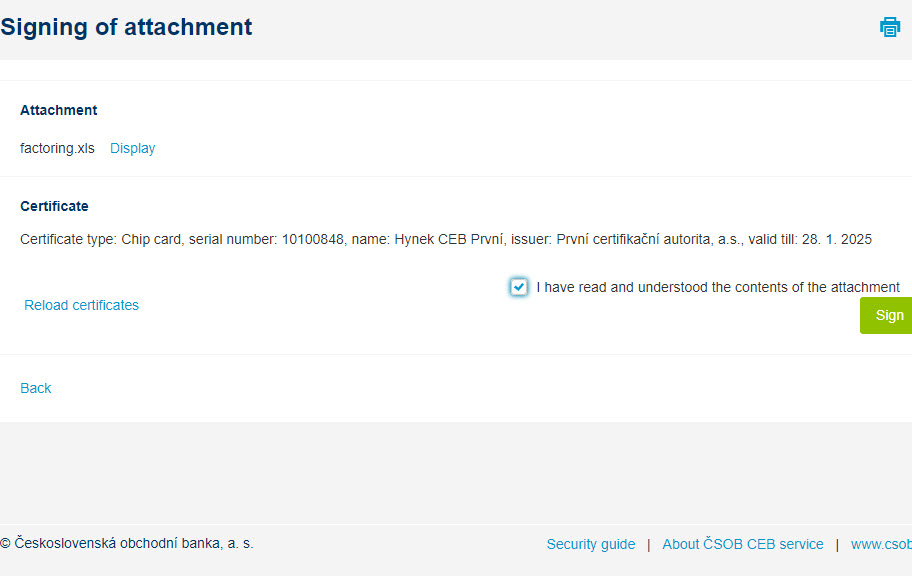
Sign the attachments than require a signature (for receivables, signing with a qualified
certificate will be necessary).
-
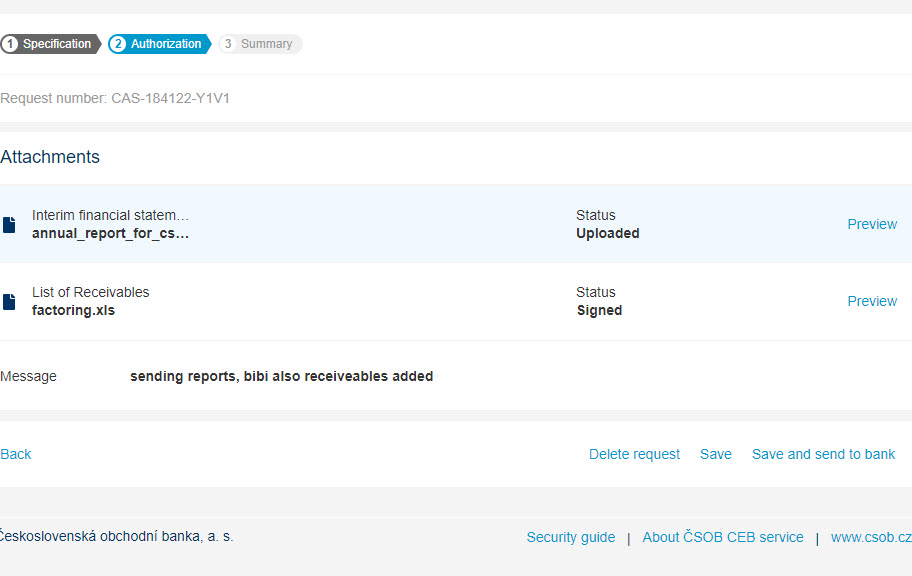
Done. All attachments have been signed. Select Save to save the request and send it later (e.g.
when other signatures are required), or Save and send to bank to send the documents to the bank
for further processing.
Ordering cash withdrawal at a branch
-
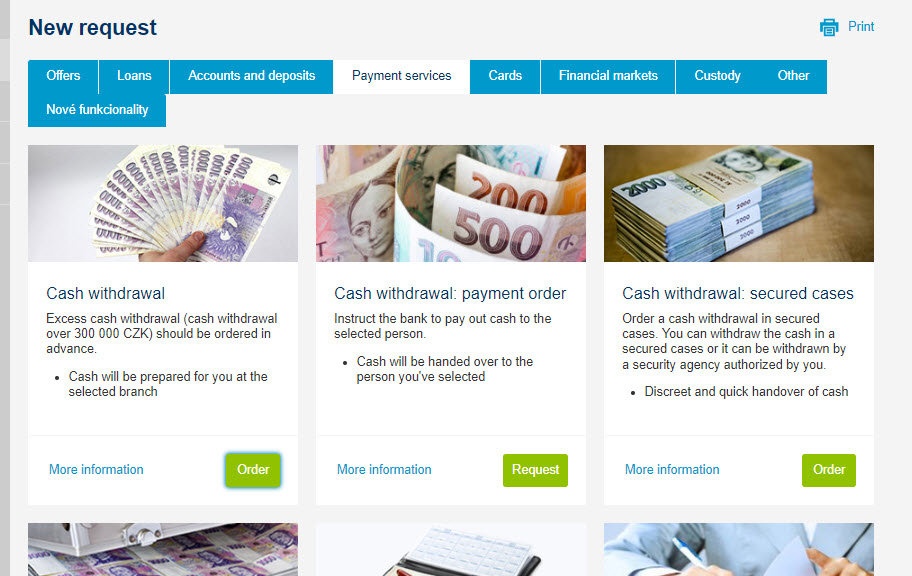
You can easily order a cash withdrawal at one of our branches through Virtual branch. Go to the
Payment services tab and select the Cash withdrawal tile.
-
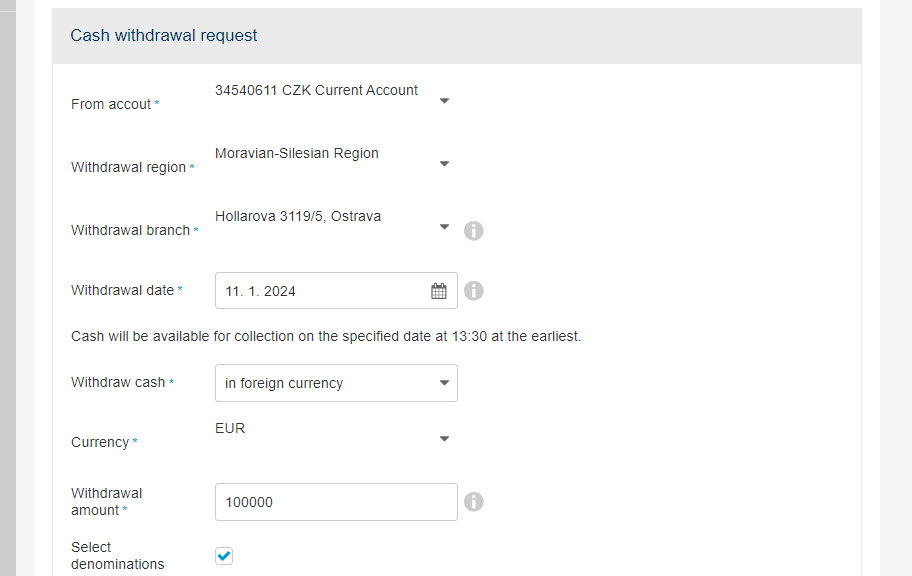
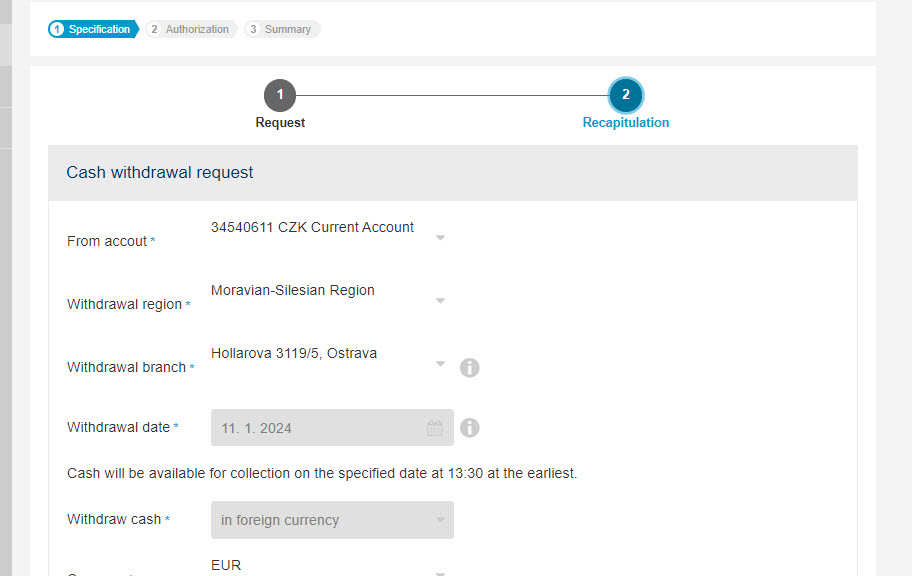
In the first step, enter all the details necessary for your excess cash withdrawal. Indicate from
which account the cash should be withdrawn, specify the branch for cash pickup, and enter
the withdrawal date.
-
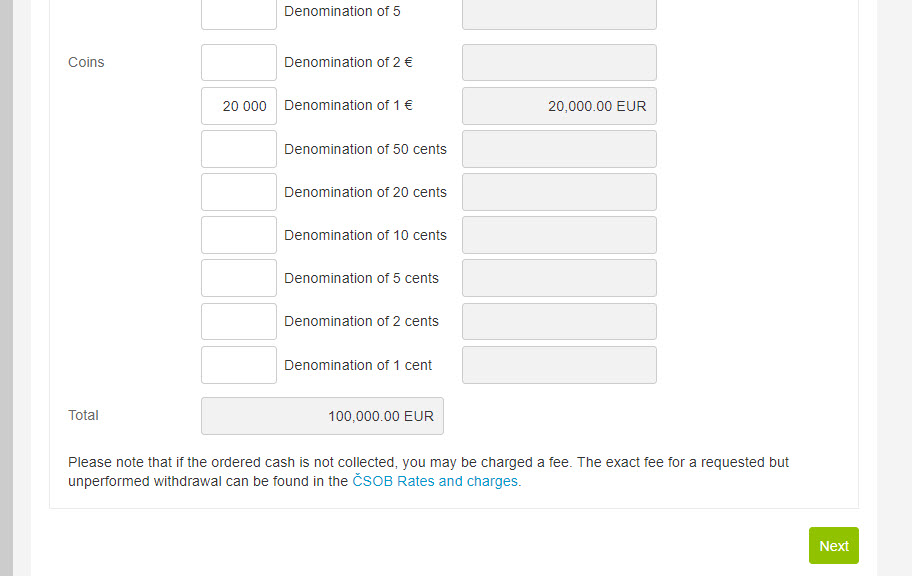
Specify the currency and the amount you wish to withdraw in the selected currency. If you prefer
to receive cash in specific denominations, use the Select denominations option.
-
After completing the form, click on Next. Check the entered details and press the Send
button to send everything to the bank for processing.
-
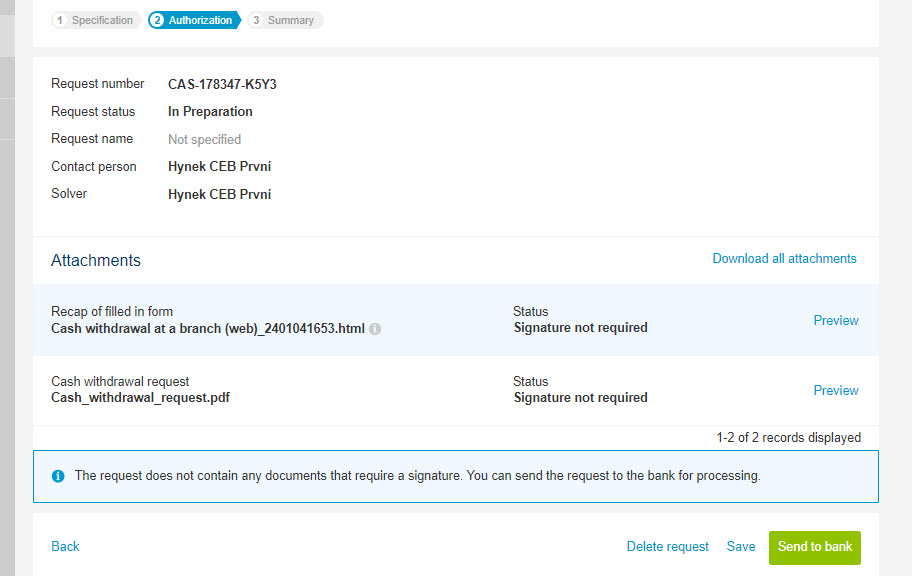
No signatures are required for cash collection order. Press the Send to bank button to submit the
cash withdrawal.
-
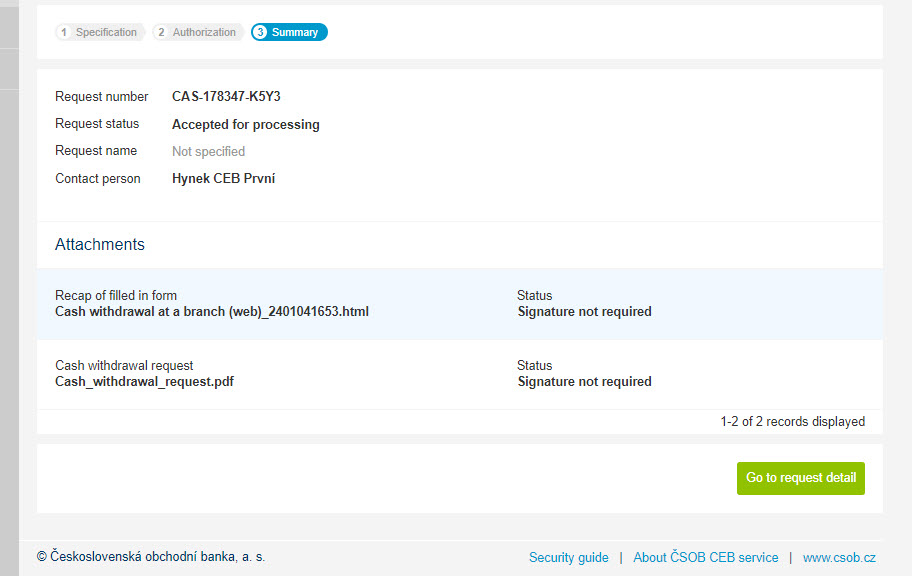
Done – now it is up to the bank to prepare the cash. If needed, we will contact you for additional
details.
Signing a document in pairs
-
If you are signing in pairs within your company, you can easily sign selected documents
electronically in the Virtual Branch anytime, anywhere.
-
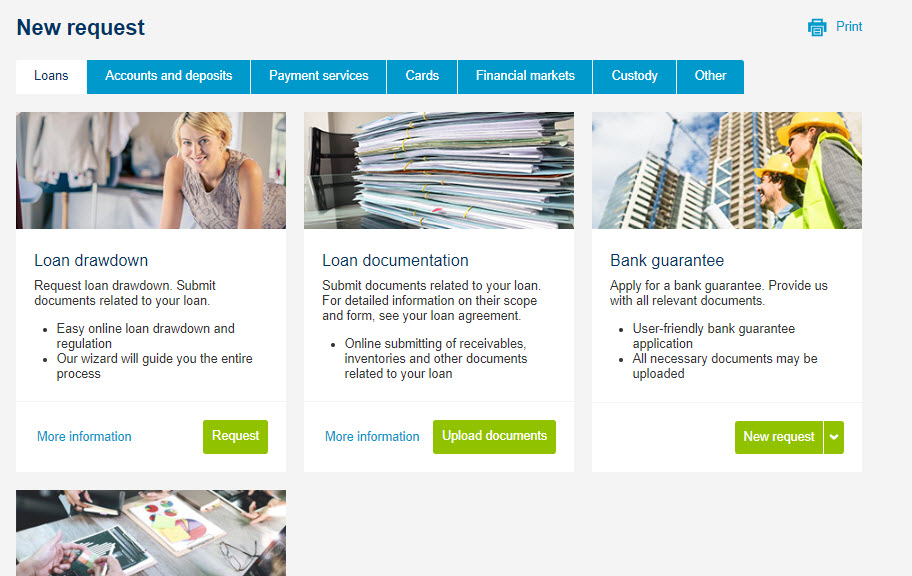
On the request detail in the Virtual Branch, you will find all the files prepared
to sign.
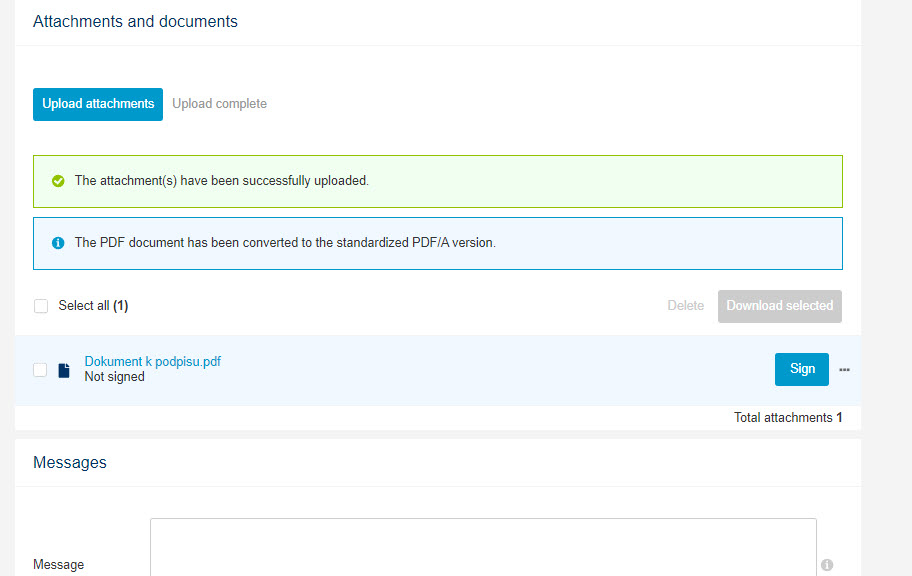
-
Documents to be signed are usually in PDF format with a Sign button available.
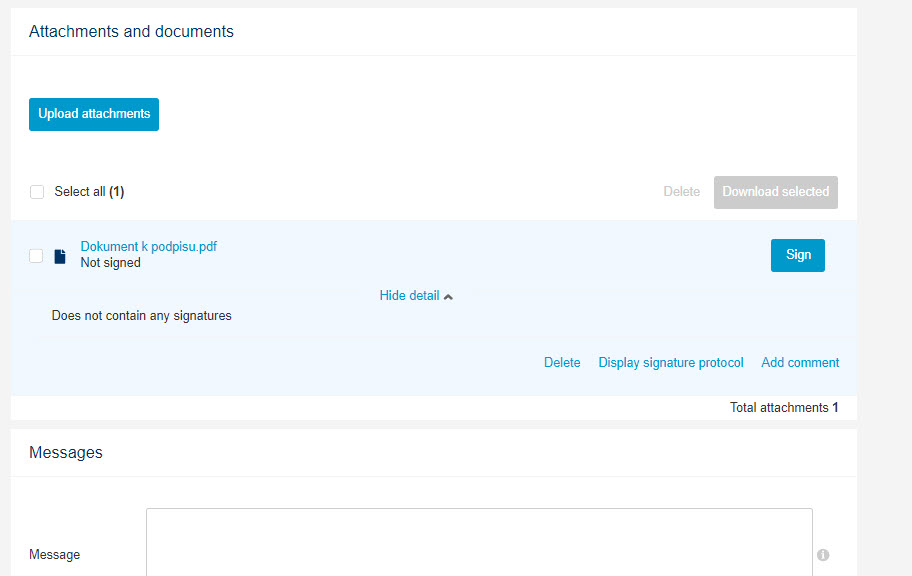
-
Click on the document title to preview the attachment you about to sign.
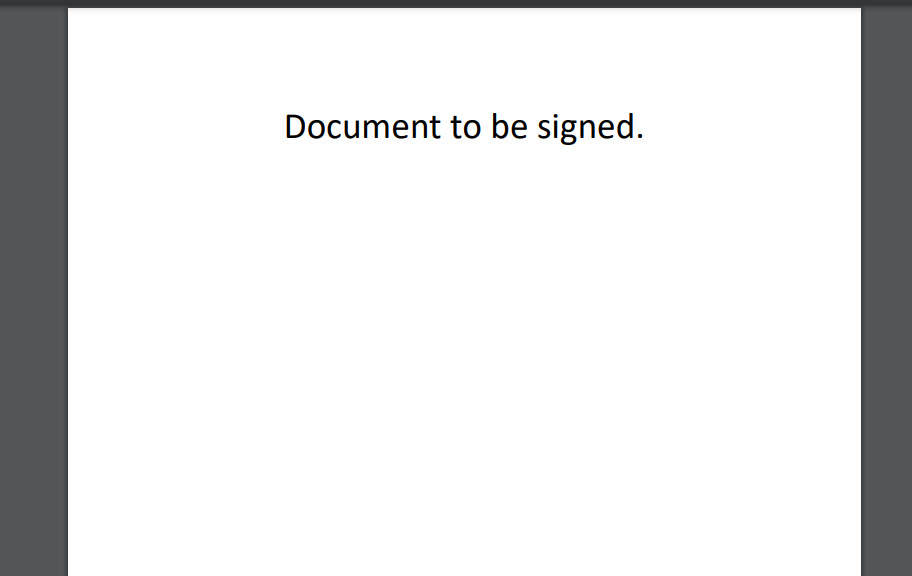
-
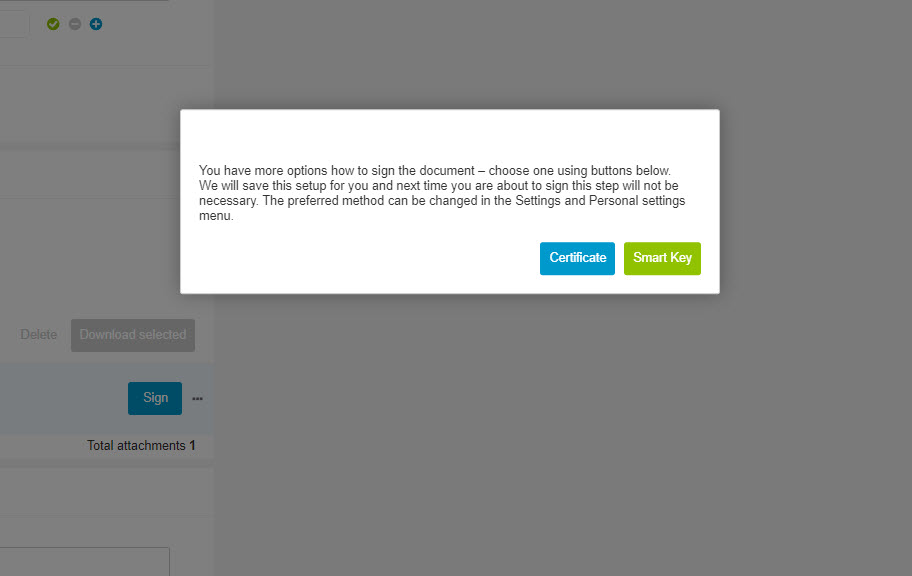
By clicking to the Sign button will take you to the Signing screen. For different types of
electronic signatures (e.g. Certificate or Smart Key), the system will automatically ask you to choose
one.
-
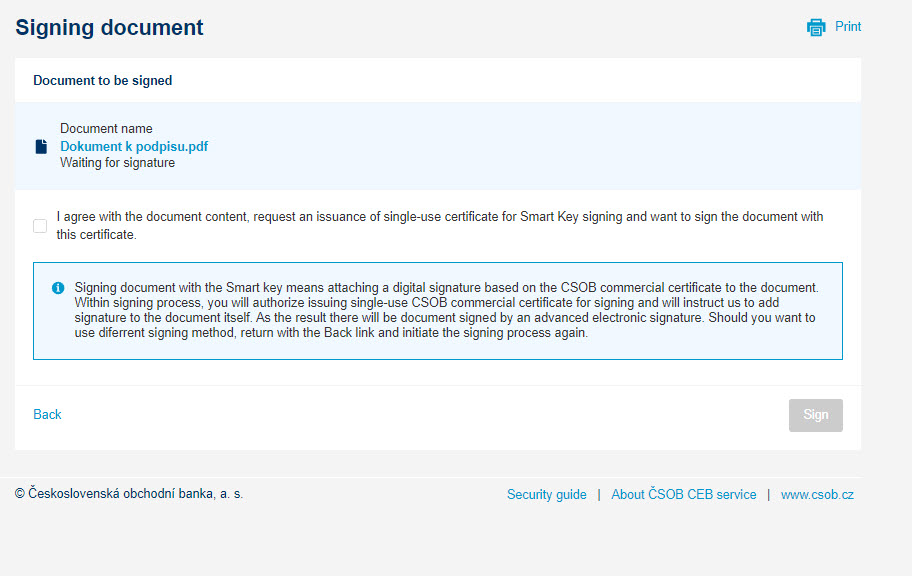
On the Document Signing screen, you have the last option to check the document you are about to
sign. To change the signing method, please select Back and choose a different signature type.
-
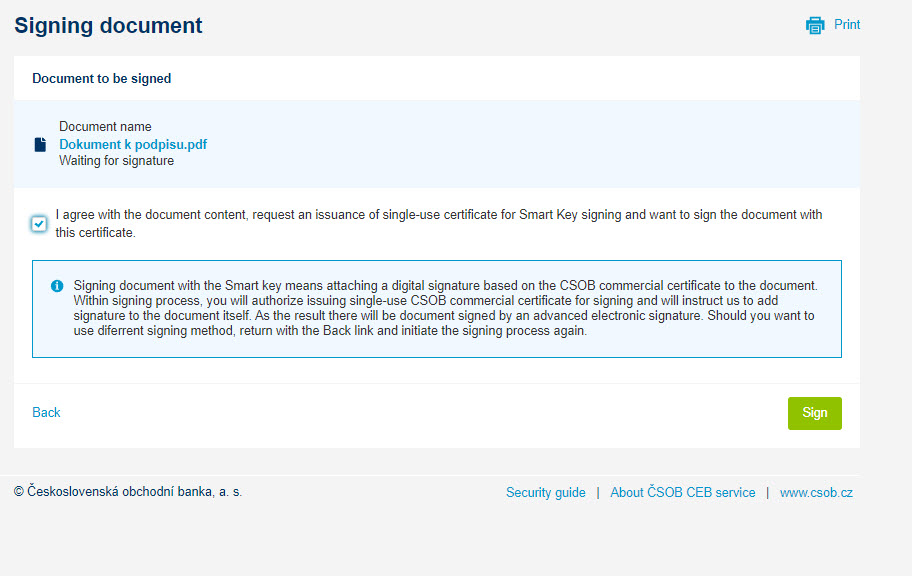
To enable the Signing button, please check the consent with the content of the document
option. Then click to the Sign button.
-
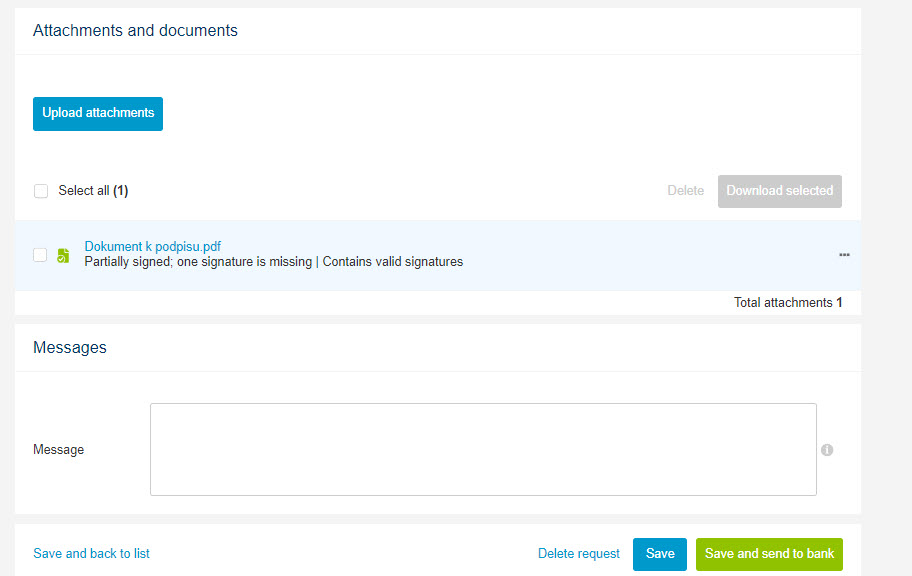
Depending on the signing method you choose, either enter the PIN to your chip card or sign
the document using the Smart Key app. At this point, the document is partially signed.

-
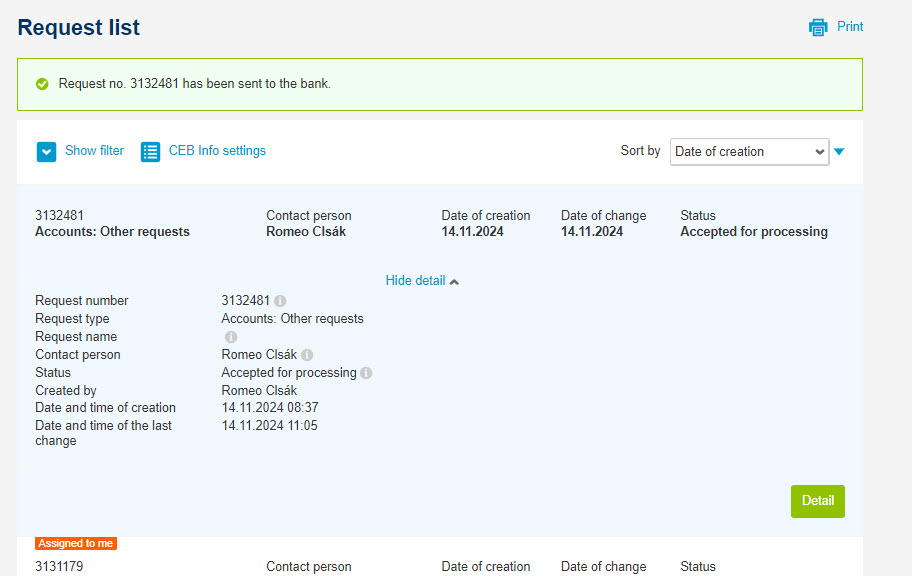
When returning back to the request detail, you will see the document containing your electronic
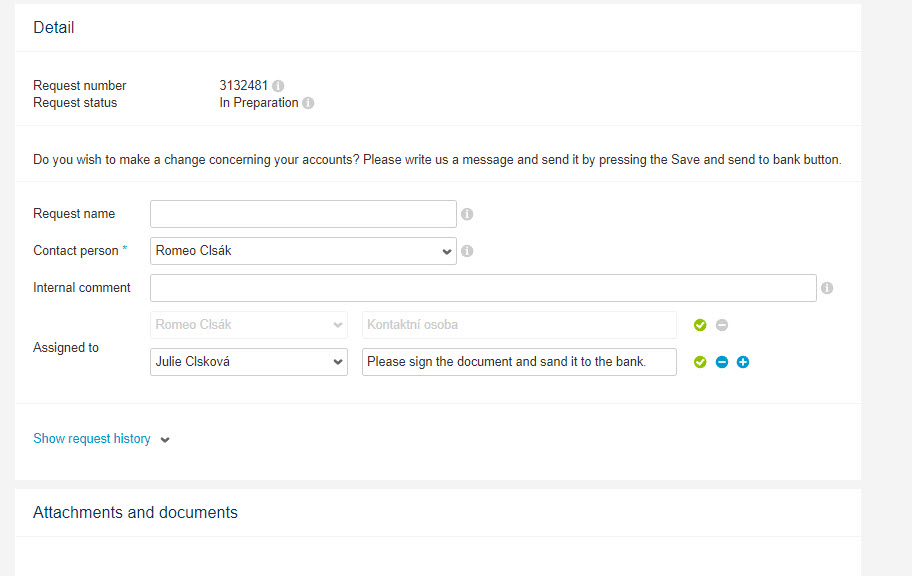
signature in the Attachments and Documents section. To sign the document by second user, please
use the Assigned to function. By default there is the same assignee as the contact person for
each request.
-
To assign the request to a second signatory, please use the + option in the Assigned to section.
Here select the person of the second signatory and leave a message (optional). Then save the
request using the Save option.
-
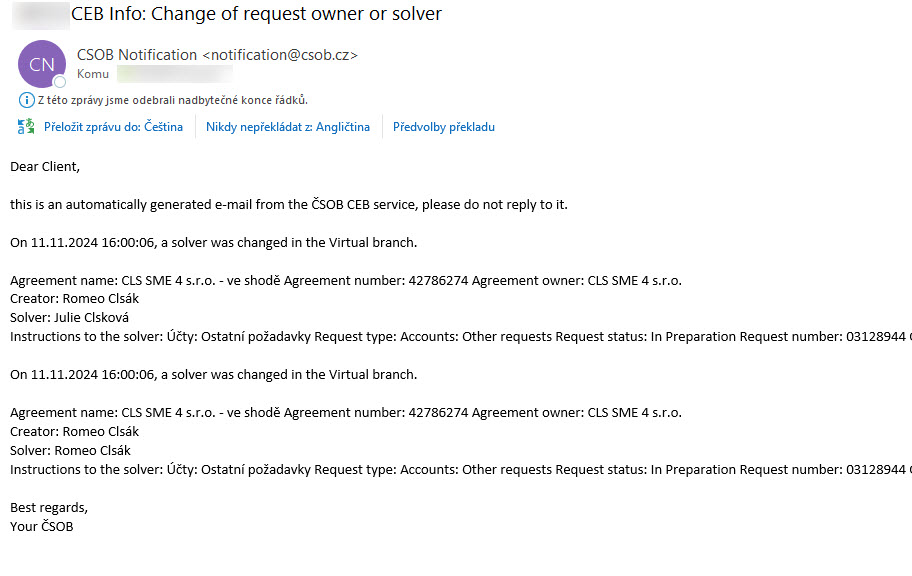
If the second user has the CEB info service set up correctly, will receive a notification regarding the
changes being made within the request.
-
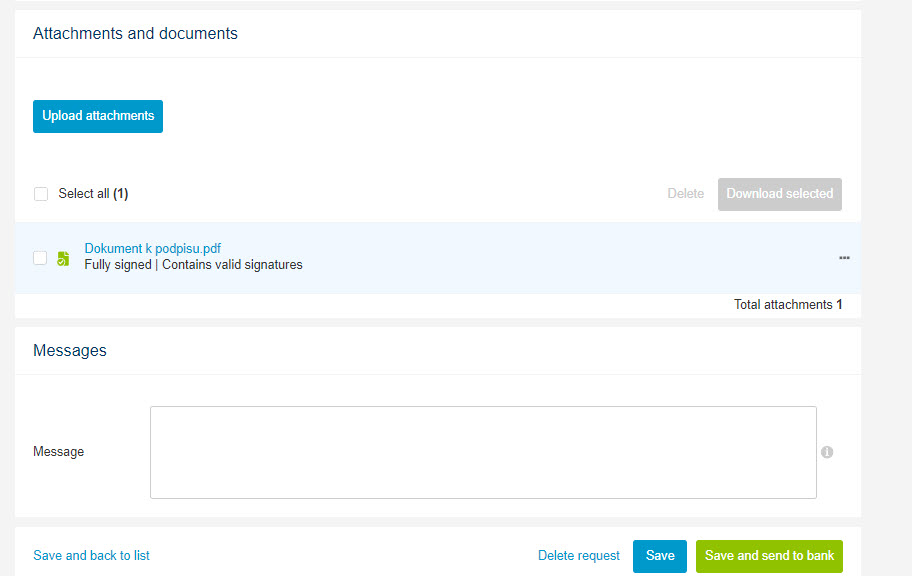
After login to the CEB, the second signatory goes to the Virtual Branch to checkt and complete the
signining process within particular request.
-
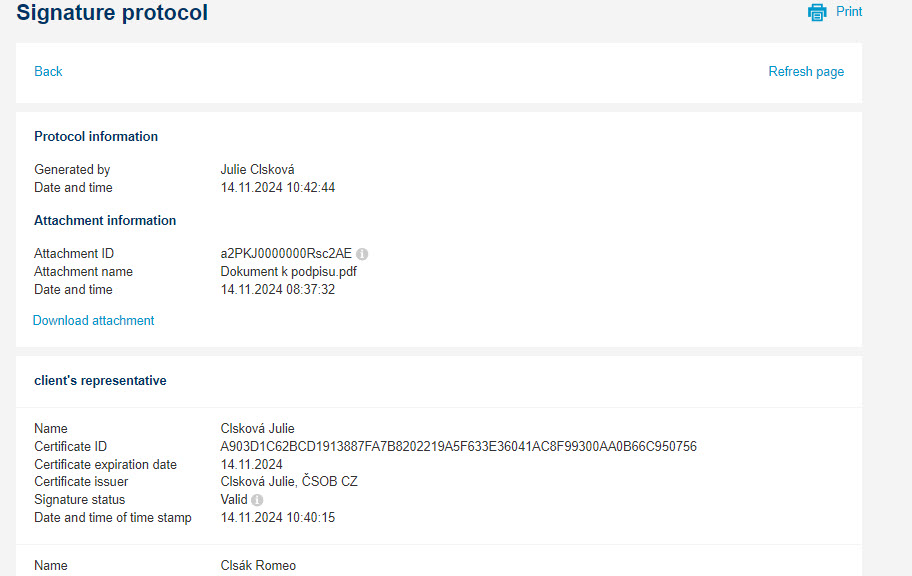
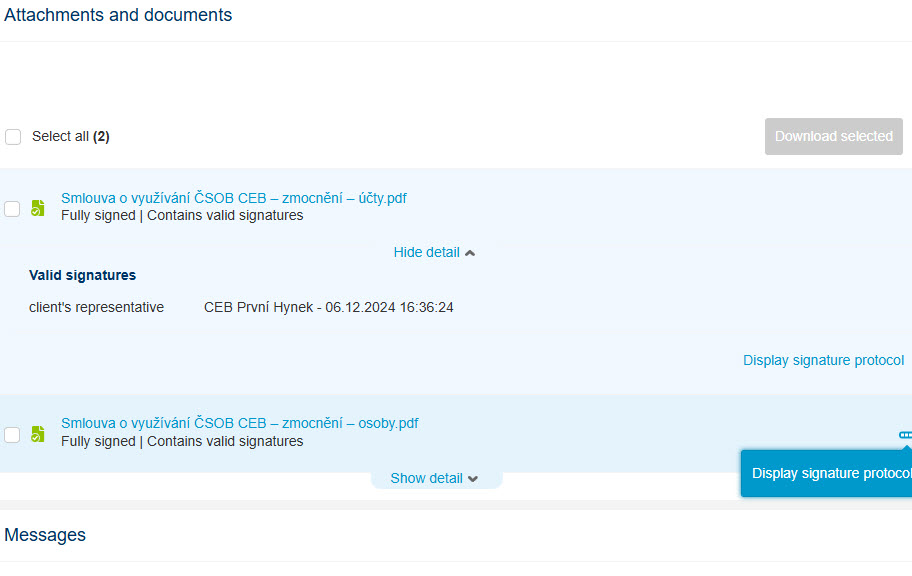
For documents already signed, you have the option to display the signature protocol using
three dots, containing all signatures attached to the document along with the date and time of
signing.
-
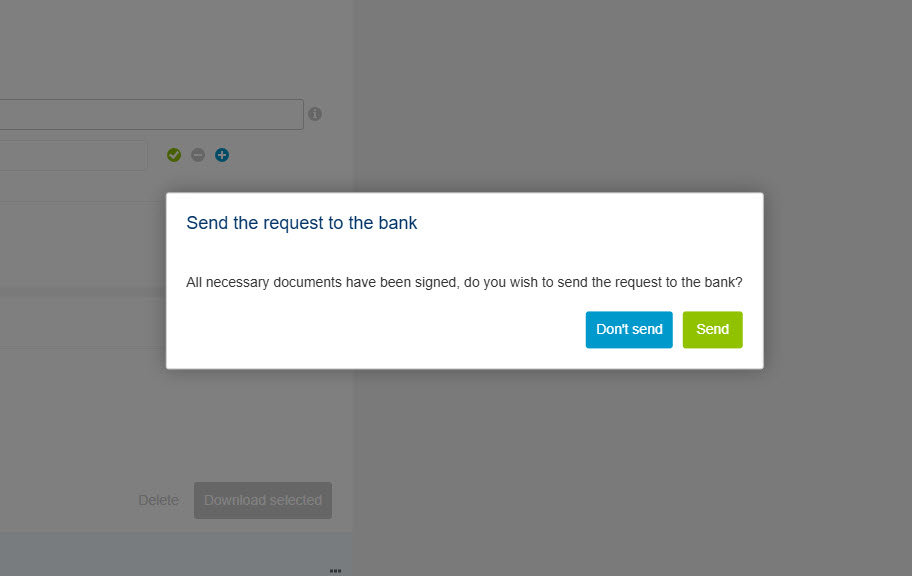
Once the document is fully signed, please use the Save and send to bank button to proceed your request.
If not, the system will automatically alerts you.
-
Same procedure can be done within the CEB Mobile app. In this case, the Smart Key signature is used.
CEB service setup in the Virtual Branch: a new user
-
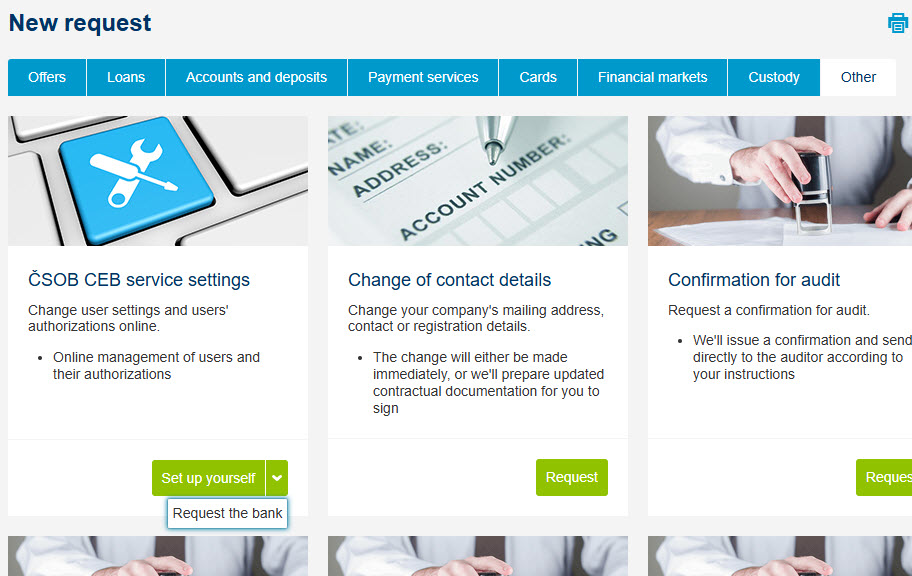
Setup a new user, add an account, change limits and other contract setup can be performer in the
Virtual Branch in the Other tab choose ČSOB CEB service settings and the button to
Set up yourself.
-
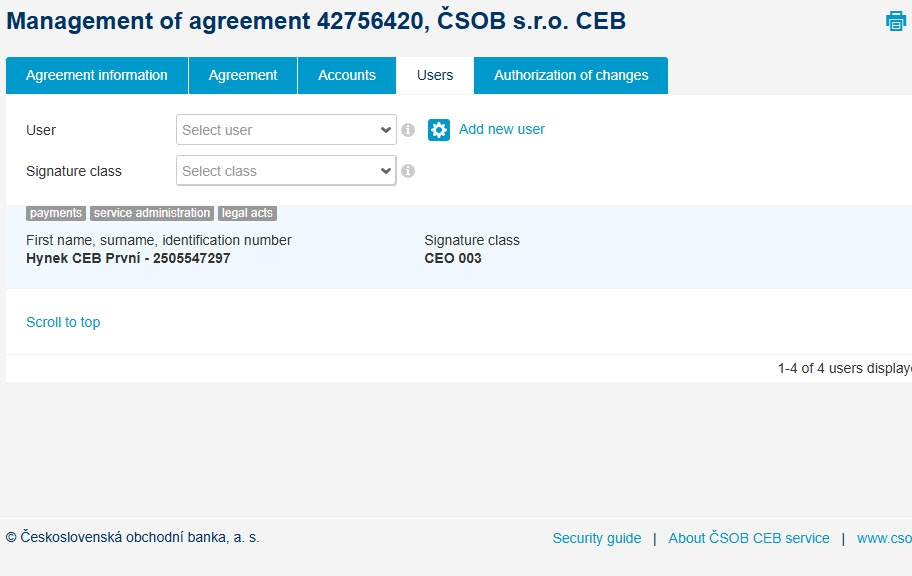
Say you have a new accountant in the company and he/she is to work with the accounts, choose the Users
tab and Add new user.
-
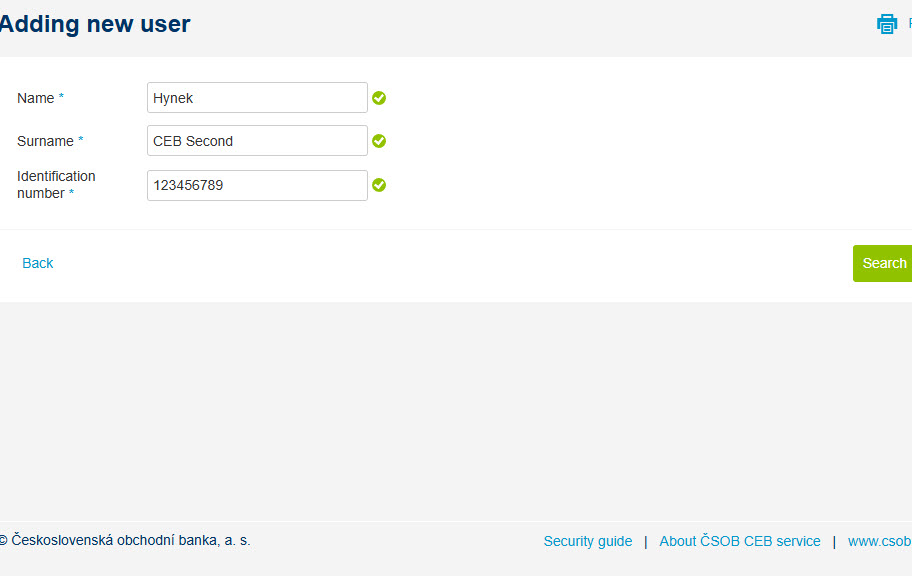
User to be added should have ČSOB Identity setup and you need to know his/her name, surname and ČSOB
Identity ID number, provided in the contract with the bank. After filling in these data you can
Search for user.
-
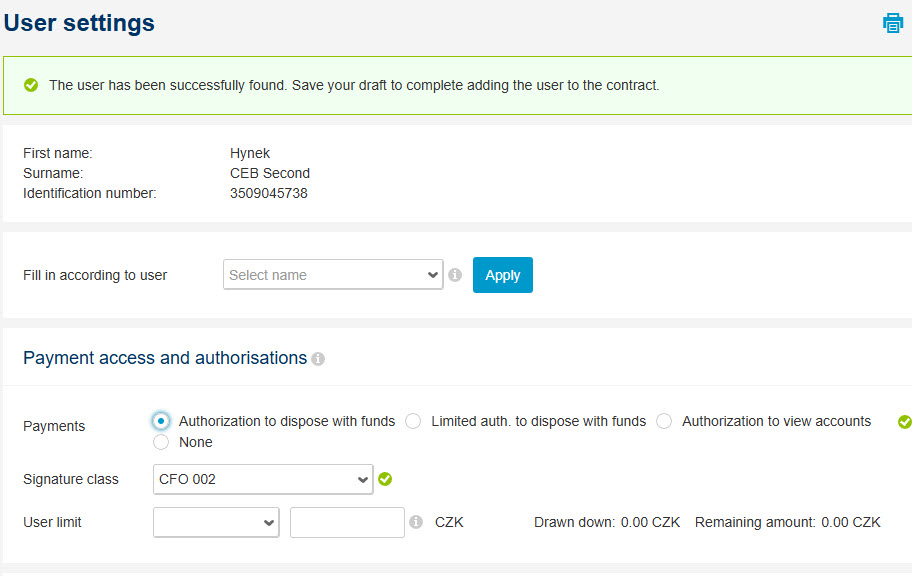
Setup new user rights and roles, signature classes etc.
-
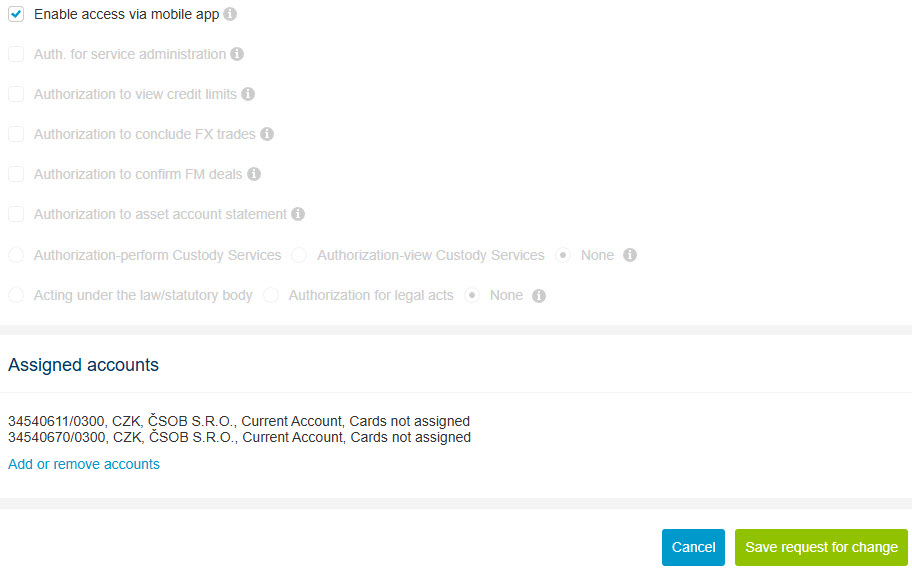
Do not forget to add accounts new user should have available. Save the draft to continue.
-
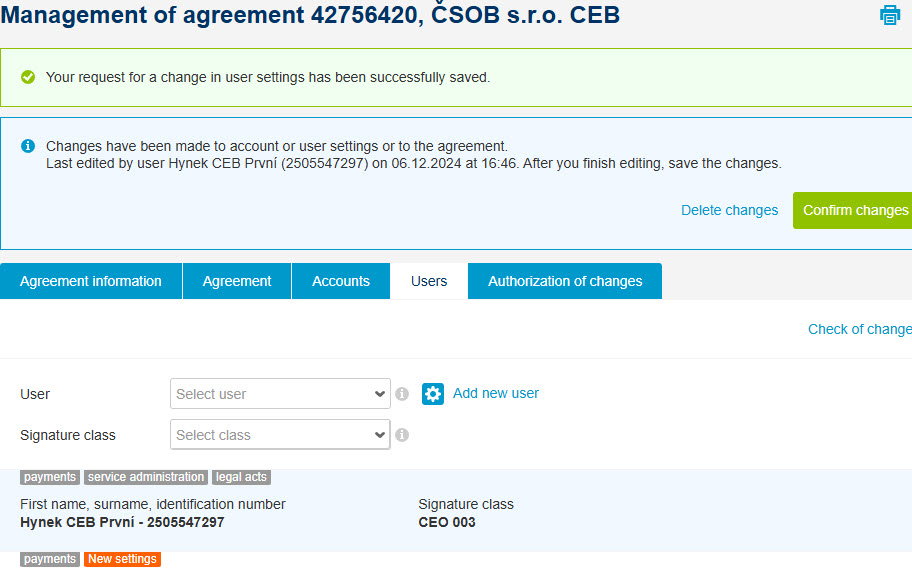
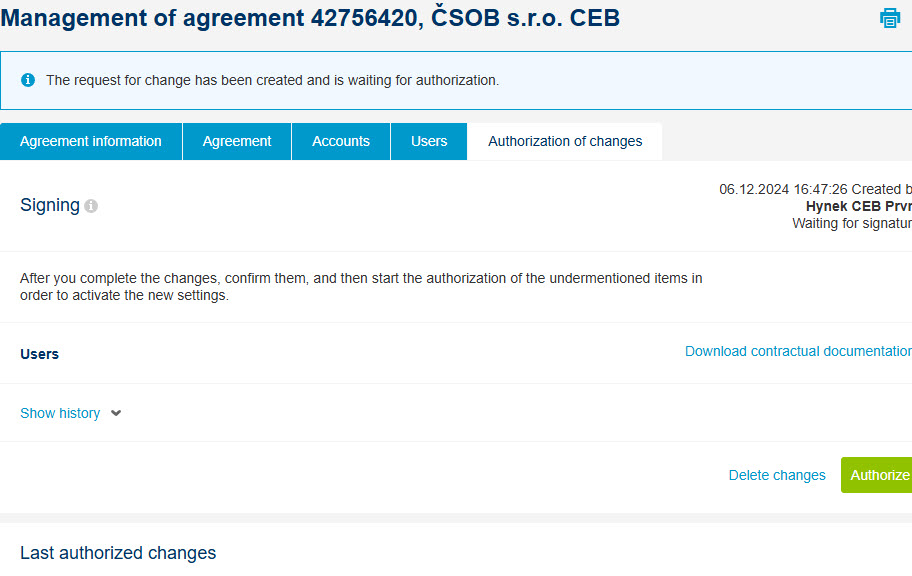
Everything done? Confirm changes and the service will generate a new contract documentation.
-
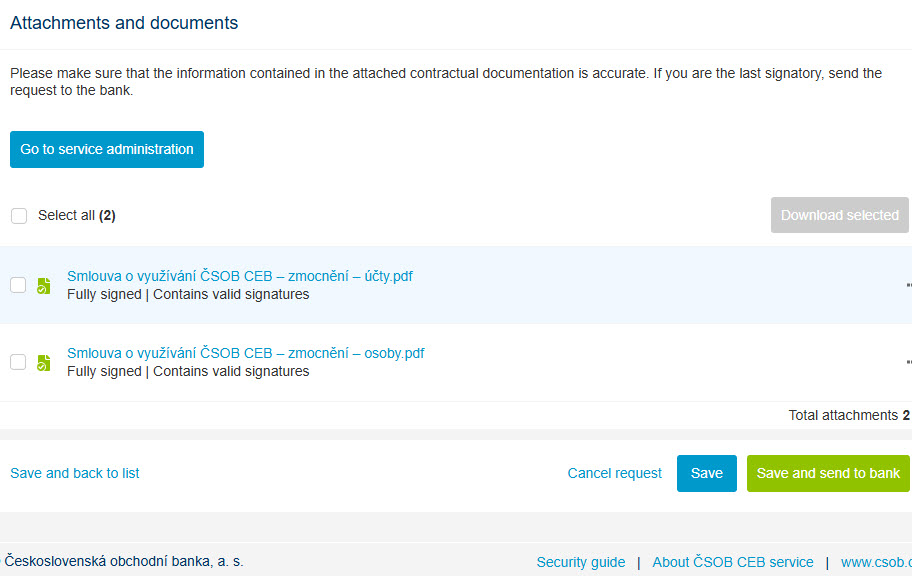
Check the changes in the documentation, if everything is correct, you can Authorize the documents
with a Smart key or chip card.
-
If you are the only one to authorize, after Sending to the bank the changes will immediately come
into effect and the new user can log on.
CEB service setup in the Virtual Branch: Adding a new account
-
Add a new user, a new account, change limits and other setup up can be done in the Virtual Branch
– just go for Other tab, ČSOB CEB service settings and hit the Set up yourself
button.

-
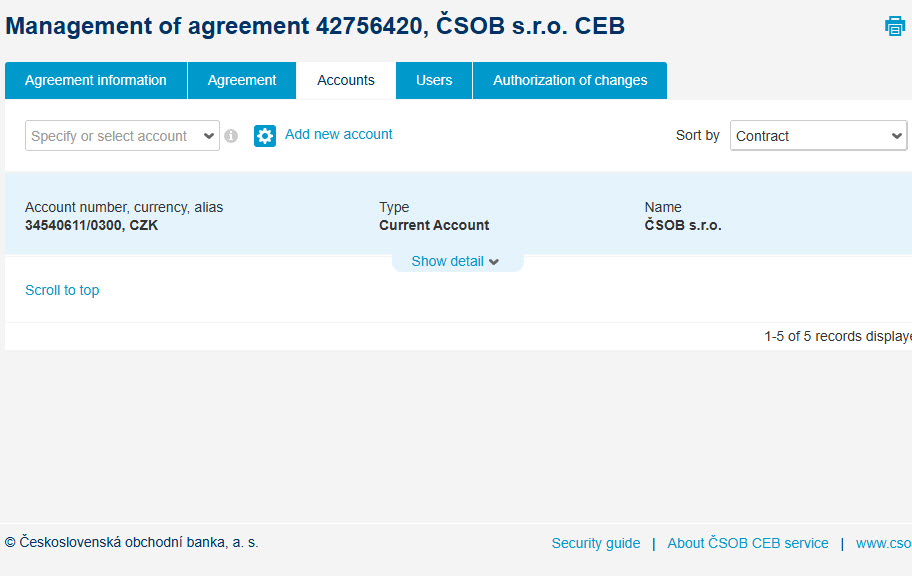
Say you have contracted a new account and want to add it to the service – head for Accounts tab
and Add new account.
-
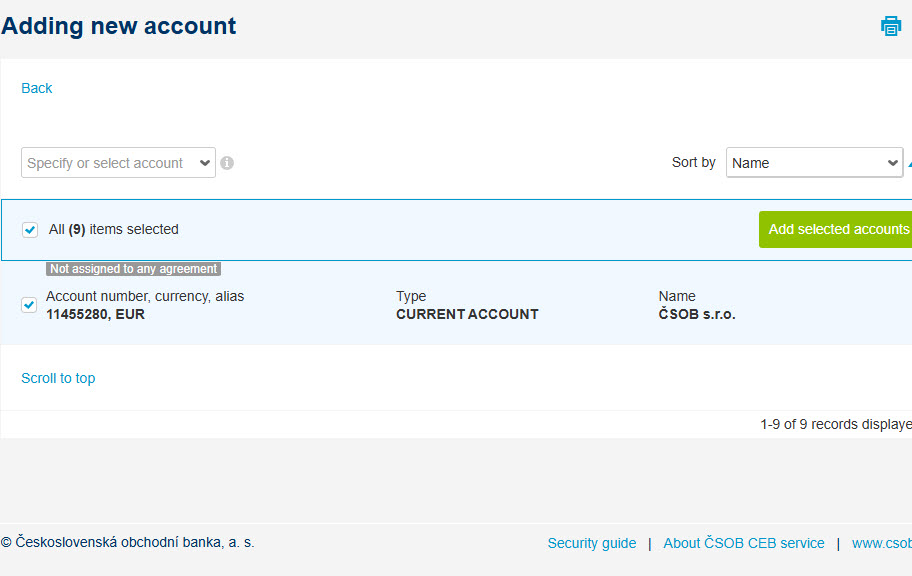
Accounts held for your company or accounts that your company has power of attorney for will be shown.
Choose the right one and Add selected accounts.
-
Edit the account settings in order to define authorization rules, set limits or add users that
will see it in the service.
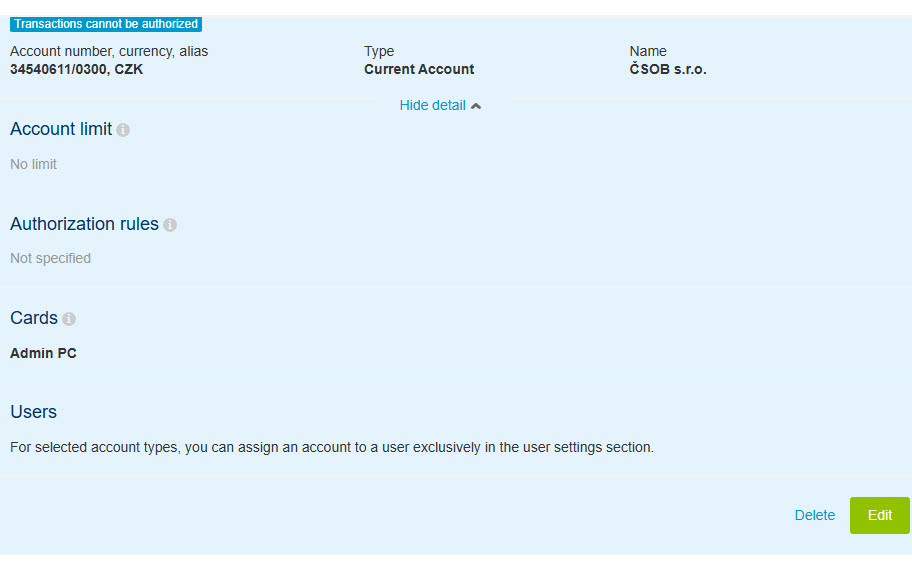
-
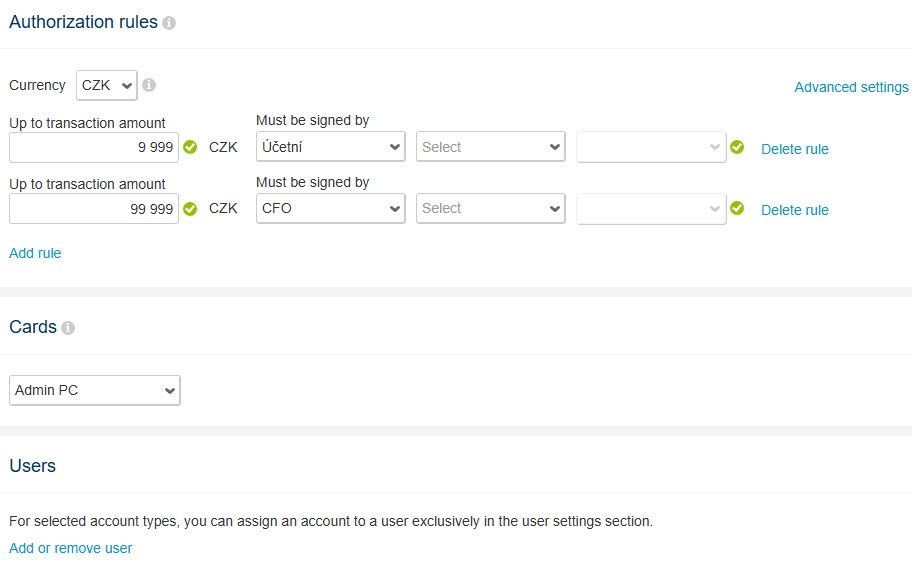
Authorization rules define users that can authorize transactions up to defined limit. Add or
remove user will take you to screen for adding users.
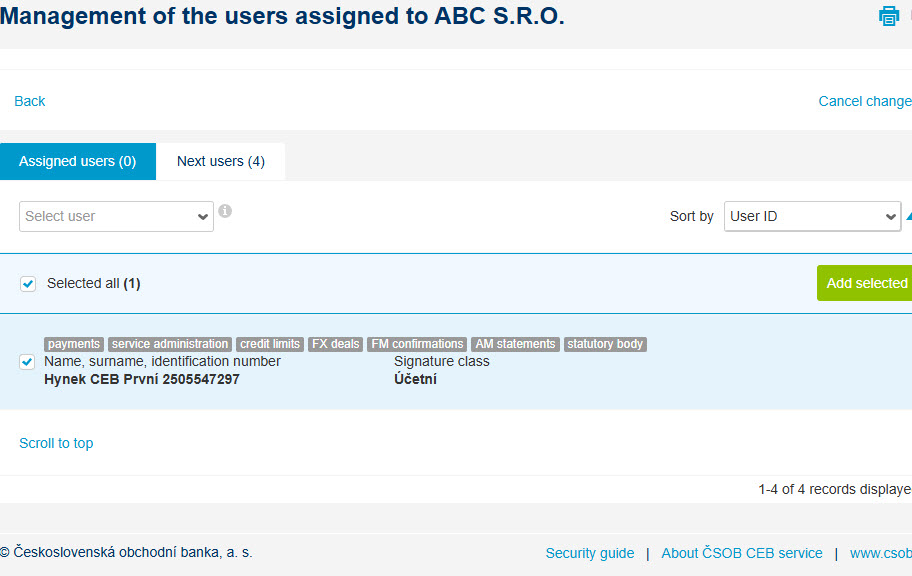
-
Choose the users, confirm by Add selected and go Back to account settings.
-
Done with this account setup? Save request for change.

-
You can setup also other accounts, when done, Confirm changes and the CEB service will generate a
new contract documentation for you.
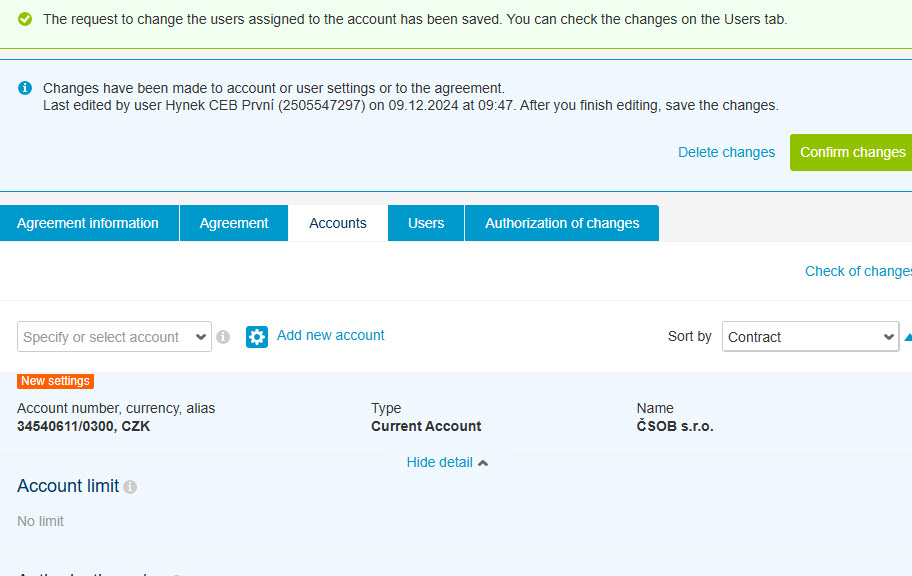
-
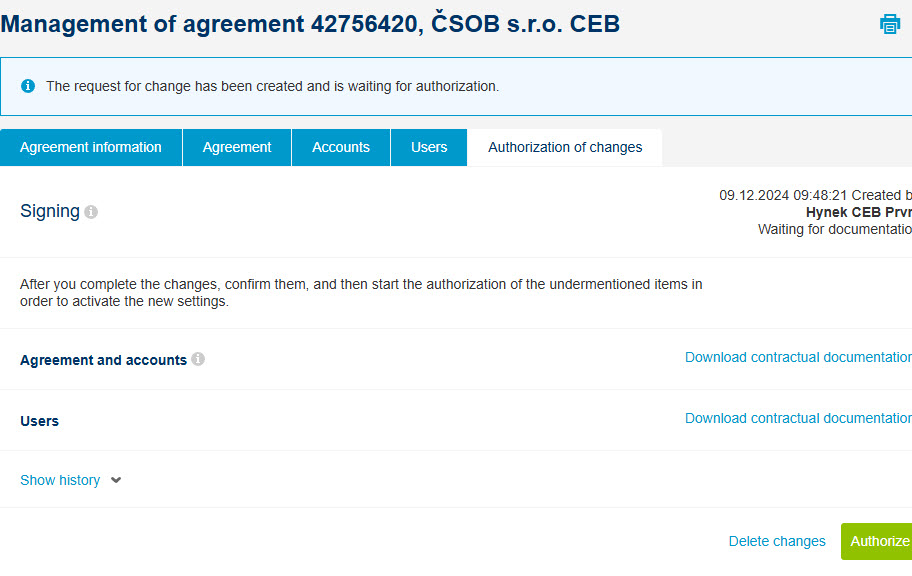
Check the documents and their content, if everything is as required, Authorize changes.
-
Wait for signing process to finish and Save and send to the bank so the setup will come into
effect.

Arranging term deposit online
-
Term deposit within the CEB service can be arranged in the Virtual Branch or via an option in the menu Financial management / Term deposits / New deposit. This function is available on working days 8:15 to 16:30. To conclude a new deposit, you will need appropriate user rights for the Virtual Branch and an account in the selected currency. Choose a tile with appropriate currency, rate and tenor.
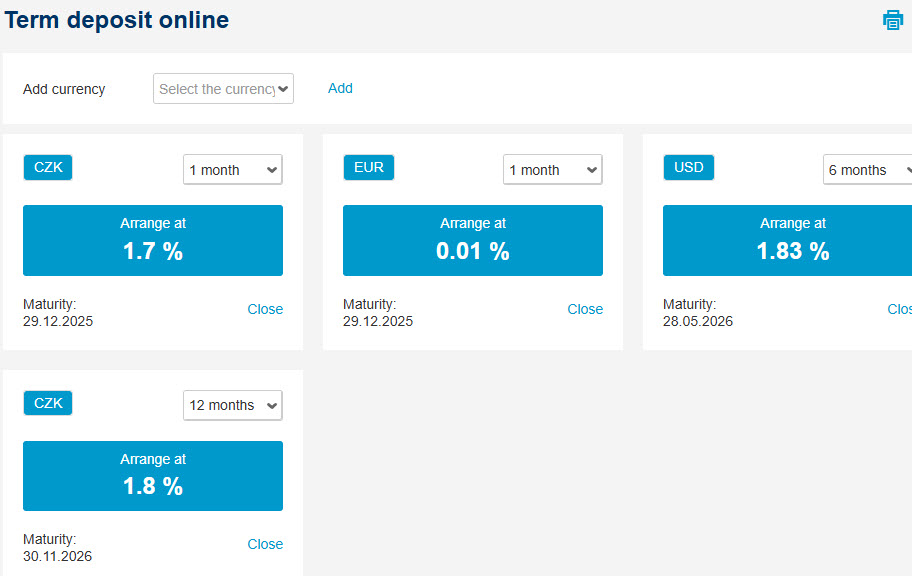
-
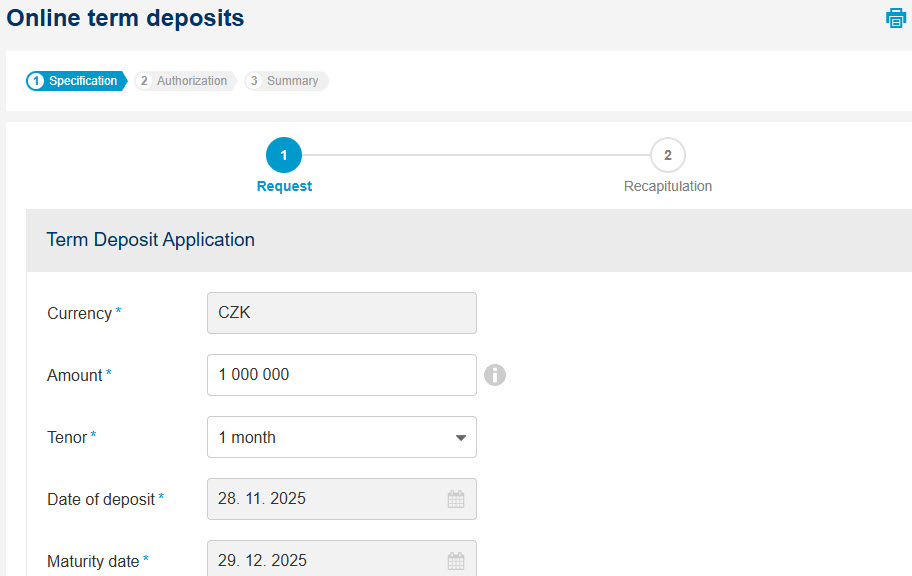
Please set the Amount, Tenor and Current account to top up the deposit account. We will recap the parameters for you (termination date and amount to be sent back to the current account).
-
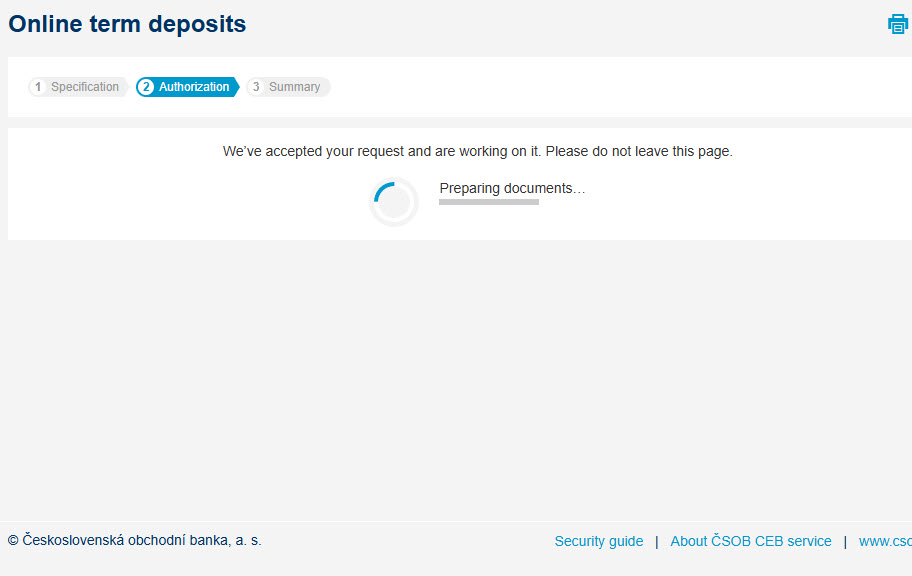
Based on the information provided, a contract documentation will be prepared, please stay on the screen.
-
Now the Request (requiring your Signature) is ready, along with other documents – e.g. pricelist, terms and conditions and other. Please confirm and sign.
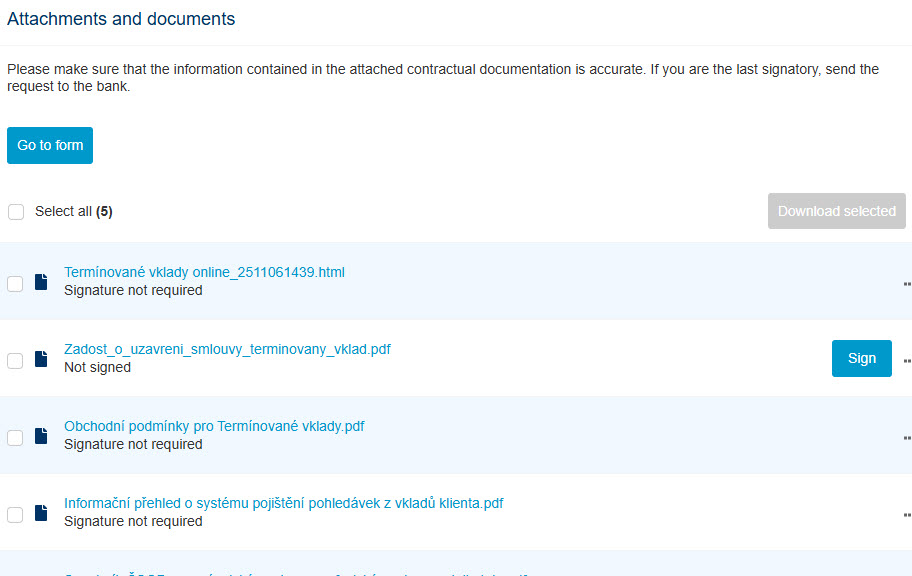
-
Request can be signed via Smart key in your phone or with a chip card.
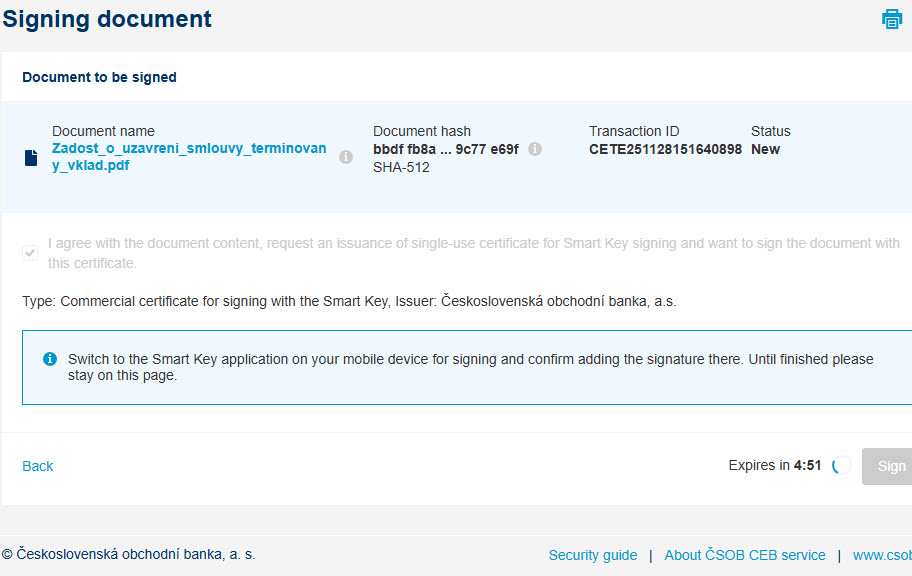
-
Once signed, do not forget to Send to the bank for processing.
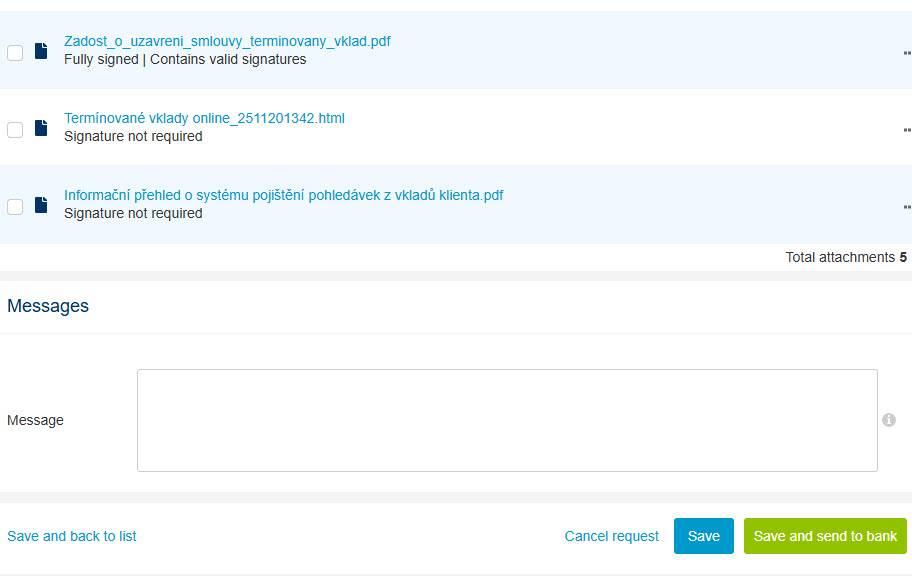
-
Now it is in the bank, the request is being processed – deposit account being created and the amount is being transferred. In some cases existing account can be reused.
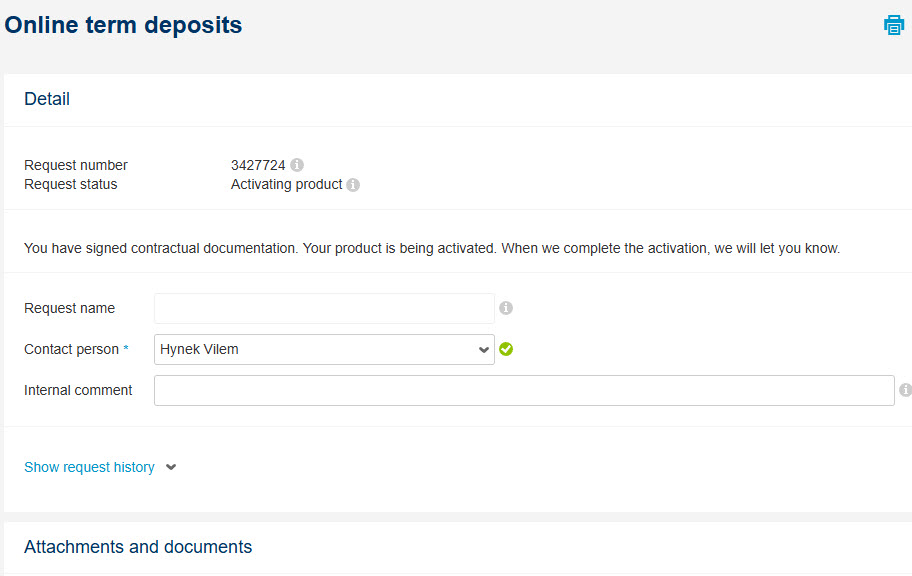
-
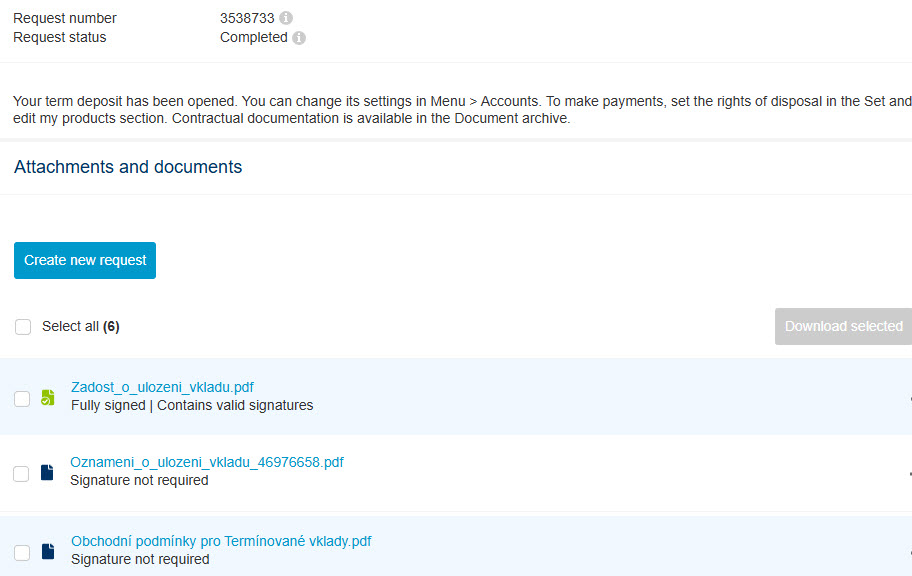
To confirm, we will add another document noting the account and deposit has been created – all within the same request in the Virtual Branch (also the account balance will change). Should you need to add the account to the CEB service too, you can use Virtual Branch or Administration features to do so (or if this was requested within the process, you will have another documentation made ready for your review and signature in the Request list).
Confirmation for audit
-
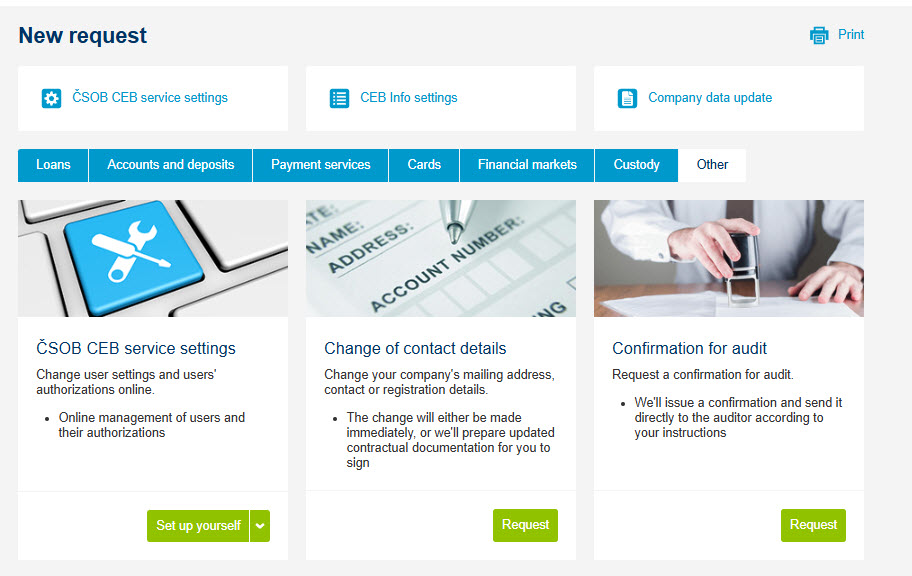
After logging in to the CEB service, go to the Virtual Branch, select tab Other, choose Confirmation for Audit and select Request button.
-
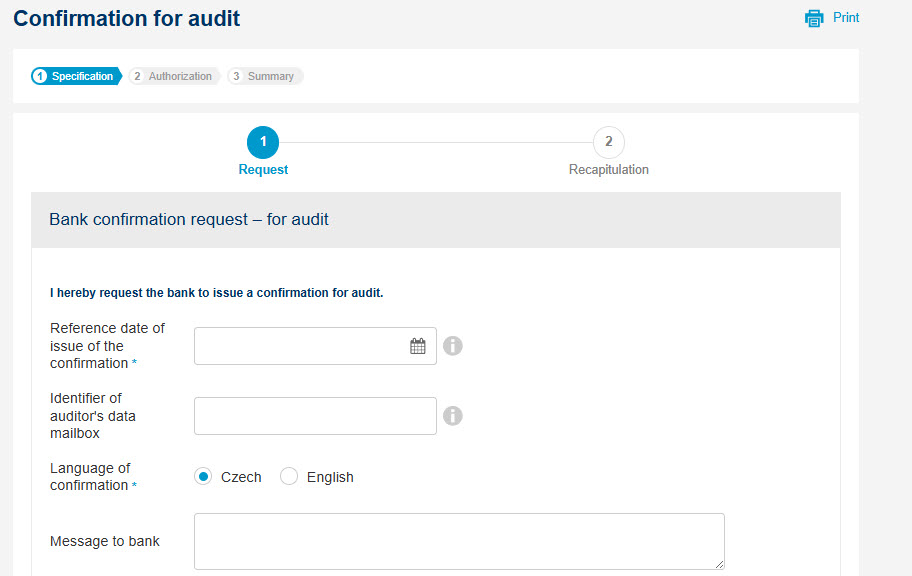
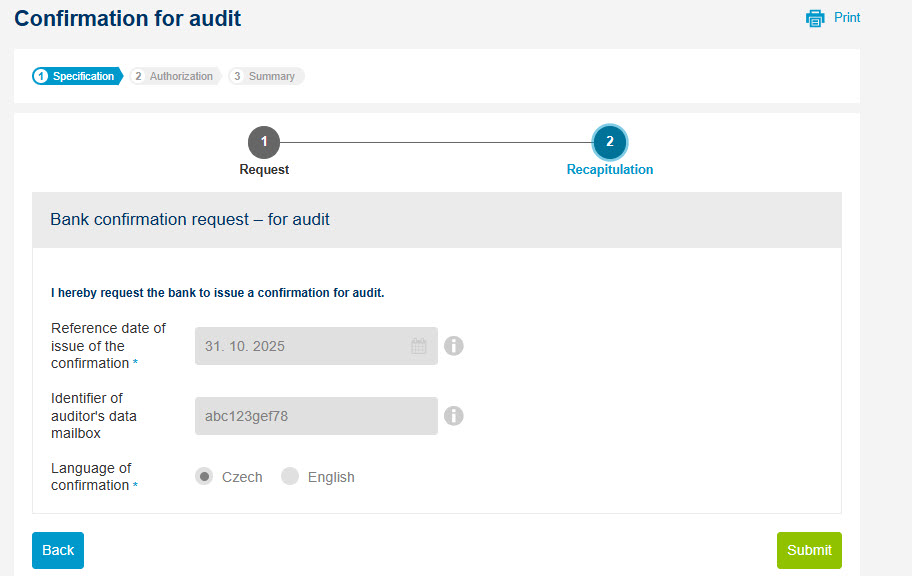
Fill in all required fields one by one. It is Reference date for the bank confirmation - i.e. the date on which the financial statement is processed and also select language of the output.
-
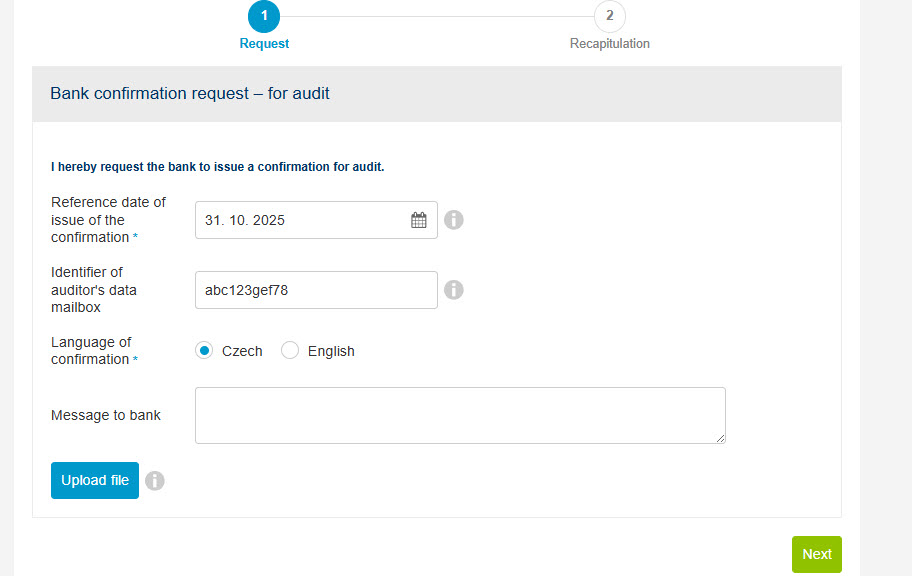
Optionally, you can also enter the ID of auditor’s data box, where we will send the issued confirmation if needed. Otherwise, we will send the confirmation to the auditor by standard mail.
-
Optionally add additional information or instructions in the Message to bank field. You can also attach an external auditor’s report containing the requirements for the bank confirmation using the Upload File button.
-
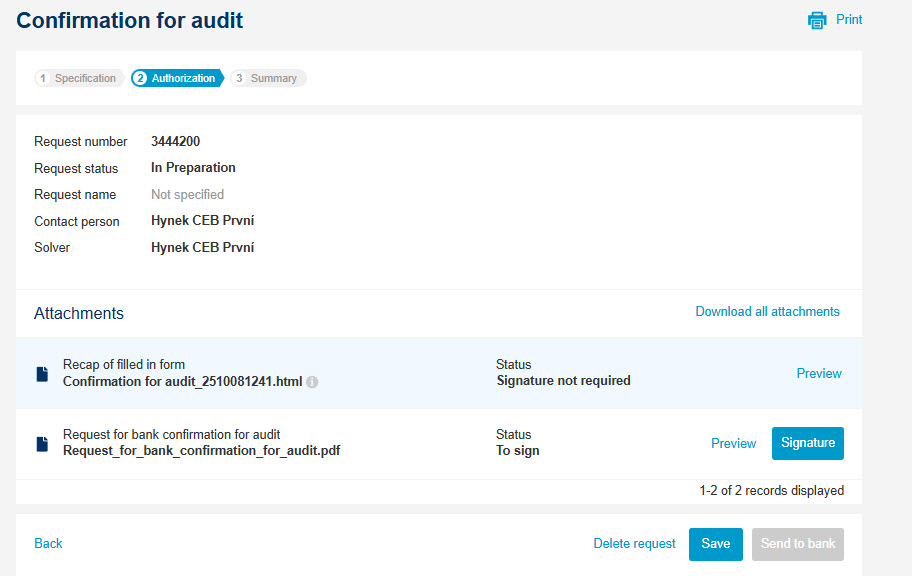
Select Continue for recapitulation. Using the Submit button, you will continue to the next step, where you will find the PDF document of your request ready for signature.
-
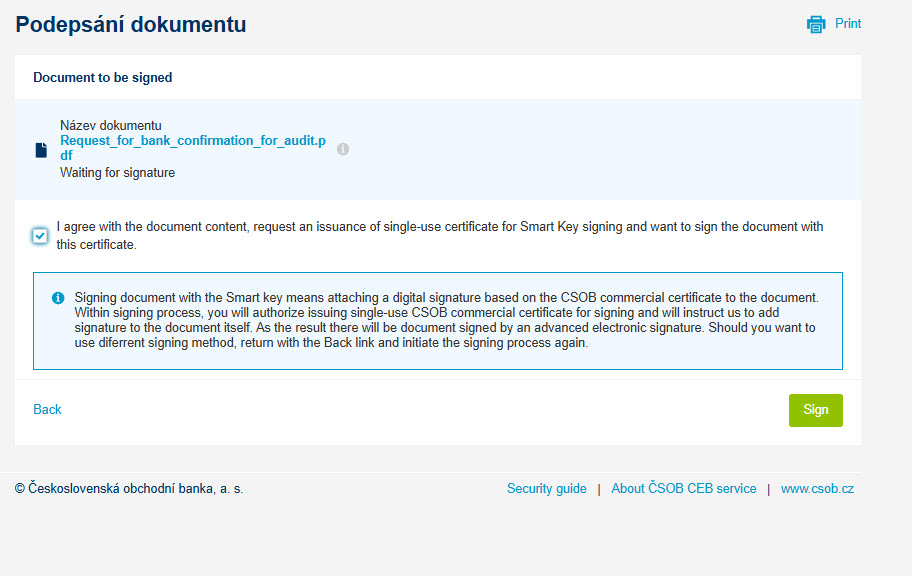
The Sign button allows you to sign the document electronically after checking the necessary consent. Electronic signature can be made by Smartkey, or by a chip card.
-
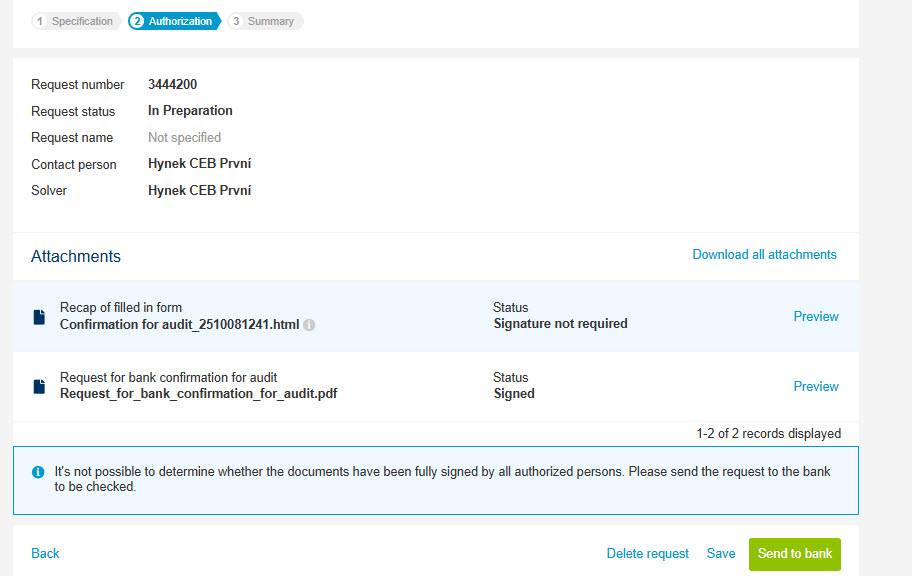
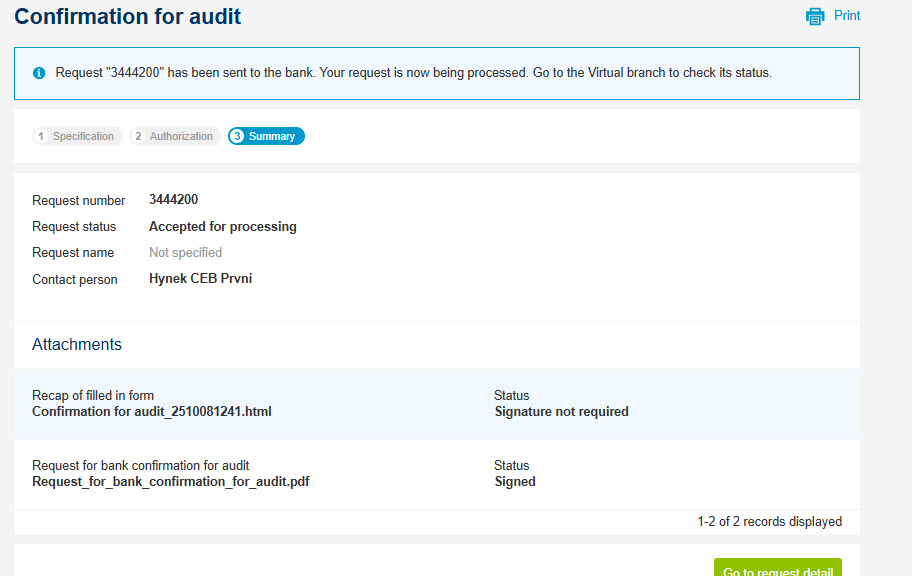
Once the document is fully signed, you can submit your request by Send to bank button.
-
The system notify you on that.
-
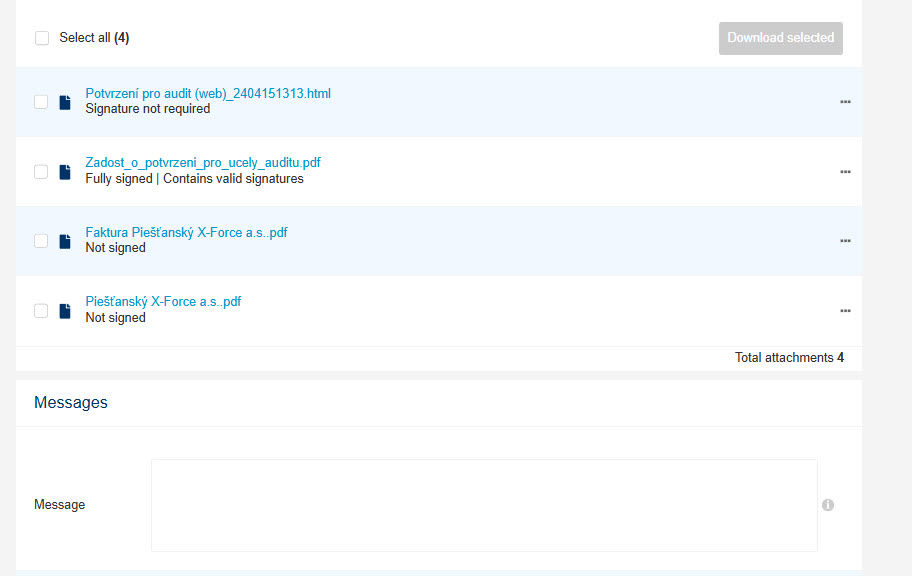
After that we will issue the confirmation, upload and send it back to you by the same request via the Virtual Branch. Optionally we will send a confirmation by mail (or data box) to the relevant auditor if requested so.

-
Use a similar process in the CEB Mobile app. In this case, the electronic signature is always done with the Smart key.
Generating signature protocol
-
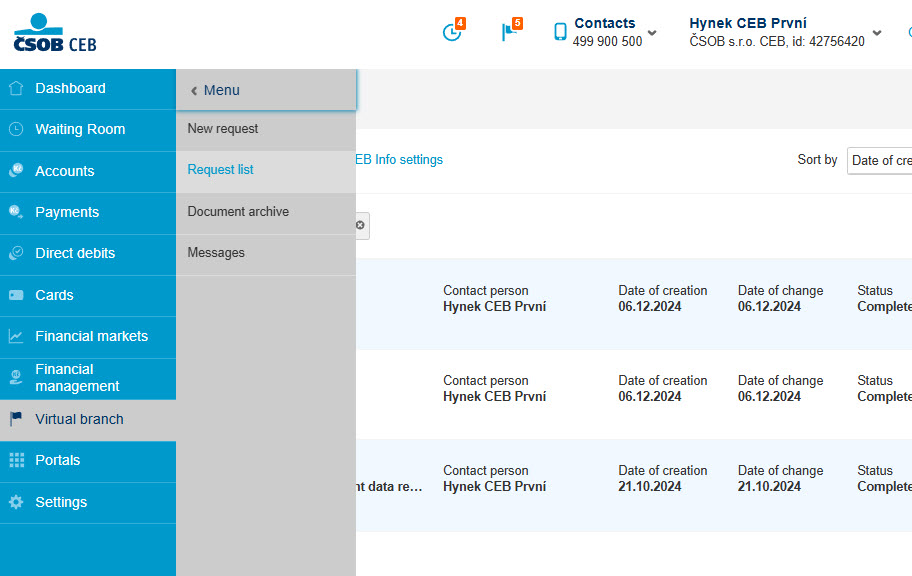
After logging in to CEB service, go to the Virtual branch and display the Request list.
-
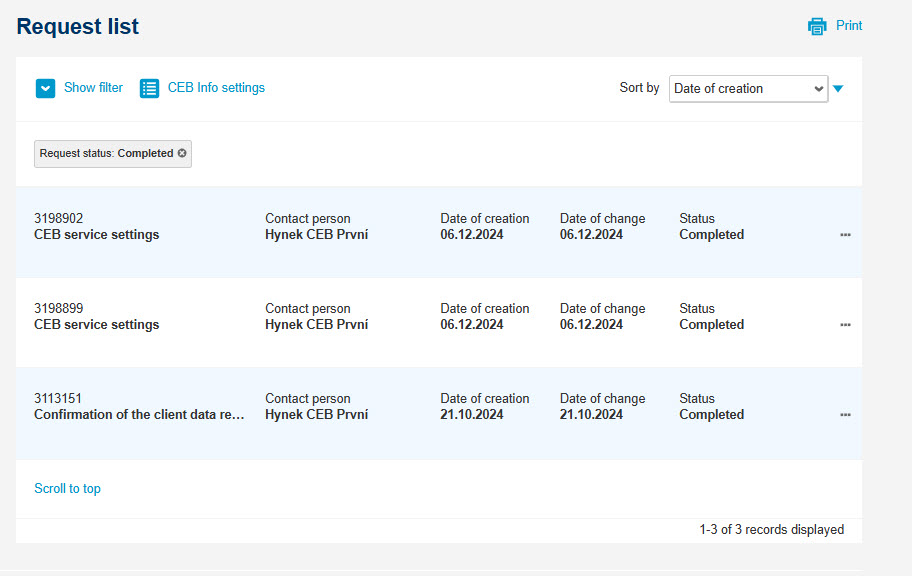
Select the request with the signed document and go to the Detail. In order to better sorting apply a filter using Show Filter at the top of the screen.
-
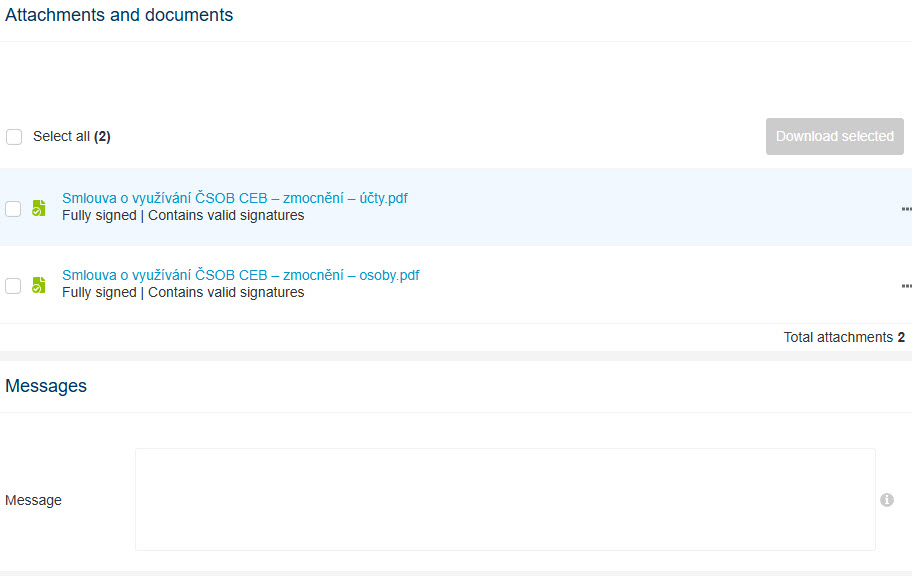
On the request detail go to the Attachments and documents section and select the signed document for which the signature protocol should be generated.
-
Point to the document and use Show detail option to get extended view with the Display signature protocol button. Alternatively click on the three dots in the right top corner of the document line.
-
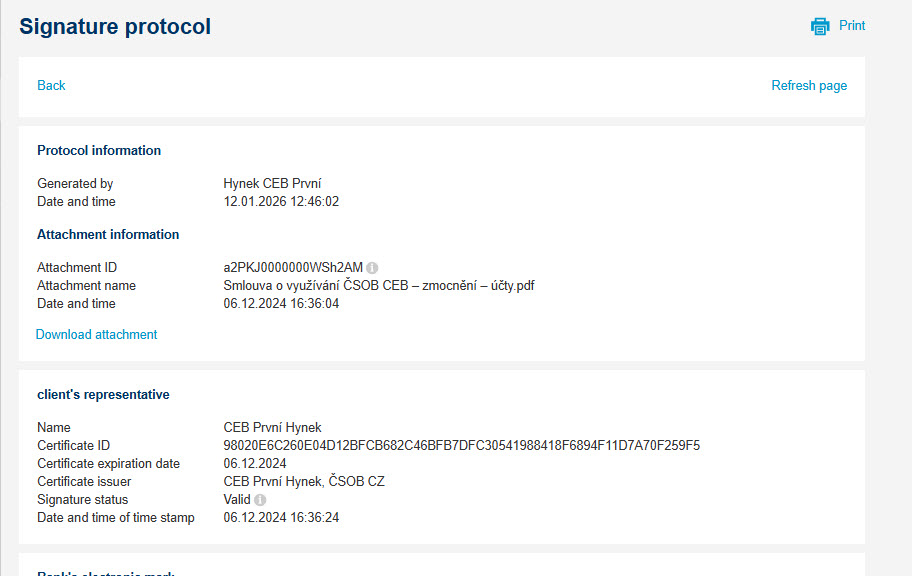
You are now on the Signature Protocol screen. Here you will find all necessary information regarding electronic signatures such as date and time of signature, attachment name, certificate ID validity and issuer, signature status etc.
-
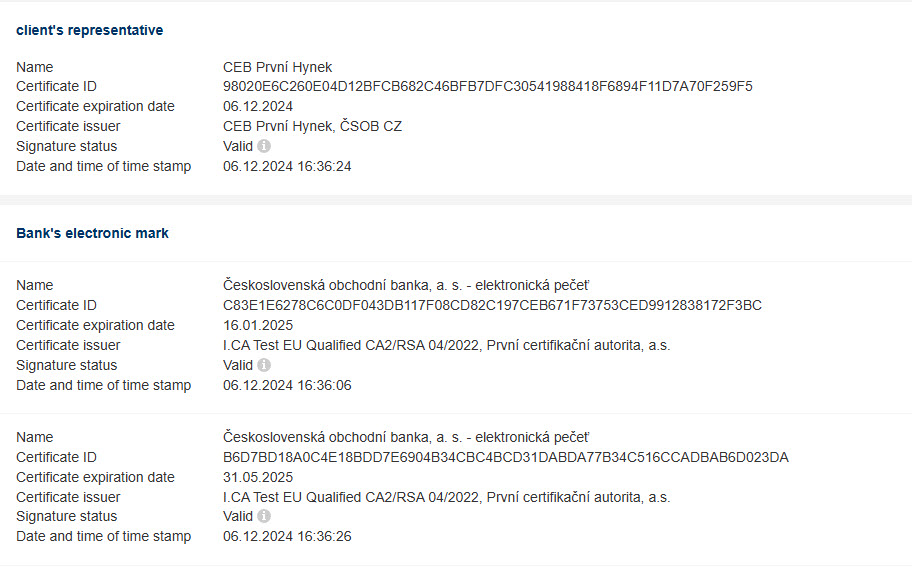
The first section of the protocol contains basic information with the Download attachment option. The second part contains client’s signatures. The third part contains bank’s signatures and seals.
-
Print the signature protocol by Print button situated in the top right corner, or alternatively create a PDF document by Save as PDF option within your printer.
Loan repayment confirmation
-
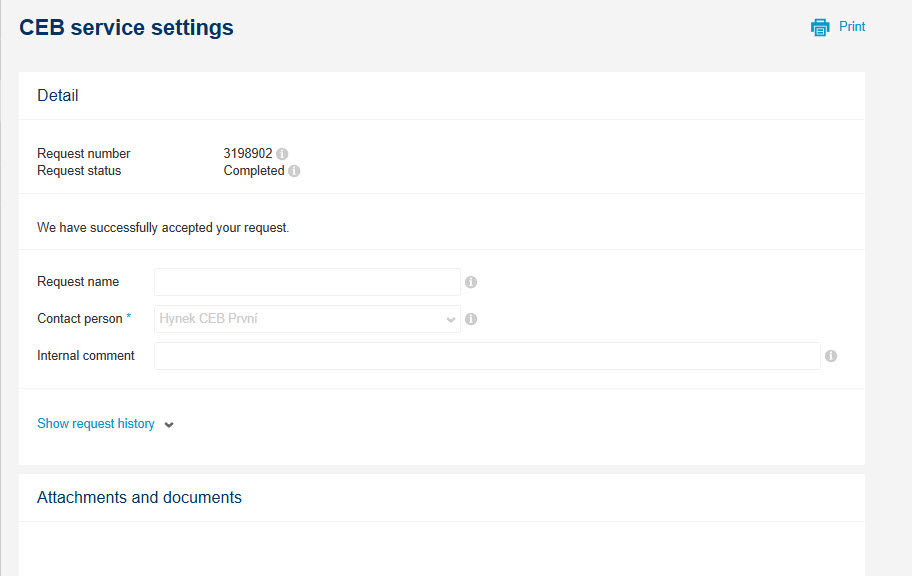
After log-in to the CEB service, go to the Virtual Branch, select tab Other, choose Other confirmations and select Request button.
-
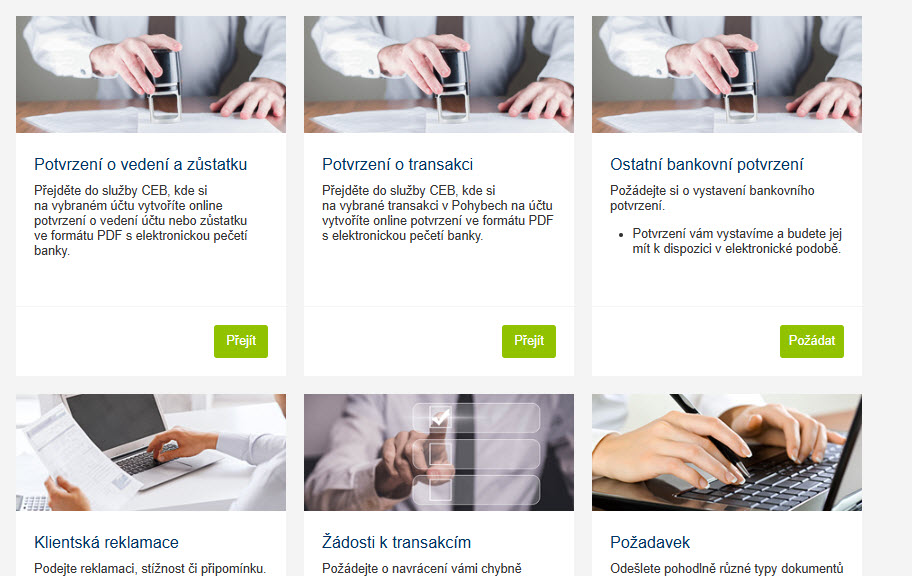
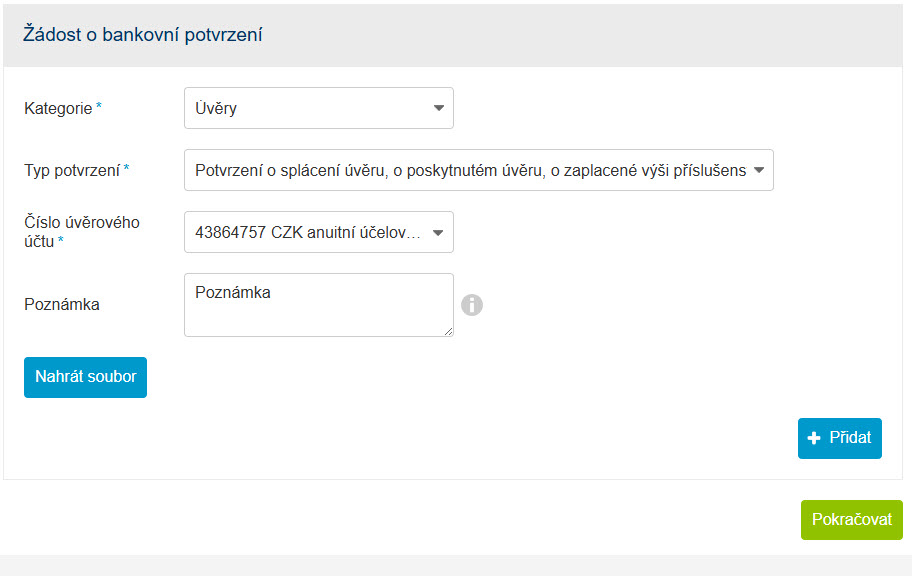
In the Category field, select Loans, then move to Type of confirmation field and click on Confirmation of the loan repayment, loan granted, paid ammout of accessories
-
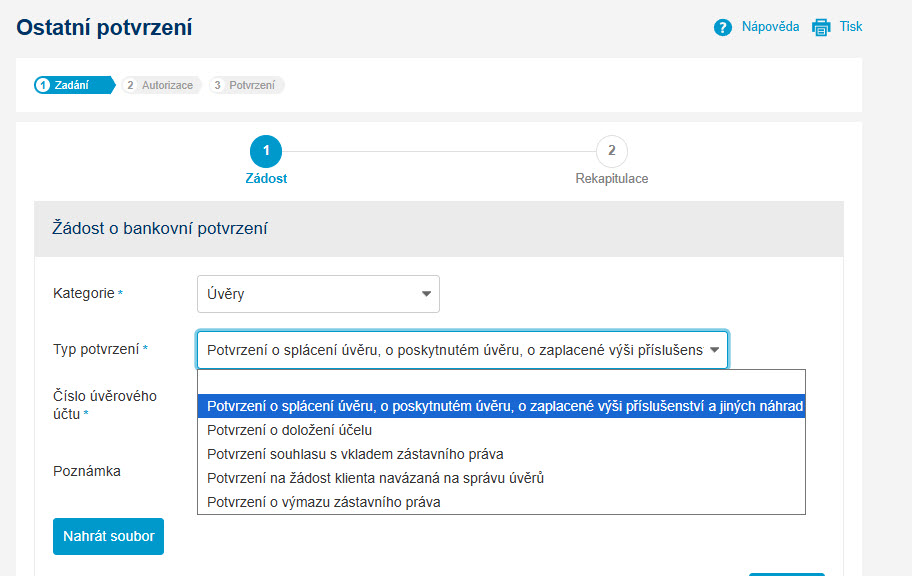
Next just select the Credit Account Number for which the confirmation should be issued.
-
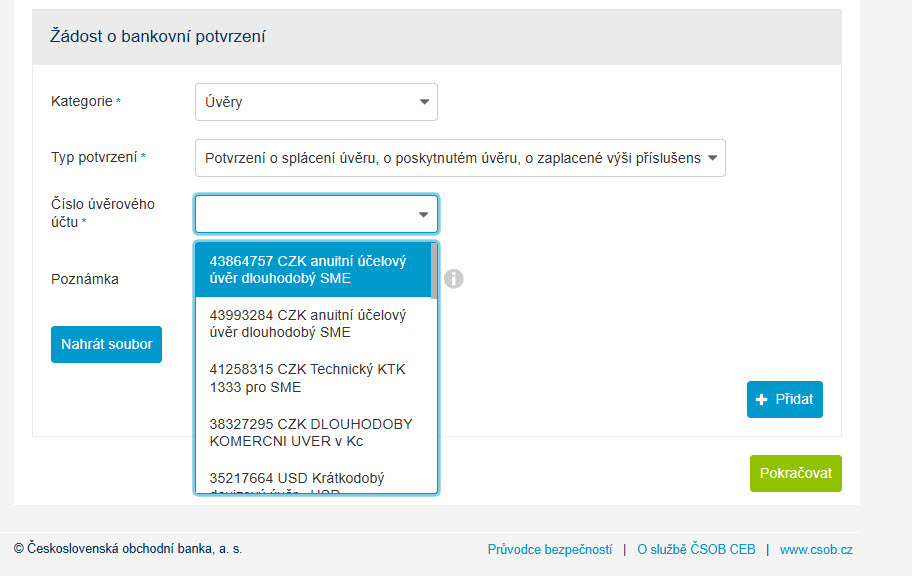
Using the Note field, you can specify your other requirements. If needed, you can also upload a custom template or your own file using the Upload file option.
-
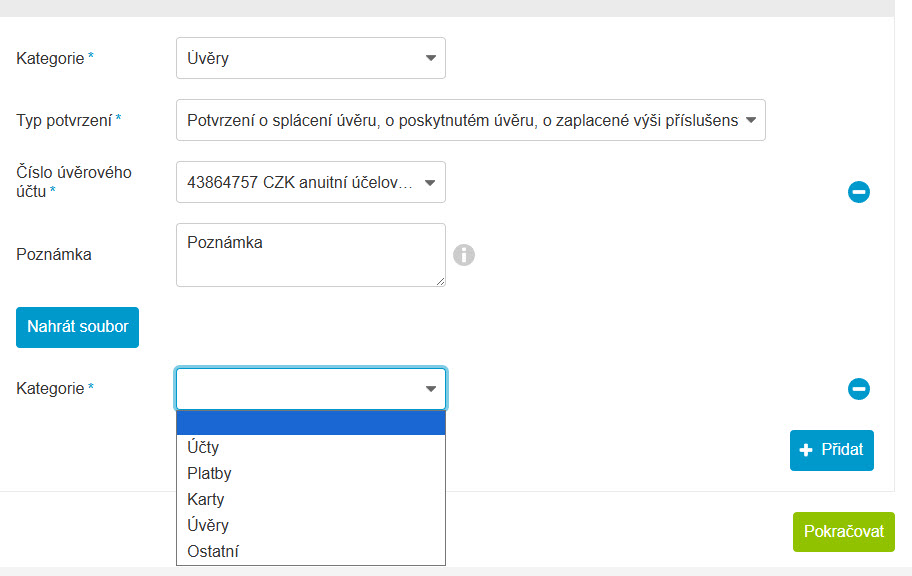
In case of more types of bank confirmations within the one application, use the +Add button and select the category.
-
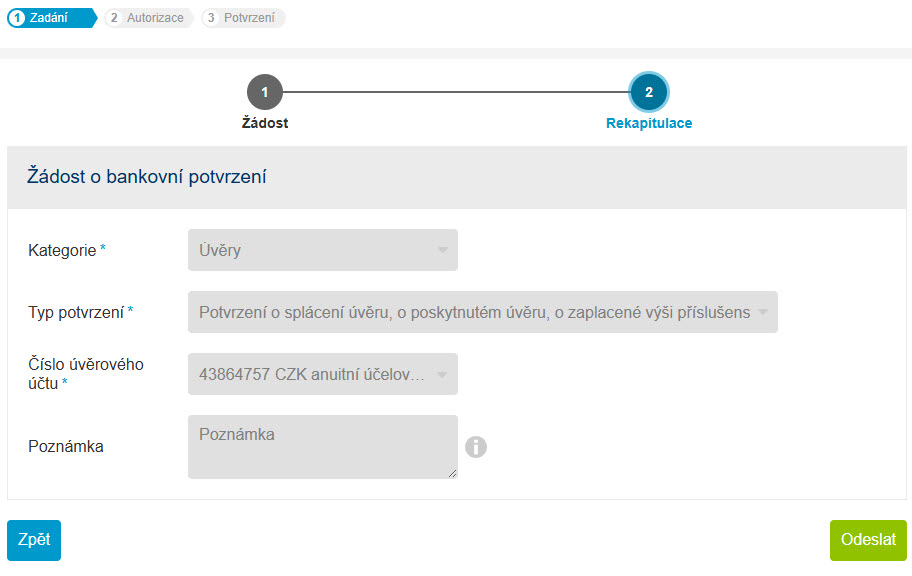
Using Continue will take you to a recap, here you can check your request again.
-
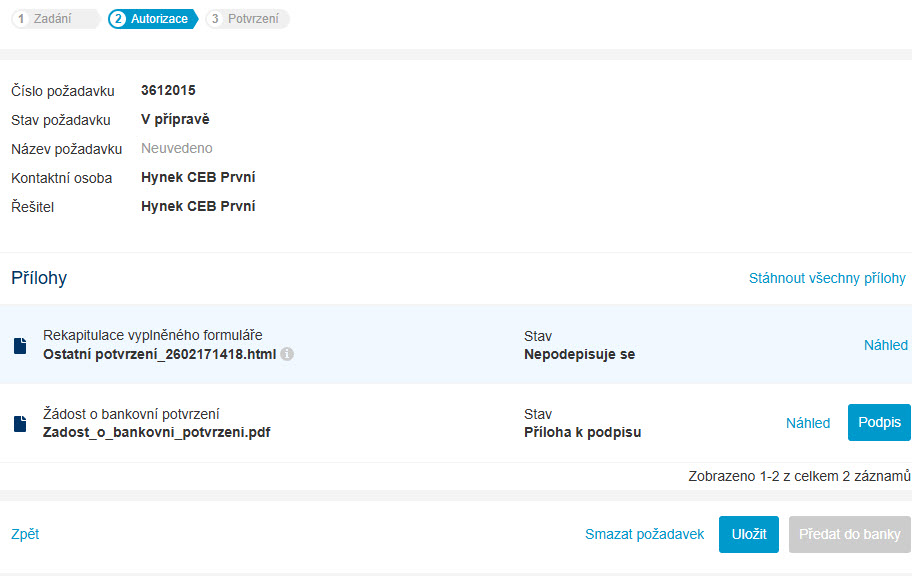
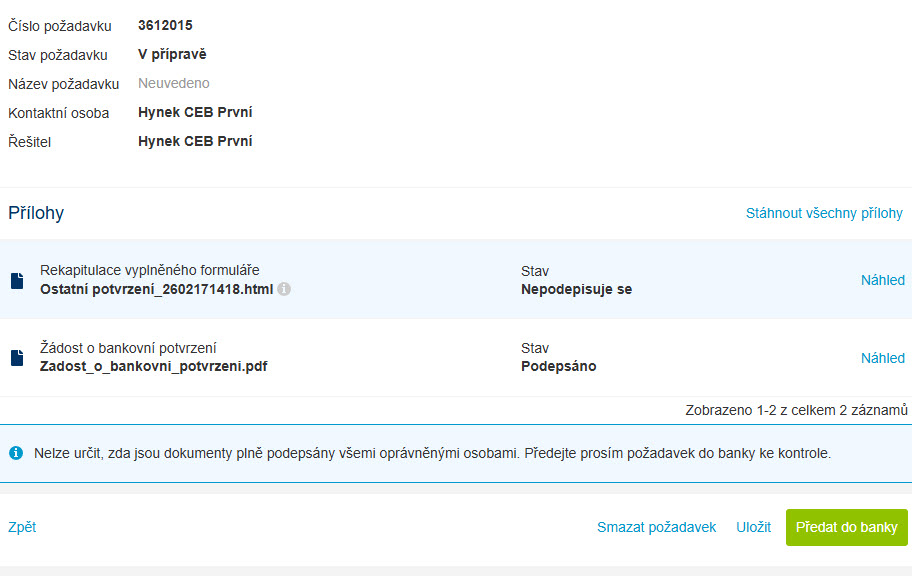
Using Send option will generate a PDF file of the application, which you are about to sign electronically using the Signature button.
-
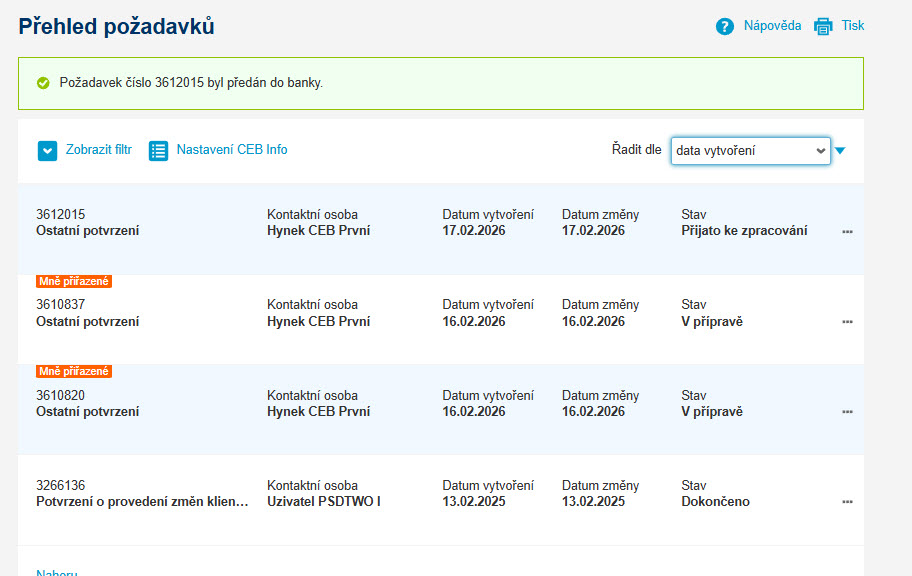
Once the file is signed, the application can now be handed to the bank for processing using Send to Bank.
-
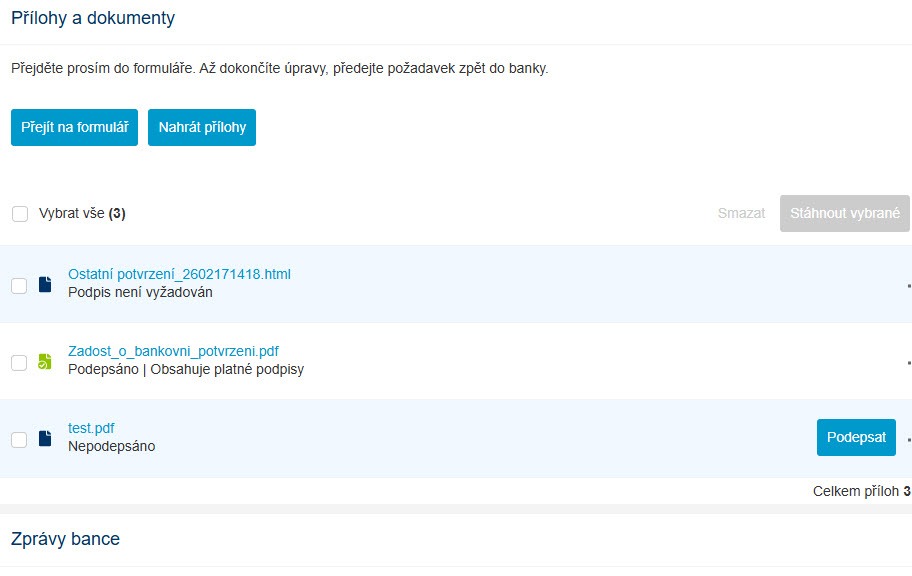
Once the bank has issued the confirmation, they will usually send it back to you by the same request. If you have set up the CEB Info service, you will be automatically notified.
-
Follow a similar process within the CEB Mobile app. In this case, the signature is always done with the Smart Key.
New agreement on financial markets
-
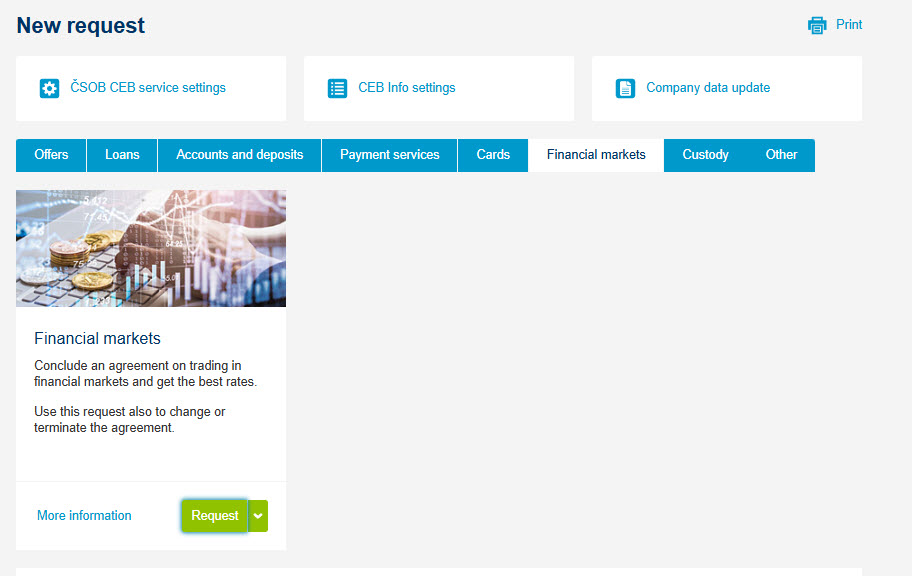
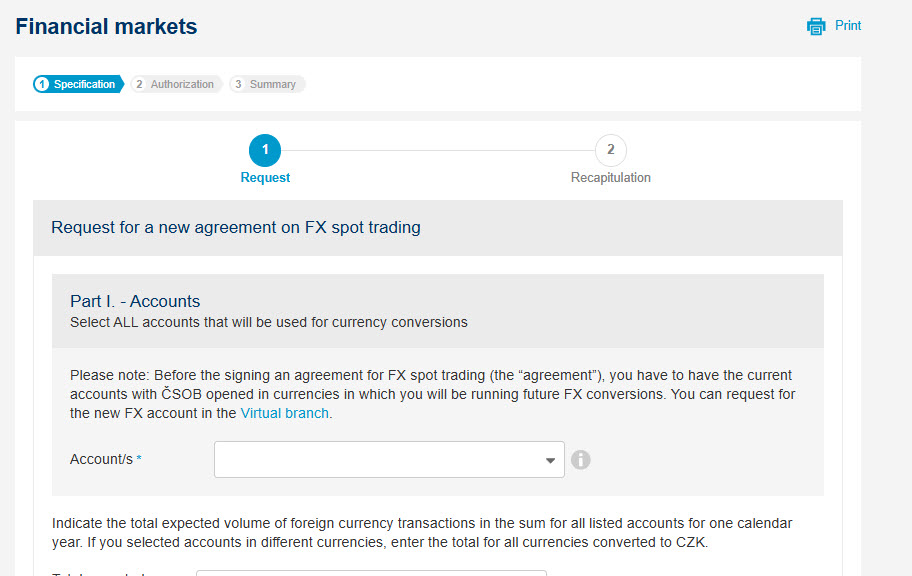
Log in to the CEB and open the Financial Markets tab in the Virtual Branch menu. Click the Financial Markets tile and select Request.
-
Fill in the required fields in the form. This includes: accounts used for currency conversions, the total volume of funds, persons authorised to trade and confirm transactions.
-
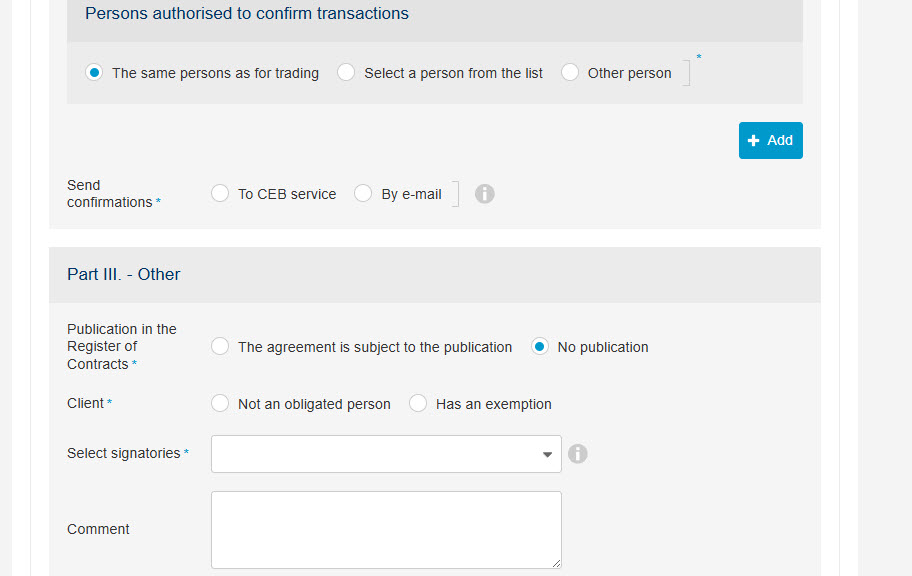
In the lower part of the form, specify whether the agreement is subject to registration disclosure and select the signatories. If needed, use the Note field to provide additional details.
-
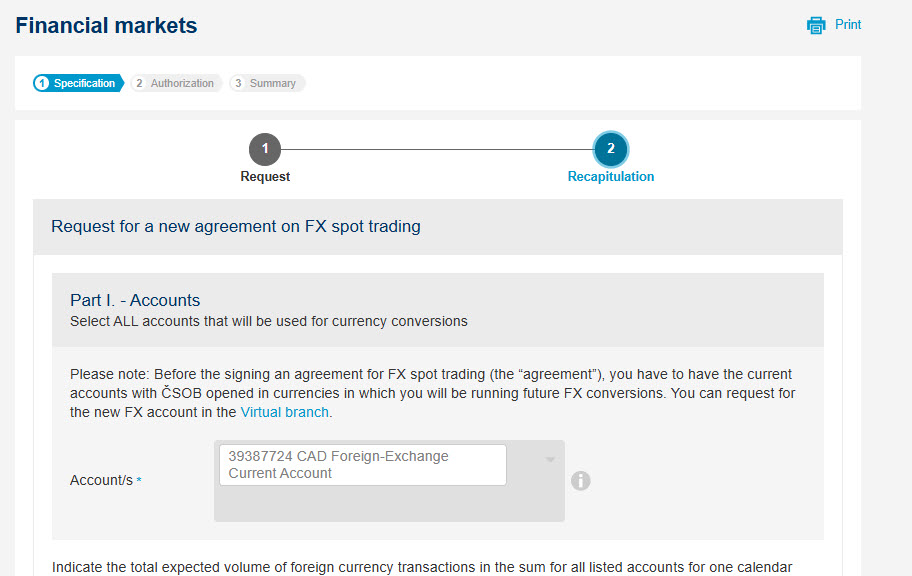
Click Next to proceed to the Recapitulation, where you can review your request.
-
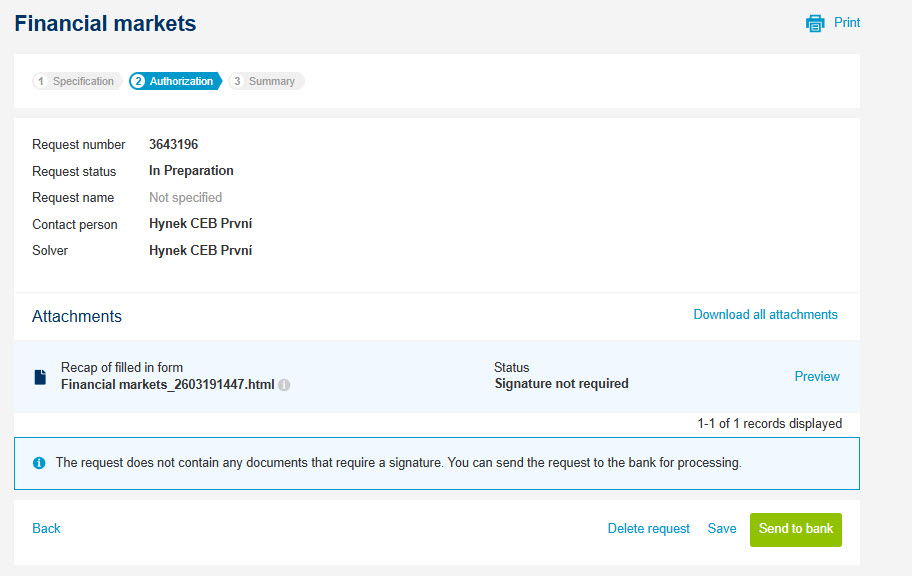
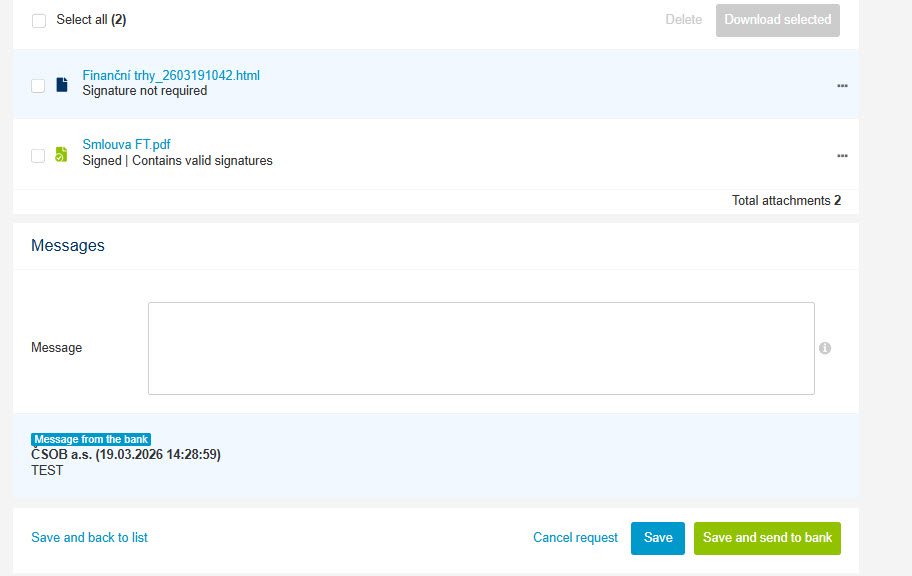
Click Submit to generate the request. After successful submission, a document in HTML format will appear. Use the Preview option to view it.
-
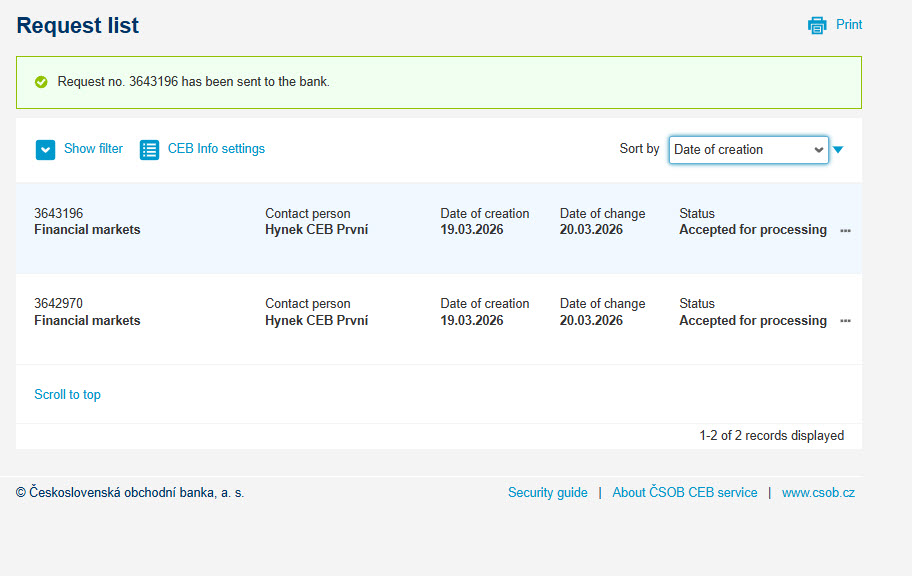
Select Send to Bank to submit your request for processing. The system will display a confirmation once the request is successfully sent.
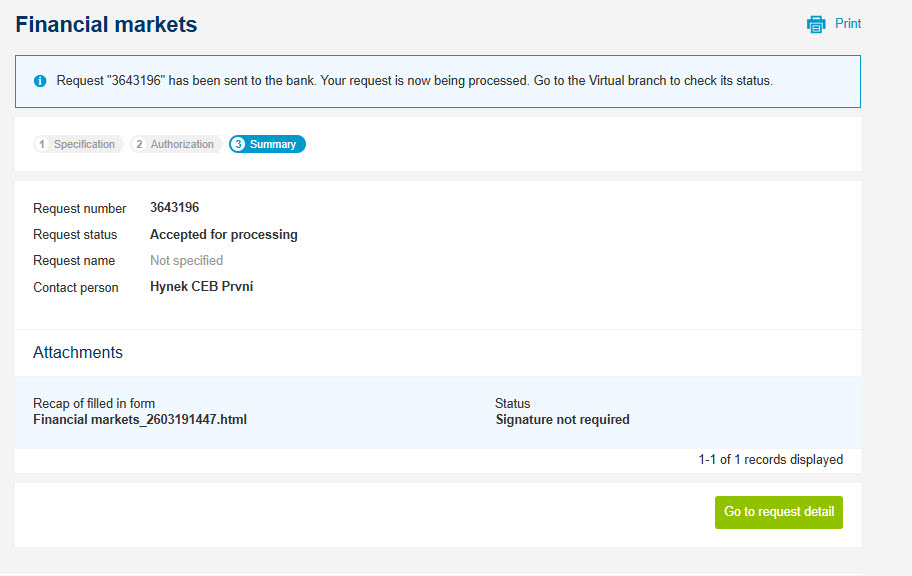
-
Once the bank processes your request, than will prepare a draft of the agreement stamped with an electronic seal and send it back to you within the same request. If you are using CEB Info service, you will be notified via email or SMS/push message.
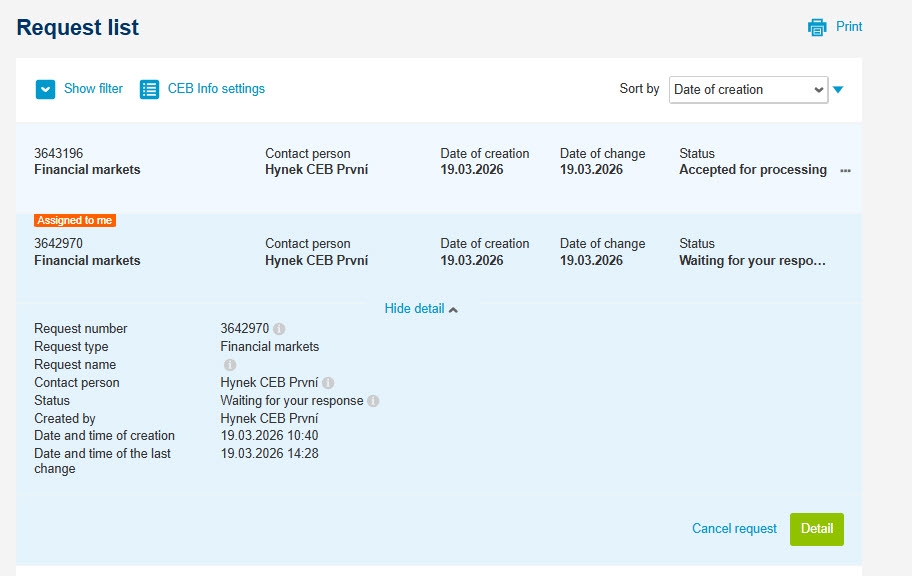
-
In the request detail page, you will find the Agreement ready for signature. Review the document carefully and, if everything is correct, sign it using the Sign button.
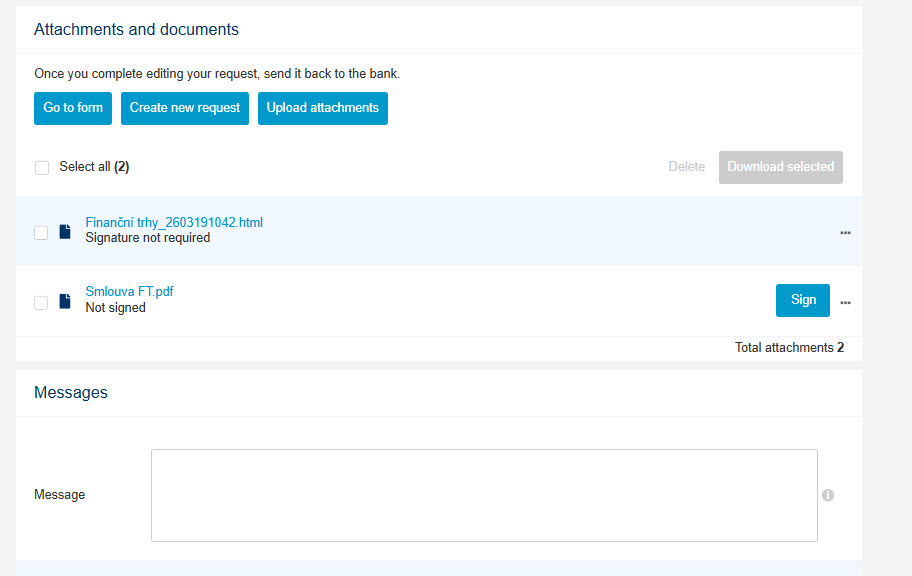
-
Send the signed Master Agreement back to the bank by selecting Send to Bank.
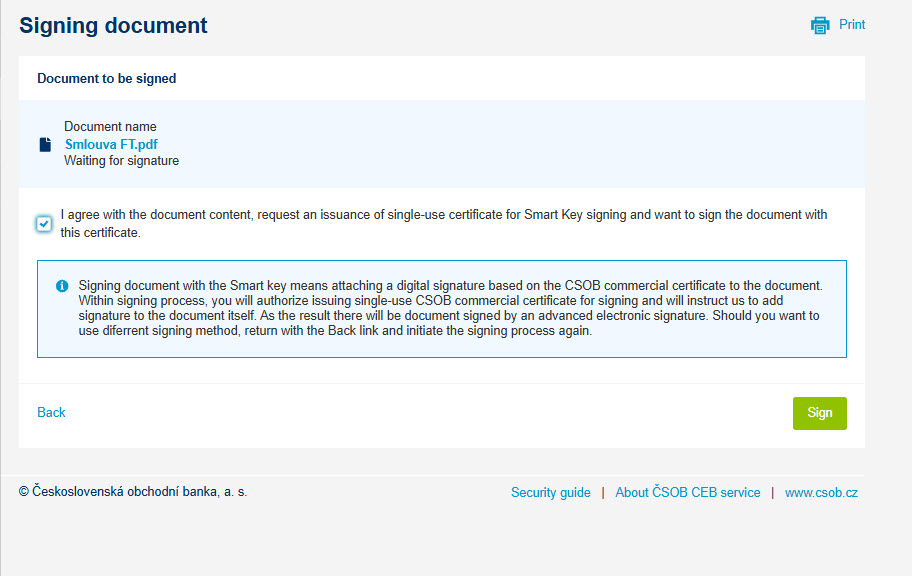
-
The bank will review the agreement, add its signature, archive the documents, and close the request. If you have the CEB Info service activated, you will be notified once the process is completed.
-
You can follow the same process in the CEB Mobile app. In this case, signing is always performed using the Smart Key.
Duplicate statement request
-
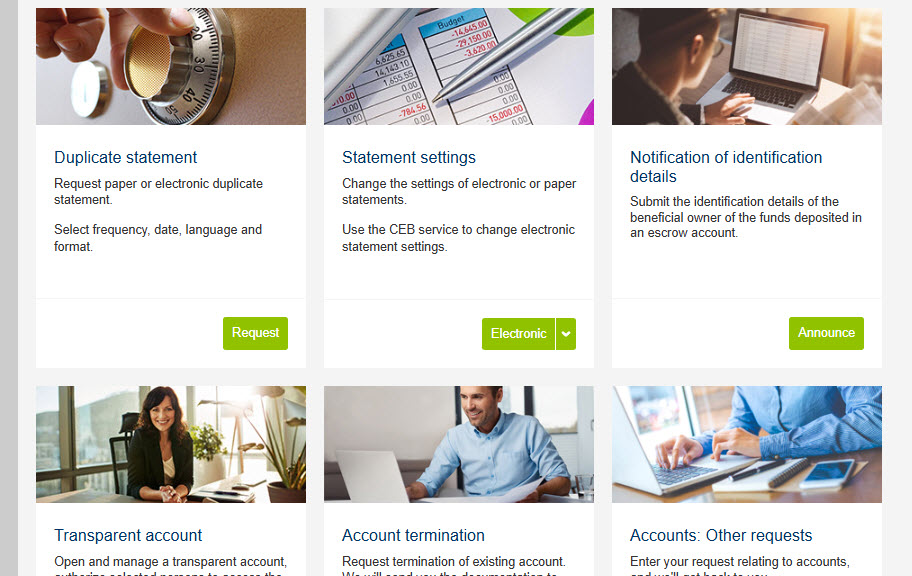
Log in to the CEB and open the Accounts and Deposits tab in the Virtual Branch menu. Select the Statement Duplicate tile and click Request.
-
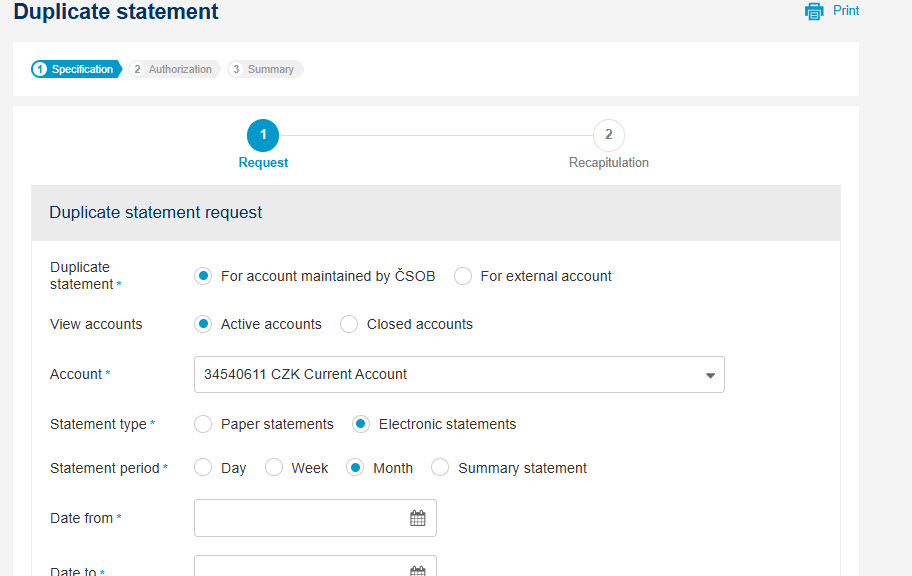
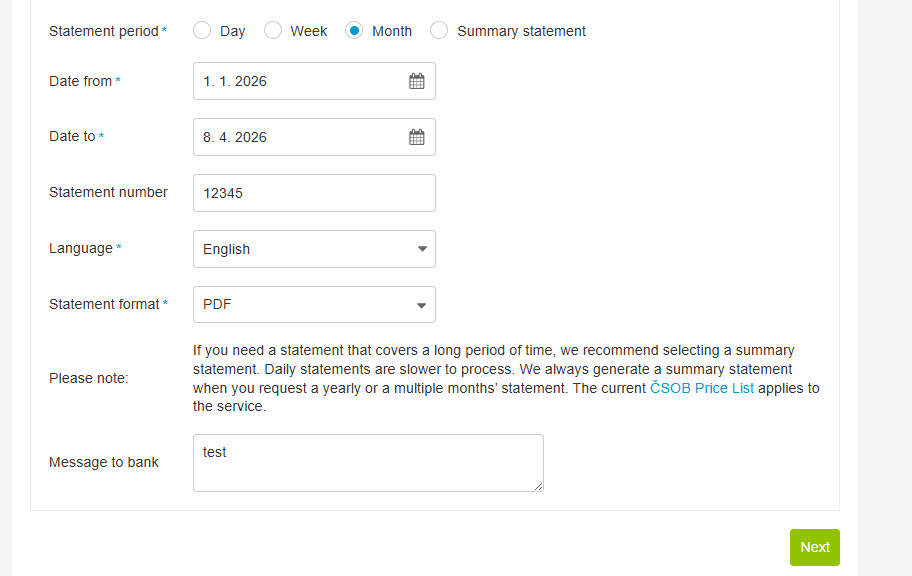
Fill in the required fields in the form. This includes: account, statement type, frequency, requested period, language, and for electronic statements also the format.
-
Optionally, you may enter the Statement Number or specify your request within the Message to the Bank field.
-
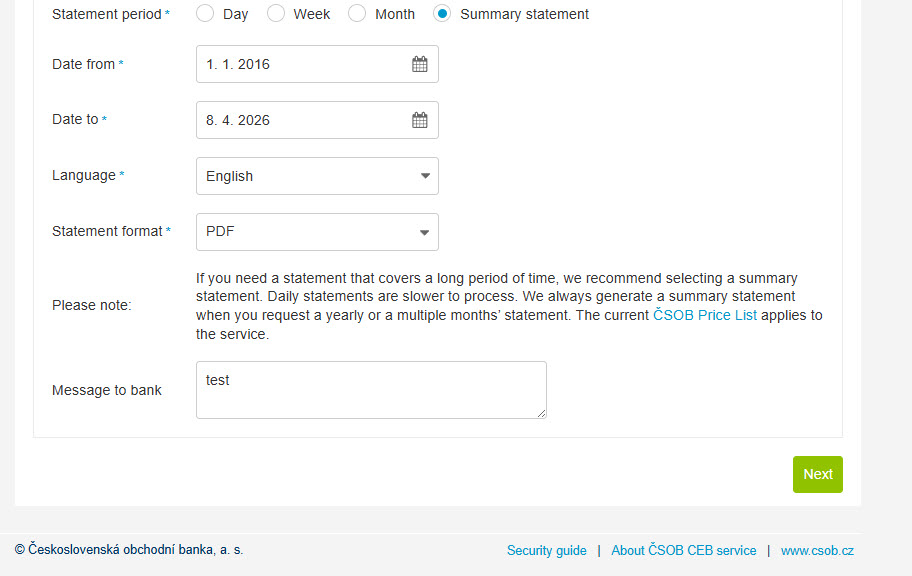
If you require a statement for a longer time period, we recommend selecting a Summary Statement, where you can define the from – to date range.
-
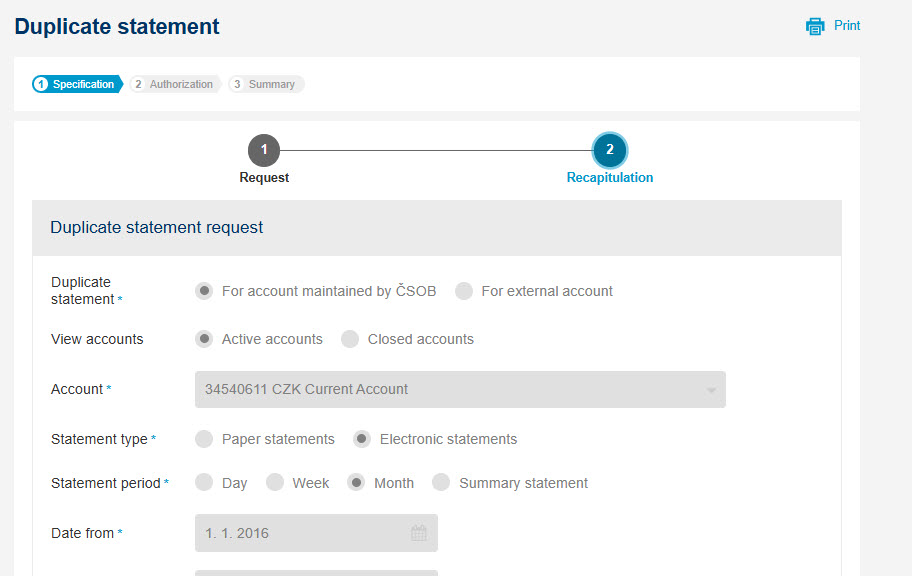
Click Next to proceed to the Recapitulation, where you can review your request.
-
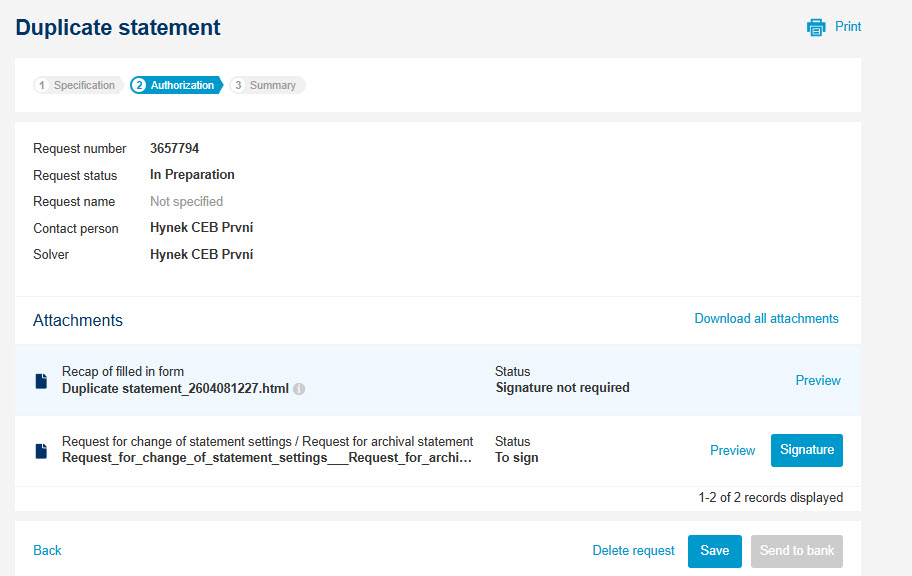
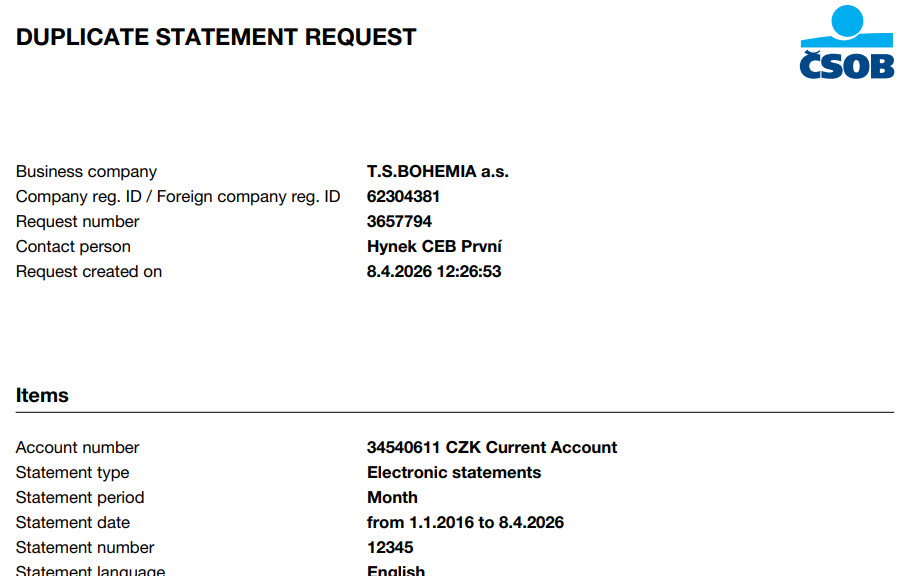
Click Submit to generate the request. After successful submission, the documents in HTML and PDF format will appear. Use the Preview option to view it.
-
Review the PDF document carefully and, if all details are correct, sign it using the Sign button.
-
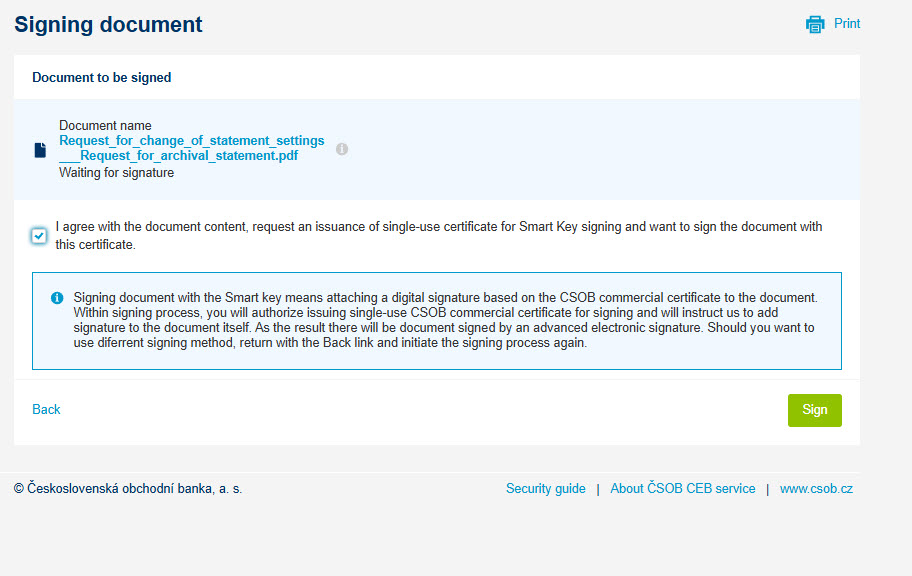
On the next screen, confirm your consent and electronically sign the document by selecting Sign Document.
-
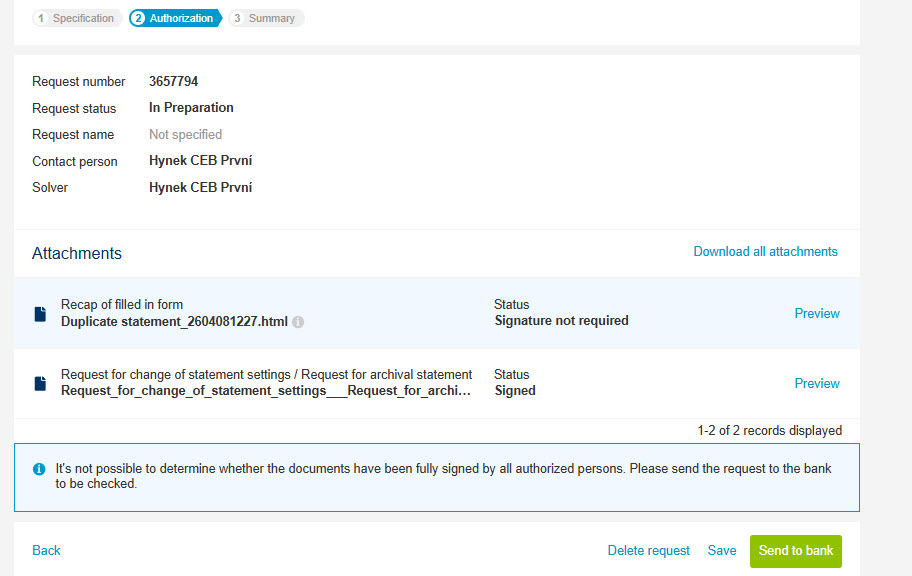
After successful signing, you can send your request for processing by selecting Send to Bank.
-
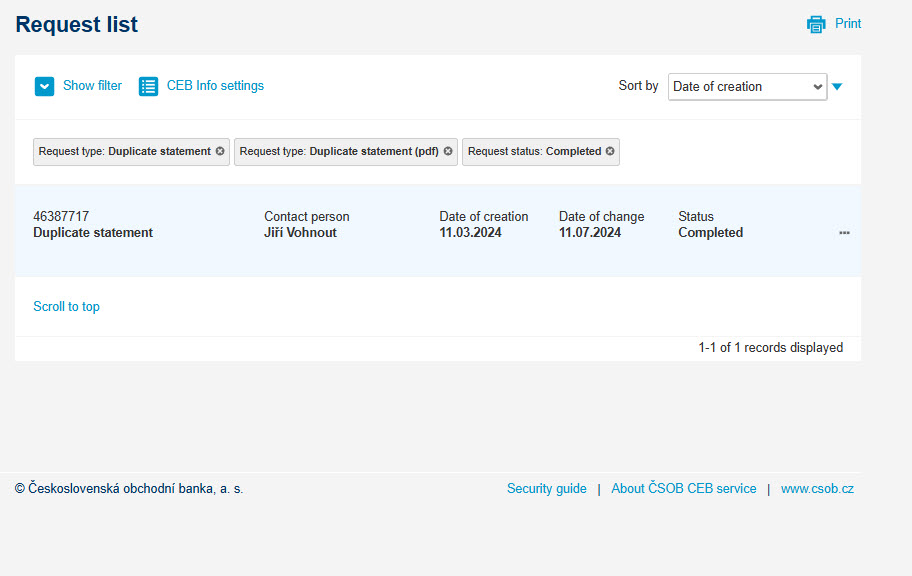
Once the bank issues the statement duplicate, it will either: upload it directly to the CEB service under Accounts → Statements and Advices → Statements, or return it to you within the same request, depending on the statement type. If you have the CEB Info service activated, you will receive a notification message.
-
You can follow the same process in the CEB Mobile app. In this case, signing is always performed using the Smart Key.
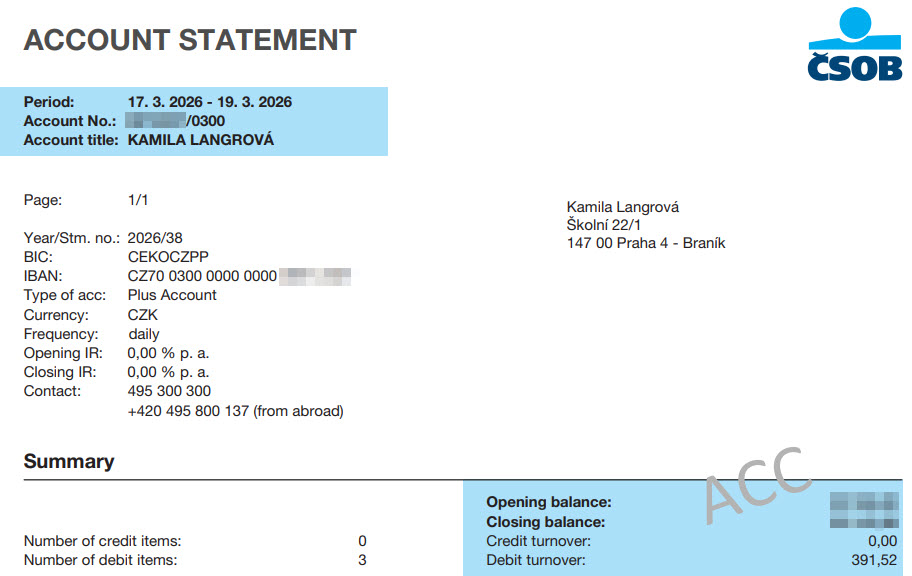
Payment return request
-
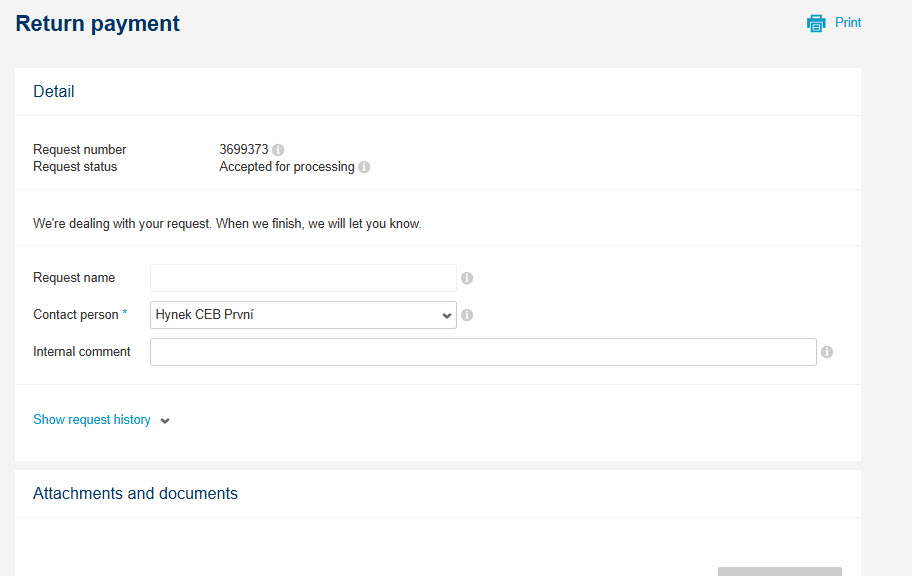
Log in to the CEB and open the Other tab in the Virtual Branch menu. Select the Requests regarding transactions tile and click Return payment.
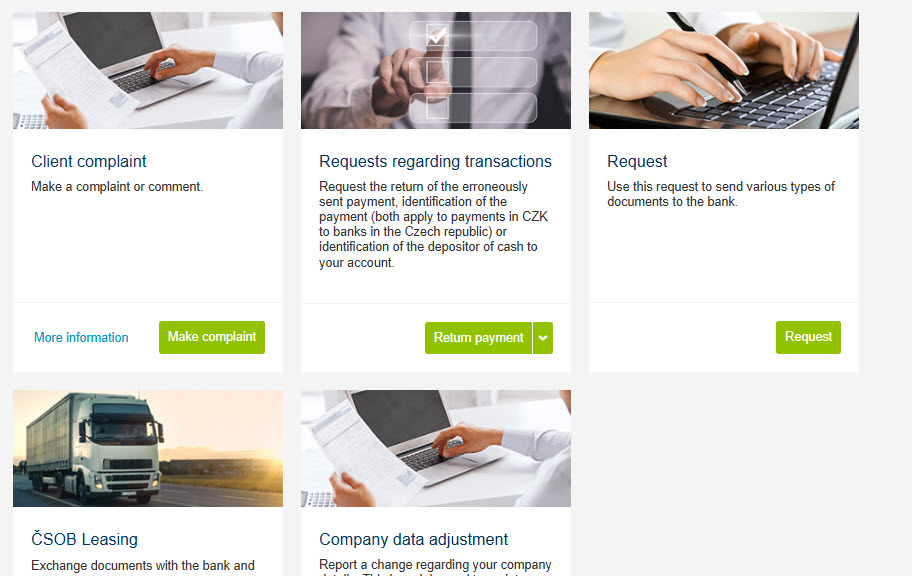
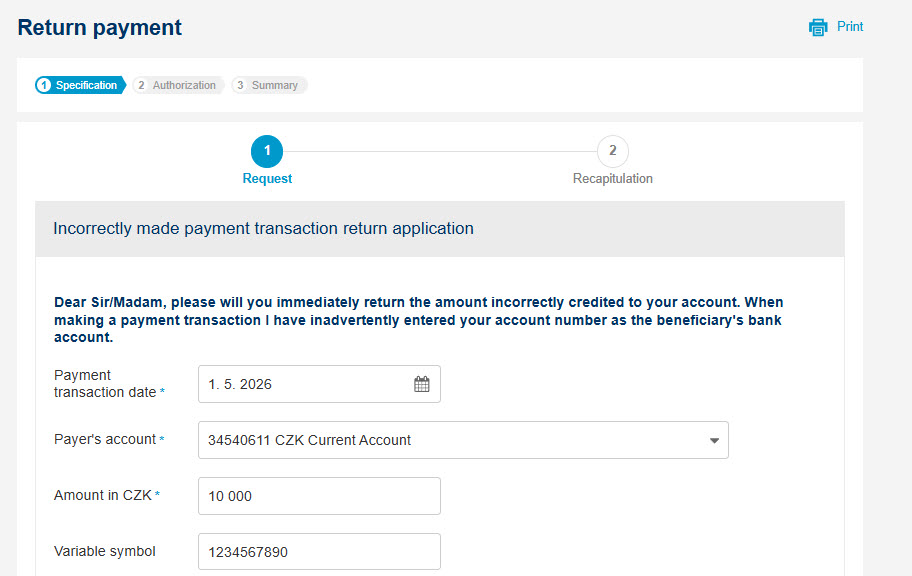
-
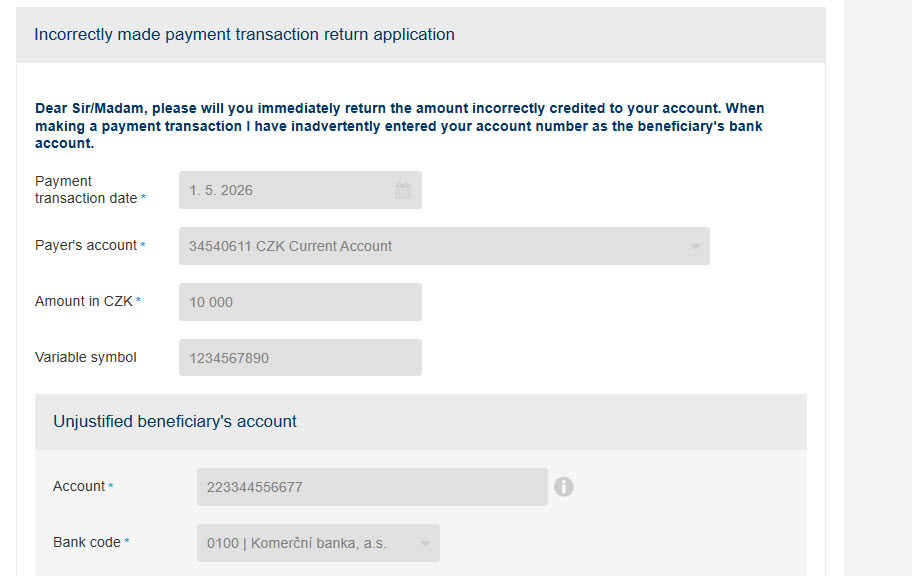
Fill in the required fields in the form. This includes: payment transaction date, payer's account and amount. Optionally, you may enter the variable, specific, or constant symbol of the payment.
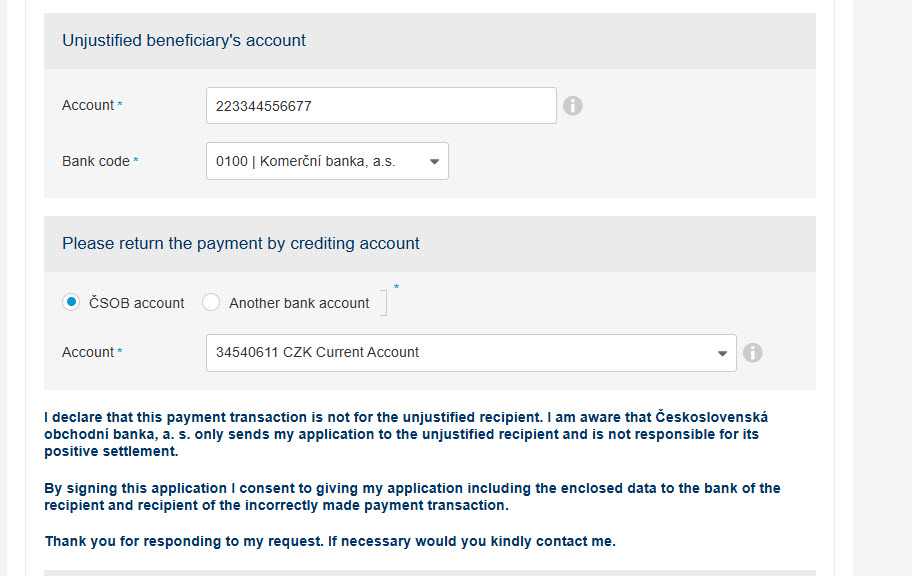
-
Next, fill in the unjustified beneficiary's account number, including the bank code. Specify whether you request to return the payment by crediting the ČSOB account or to another bank account.
-
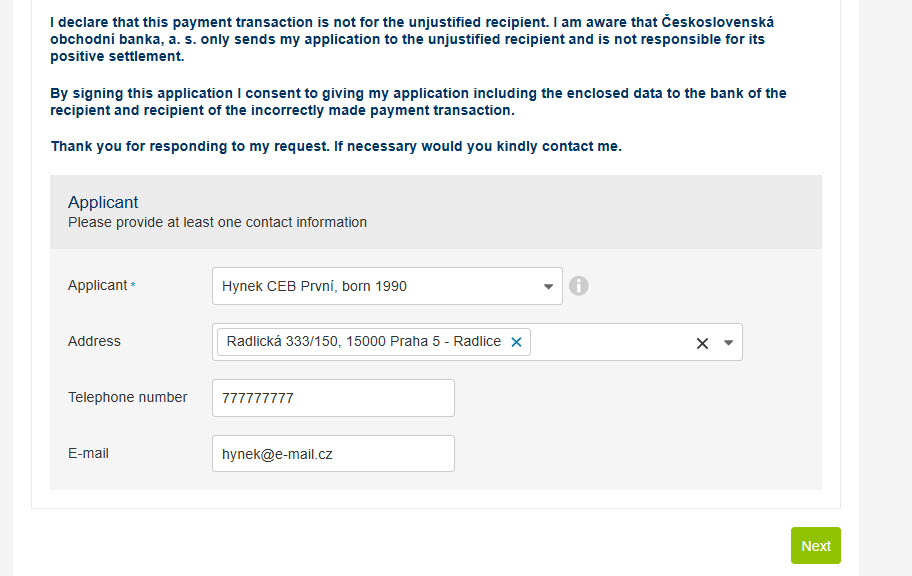
Finally, select a person from the applicant list who will sign the application.
-
Click Next to proceed to the Recapitulation, where you can review your request.
-
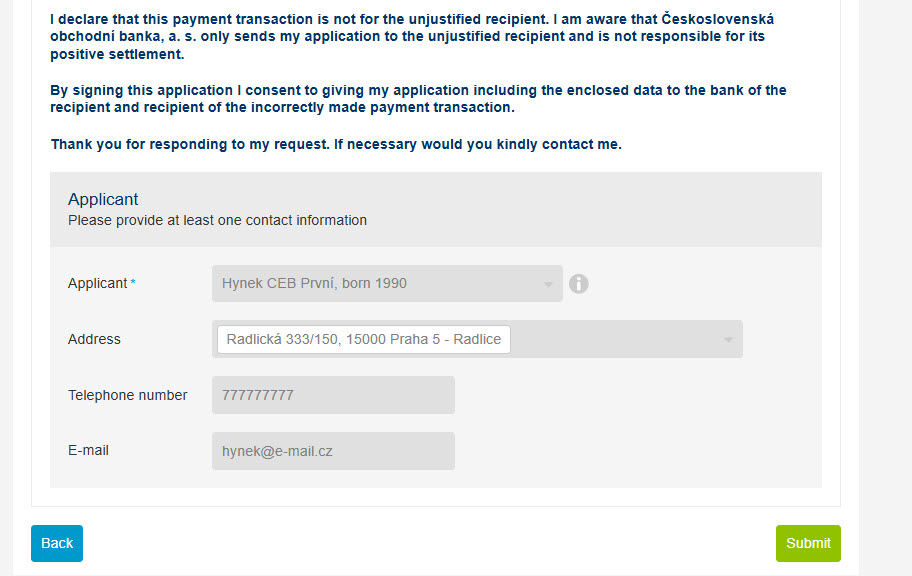
Click Submit to generate the request. After successful submission, the documents in HTML and PDF format will appear. Use the Preview option to view it.
-
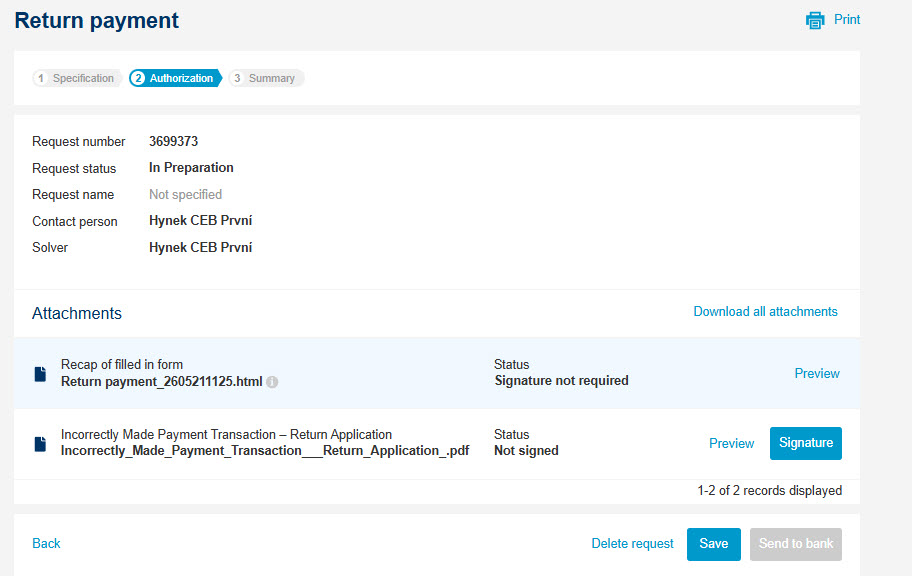
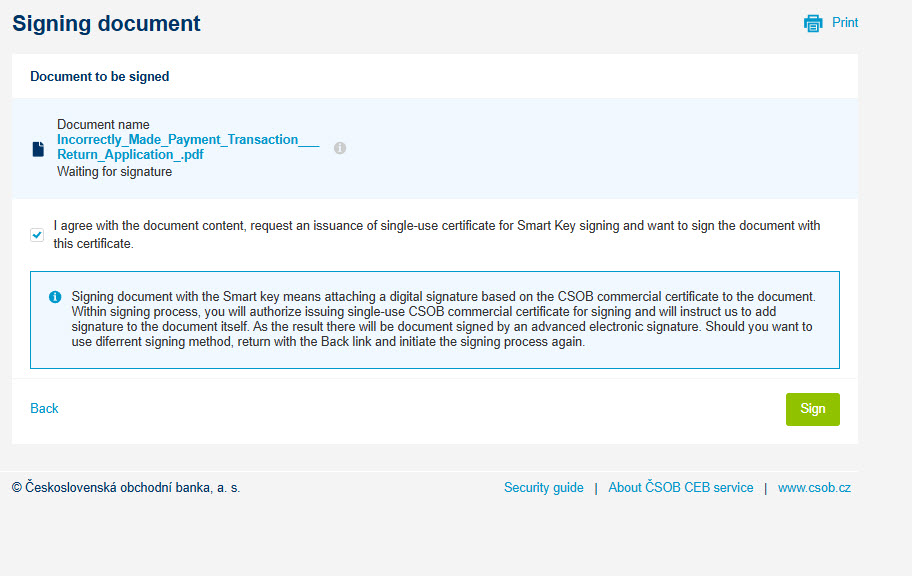
Review the PDF document carefully and, if all details are correct, sign it using the Sign button.
-
On the next screen, confirm your consent and electronically sign the document by selecting Sign Document.
-
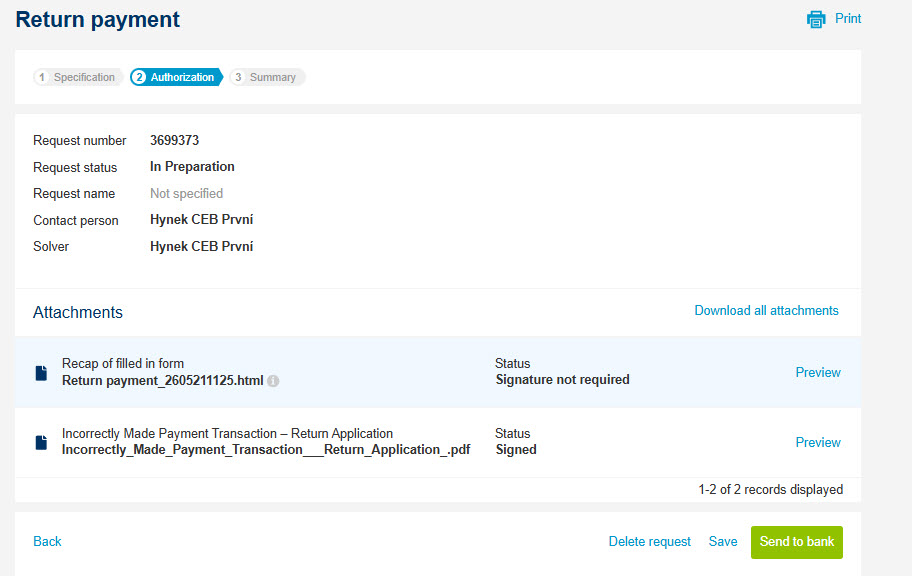
After successful signing, you can send your request for processing by selecting Send to Bank.
-
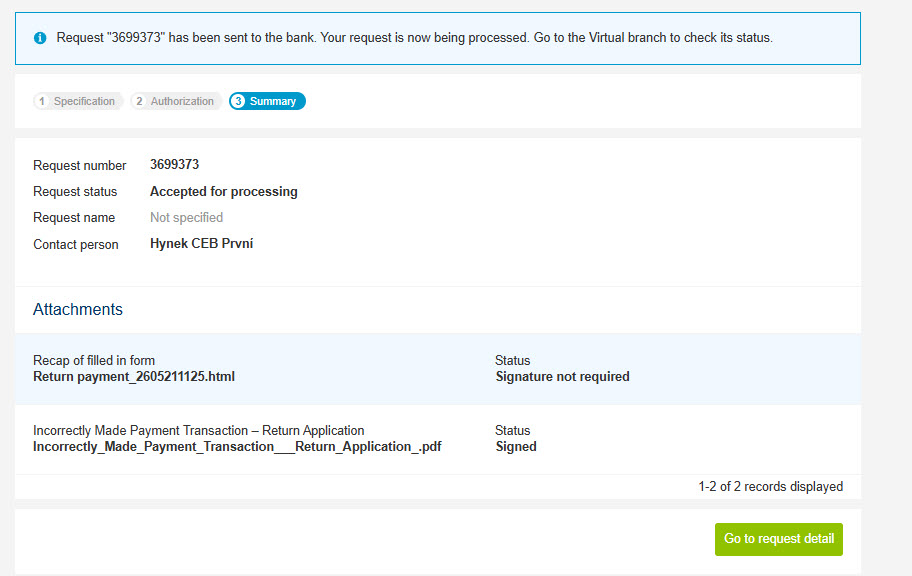
You will receive information from the bank that the request has been received and forwarded for processing. The deadline for processing is 15 working days. Once the request is processed, the bank will inform you by e-mail or by mail how to proceed if the funds are not returned to you.
-
You can follow the same process in the CEB Mobile app. In this case, signing is always performed using the Smart Key.